- Where to buy a laser level profitably and reliably?
- Specifications Huepar LS04CG
- Instrument housing
- Size comparison with analogues
- Build quality and materials
- Lithium ion battery
- Laser modules
- Compensator
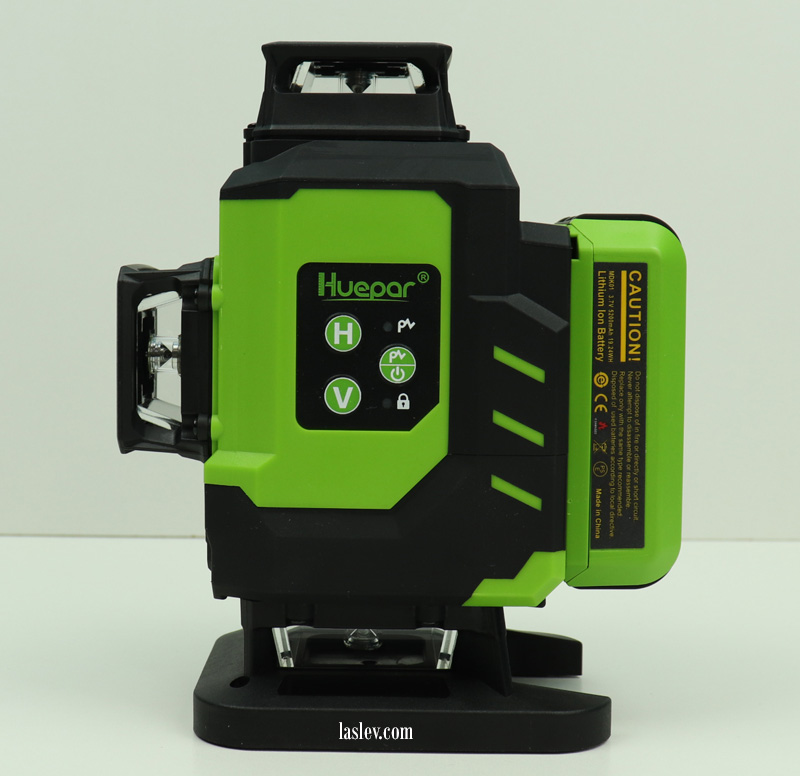
- Huepar LS04CG control panel
- Functional capabilities
- Comparison table with the analogue
- Thickness of laser lines at different distances
- Measuring laser line brightness
- Compliance with the declared accuracy
- Adjusting the Huepar LS04CG laser level
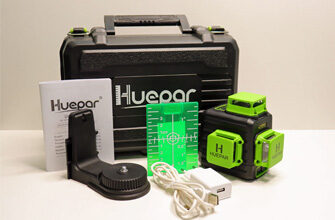
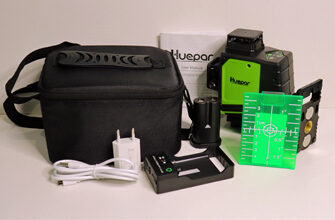
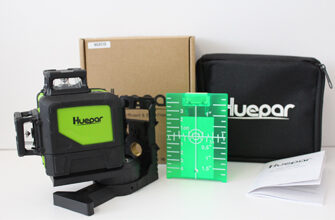
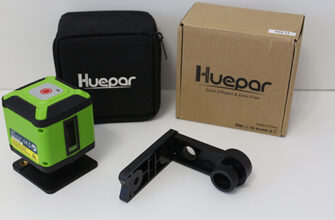
- What is included in the laser level kit
- Pros and cons
- Video review Huepar LS04CG
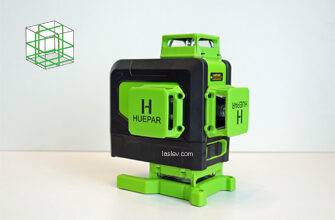
The new HUEPAR LS04CG compact 4D laser level with green beams from Osram laser emitters. It projects four 360-degree planes: two horizontal, and two vertical with intersections on the ceiling and floor, where the plumb points (zenith/nadir) are respectively obtained.
The device has passed all necessary certifications: CE, FDA, FC and RoHS. It comes with two high-quality, quick detachable li-ion batteries. See the review for more details.
Where to buy a laser level profitably and reliably?
Specifications Huepar LS04CG
-
Accuracy: ± 0.3mm/m (± 1/9 in. at 33ft)
-
Operating Distance: 30m/98ft (100LUX)
-
Range with receiver: 40-60m/130-197ft (radius)
-
Compensator range: 3°±1°
-
Setting speed: 3 seconds
-
Laser class: II, (IEC/EN60825-1/2014), <1mW
-
Laser wavelength: 505-520nm LD
-
Power supply: 3.7V 5200 mAh Li-ion or mains
-
Battery life: approx. 6h (all planes included)
-
Charging port: Type-C, charging 5V=1A
-
Full battery charging: about 5h
-
Tripod mount thread: 1.4″-20
-
Protection against dust and moisture: IP54
-
Operating temperature: -10°C…+50°C
-
Storage temperature: -20°C … +70°C
-
TILT function: yes
-
Instrument dimensions with towers: L/W/H – 12,4 x 8,7 x 15,1 cm
-
Package weight in carrying case: 2 kg
-
Weight of laser level: 650 grams
- Minimum distance from the upper horizon:
to the floor – 14,1 cm
to the ceiling – 1 cm - Minimum distance from the bottom horizon:
to floor – 1.9 cm
to the ceiling – 13.2 cm - Distance between horizons: 12.2 cm
- Minimum distance from vertical to wall: 1 cm
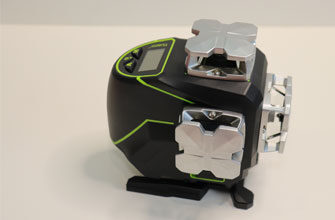
Instrument housing
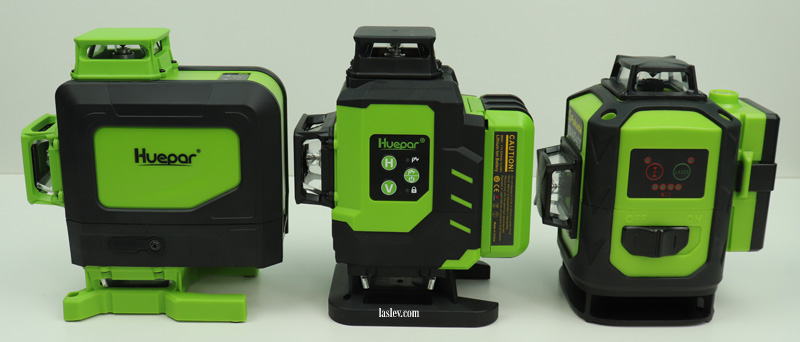
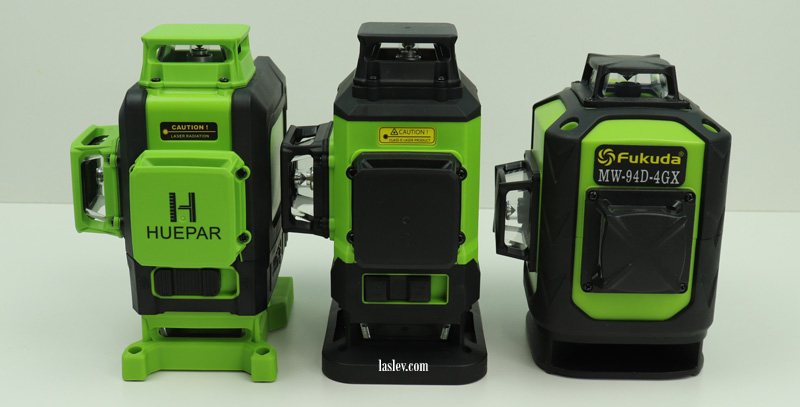
Size comparison with analogues
I would like to highlight the real compactness of the Huepar LS04CG laser level, perhaps one of the smallest 4D levels today.
In terms of dimensions, it is comparable only with the Fukuda MW-94D-4GX laser level, and even then it seems to be slimmer. I’m not even talking about Huepar 904DG, it’s quite small in comparison. You can see it yourself on the photo below.
Build quality and materials
The housing of this model is made of high quality ABS plastic, in some places covered with dense black rubber. The pairing of the main parts of the case is clear, with barely visible even gaps in the joints.
In general, the build quality is as high as always, as with all other HUEPAR laser levels.

The protective towers are also made of plastic. They are fastened with four screws through rubber gaskets at the top and bottom, which provides reliable protection against dust entering inside the device.
In fact, this is important because over time, large amounts of dust can so clog the small bearings that the pendulum will begin to set incorrectly, which in turn affects the accuracy of the measurement.
Yes, exactly the same protective towers are installed on the 3D model Huepar GF360G.
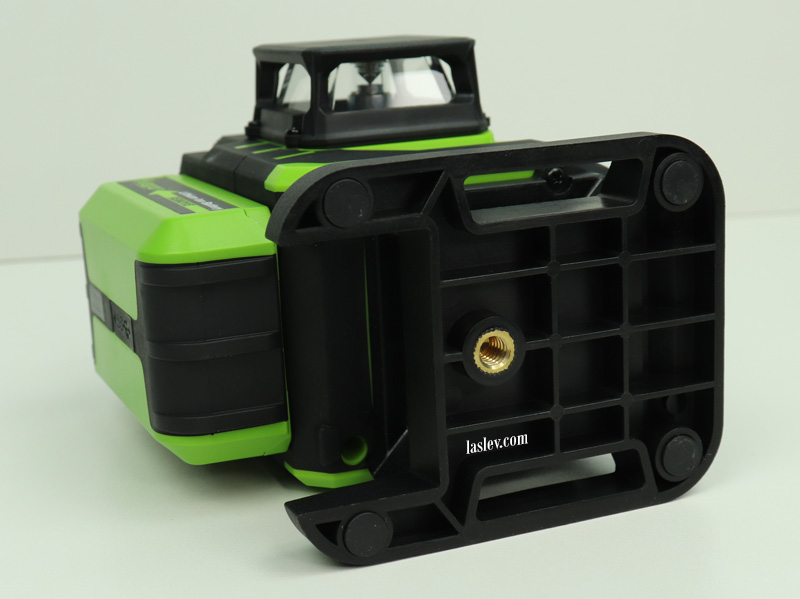
The lower massive protective tower, which is also a support, is also made of plastic. And it is also fastened through thick rubber gaskets with additional grooves for the glass.

At the bottom of the tower support is a neat brass bushing with 1/4″ threads for attaching to a variety of optional accessories, including the one included in the kit.
There are also four rubber “heels” that keep the unit from slipping on slippery surfaces like laminate or ceramic tile.
Here it is necessary to mention quite a significant disadvantage, namely the projection of the lower horizontal plane. It runs at a distance of 1.9 cm from the floor, which of course is very much for comfortable work with thin floor coverings. For the same Fukuda 4D this parameter is half as much – 0,9 cm.
Lithium ion battery
The Huepar LS04CG laser level does not have a battery compartment, it comes with two quick-release batteries that fit very snugly in their seat.
Another plus is that the battery can be charged separately or during operation. Moreover, you can charge not only from the mains, but also from the powerbank through the cable USB – USB Type-C, which is also included.
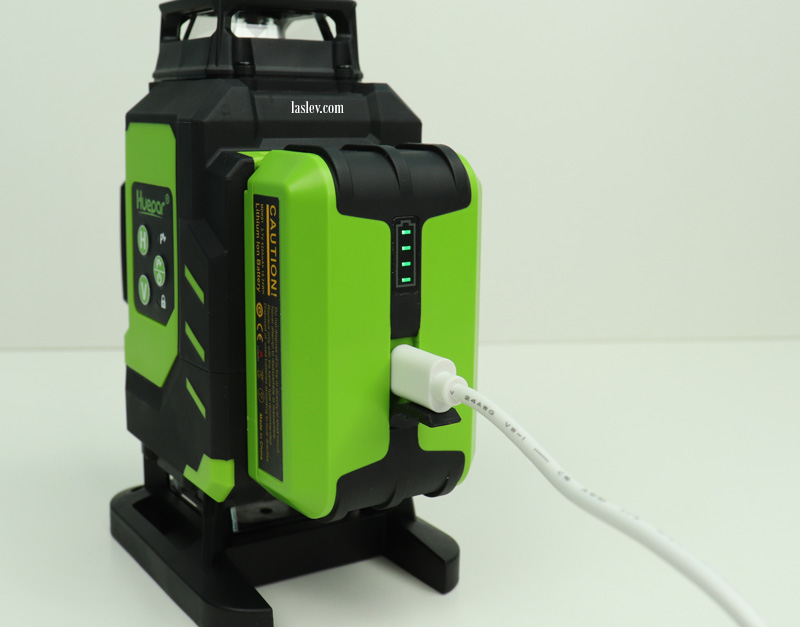
The battery is made very cool: high-quality thick plastic, rubber ribs, a four-step discharge indicator, and a tightly closing rubber cap at the Type-C connector for charging. You may have already seen batteries like this on the Huepar LS41G.
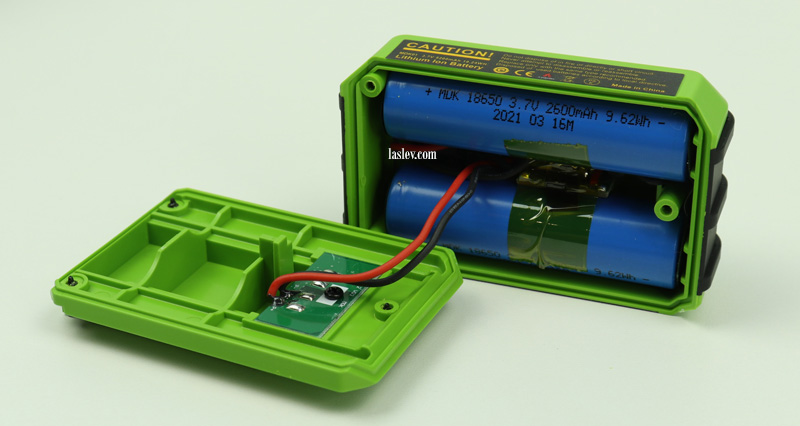
The battery case is collapsible, which should also be considered a plus, because if necessary, you can easily replace the popular 18650 batteries inside, of which there are two.
Laser modules
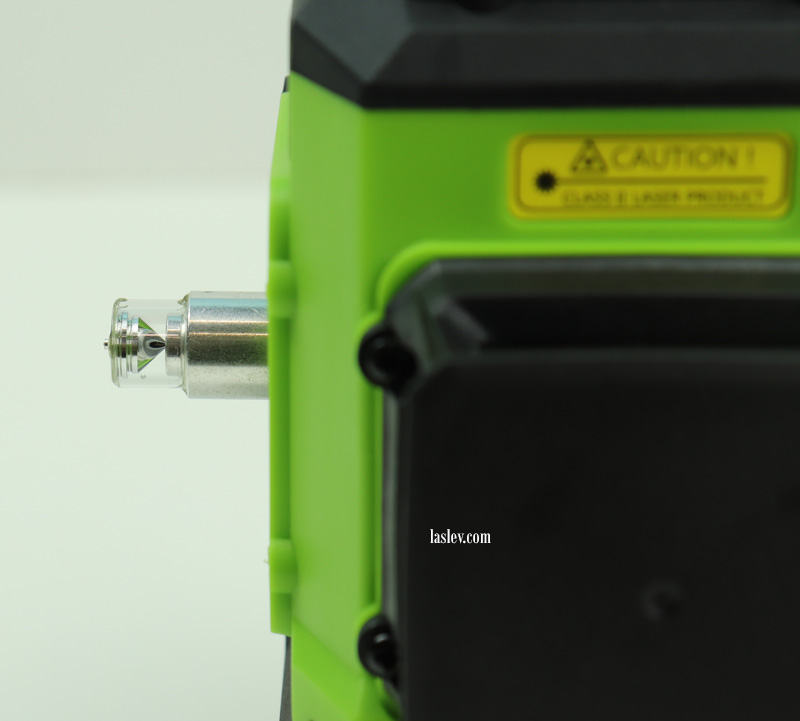
According to the seller, the Huepar LS04CG laser level is equipped with Osram laser modules, which have excellent emitters with a long life, good enough not to blinding brightness. And the lines are generally quite thin with such modules.
Osram laser modules are by far one of the best. But again, it is not possible to verify exactly what emitters are installed in the laser level. You only have to trust the seller, and of course conduct your own tests on the thickness and brightness of the lines. See these measurements in the review below.
Compensator
The Huepar LS04CG level is equipped with a pendulum type compensator on magnetic dampers, which damps the residual swing of the pendulum more quickly.
In an inclination range of 3°±1° to either side, the compensator automatically levels out. The maximum setting time from the outermost position is about 4 seconds, although the instructions state 3 seconds.
If the permissible tilt is exceeded when setting the instrument, a visual and audible alarm will automatically go off. The lines will flash in increments of two times per second accompanied by an audible alarm.
To turn the alarm off, simply place the laser level on a flatter surface.
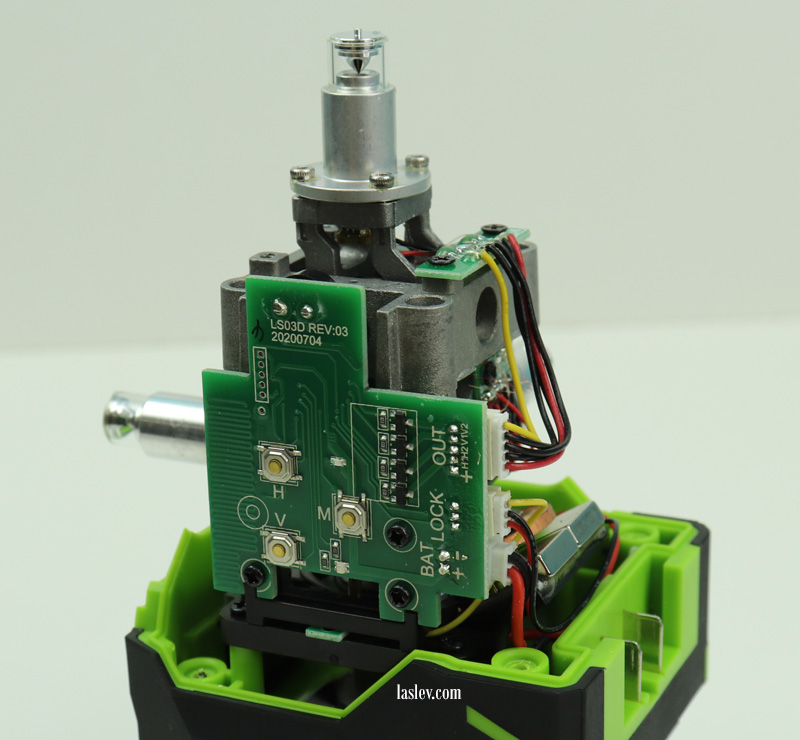
Another advantage of the Huepar LS04CG laser level is that the entire compensator system is mounted on metal supports rather than plastic ones like the Zokoun IE16R.
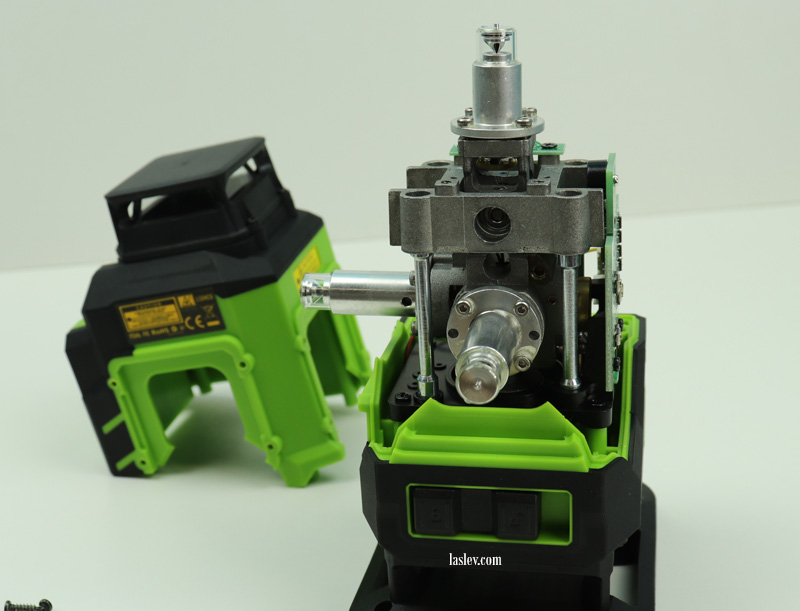
Here we should also mention the quality performance of all electronic components.
Huepar LS04CG control panel
The control is intuitive here, which is done with the help of three buttons on the housing of the device, and a two-position toggle switch.
It would be desirable to have the remote control included, but unfortunately it is not here.
And so, let us have a closer look at the control.
The toggle switch, by the way, it is quite convenient, is located on the front and has two positions “open lock” and “closed lock”.
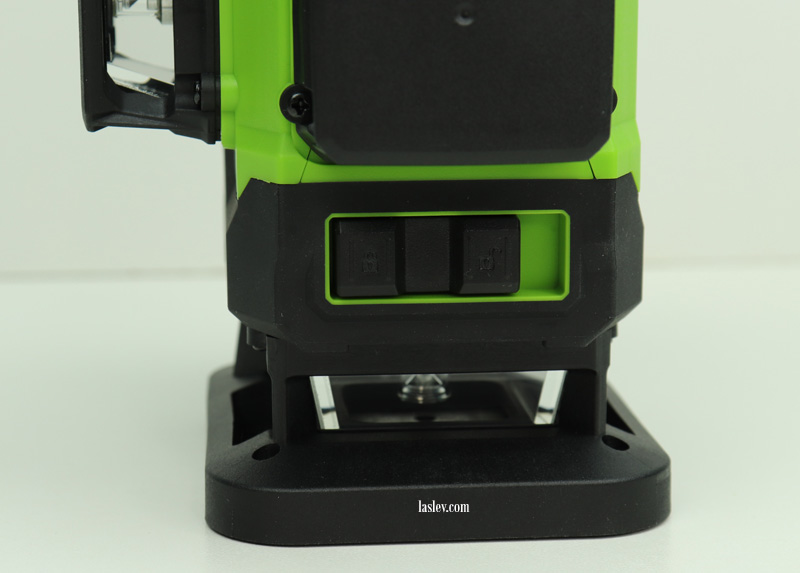
In the “closed lock” position – the compensator is locked for further transport of the laser level.
Also in this position, pressing the trigger on the side for 2-3 seconds activates the TILT mode. That is, the pendulum is locked, but the planes can be switched in any order, for marking any inclined lines.
In this mode, the lines will blink once every 5 seconds and the red indicator under the button will light up. All this is done to further alert the user that he is in a special mode.
When the TILT function is activated, you cannot make horizontal or vertical level markings, there will be a large measurement error.
“Open lock” – In this position, the compensator is unlocked and automatically aligned, after which you can start marking the horizontal or vertical level.
When the toggle switch is switched on, the lower horizontal plane lights up immediately. All further operation is done with the buttons on the device housing.
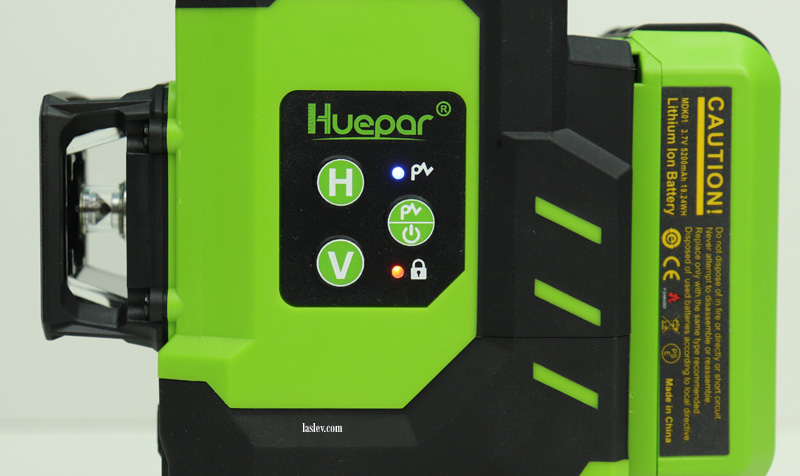
Button “H” is responsible for switching the horizontal planes. You can turn them on together or separately.
The “V” button does the same for the vertical planes.
And a third “on/p~” button is responsible for activating the TILT function when the compensator is locked, and for activating the receiver mode.
It is switched on by briefly pressing the button, the laser lines will light up a little dimmer and a blue diode will light up in front of “p~” on the control panel.
Functional capabilities
In addition to all the functional advantages of laser levels with four 360-degree planes, the Huepar LS04CG laser level has an automatic switch off function when not in use.
The unit will only be able to turn off completely when the TILT function is activated.
For example, you operated the laser level with the compensator locked in “tilt mode”. Then you turned off all the planes, but your indicators are still on. If this is the situation, you will hear a beep every 30 seconds to tell you that you need to turn the instrument off completely. If you have not done this within 5 minutes, it will automatically turn off by itself.
But if the same thing happens (you just turned off all the planes and forgot) in “auto-leveling” mode with the compensator unlocked, the device will just beep every 30 seconds, but after 5 minutes it cannot physically turn off and lock the pendulum by itself.
Today, four 360-degree planes are the maximum available on the laser level market. This optical scheme will satisfy any builder of the widest profile.
Walls, floors, ceilings – everything can be projected as close as possible for better visibility, and for quick, accurate marking.
If you separately purchase a special receiver, you can easily mark something outdoors in sunny weather at a greater distance of 40-60m/130-197ft in radius, or 80-120m/260-396ft in diameter if you put a laser level in the center of the construction site.
Agree, that’s a pretty big distance. In most cases it will be more than enough so there is no need to purchase a more expensive rotary laser level.
Comparison table with the analogue
| Technical Data | HUEPAR LS04CG | HUEPAR 904DG |
|---|---|---|
| Accuracy, mm/m | ± 0.3 mm/1m | ± 0.3 mm/1m |
| Compensator range, ° | 3° ± 1° | 4° ± 1° |
| Range without / with receiver | 30*/60m (R) 98*/197ft (R) | 40*/60m (R) 130*/197ft (R) |
| Control panel | analog | touch panel |
| Dust and moisture protection | IP54 | IP54 |
| Tilt function | yes | yes |
| Work with the detector | yes | yes |
| Remote control | no | yes |
| Socket operation | yes | yes |
| Battery | 3.7V 5200mAh 2pcs. Quick detachable | 3.7V 5200mAh |
| Auto power off | yes | no |
| Operating temperature | -10°C to +50°C | -10°C to +50°C |
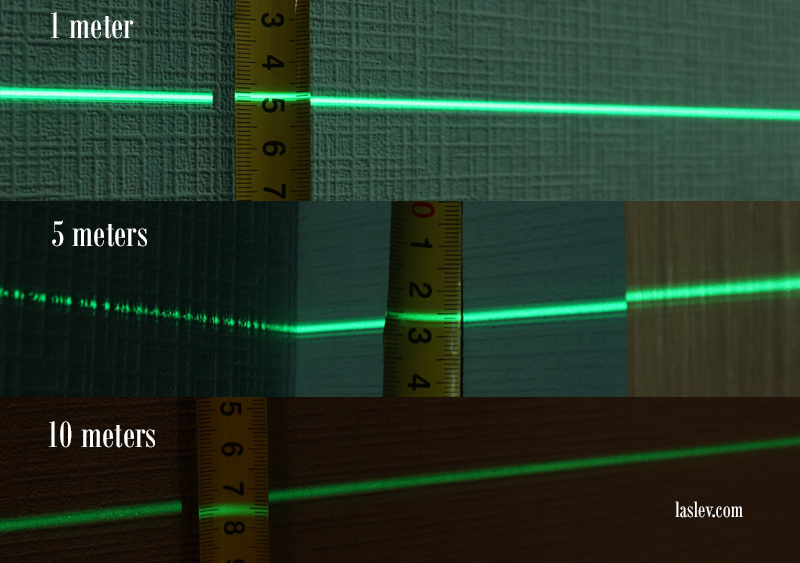
Thickness of laser lines at different distances
In this test, the LS04CG performed great at all distances, both in brightness and thickness:
- at 1 meter, the thickness of the laser line was just under 2 mm;
- at 5 meters also just under 2 millimeters;
- and at 10 meters the thickness was about 3 mm. Great result!
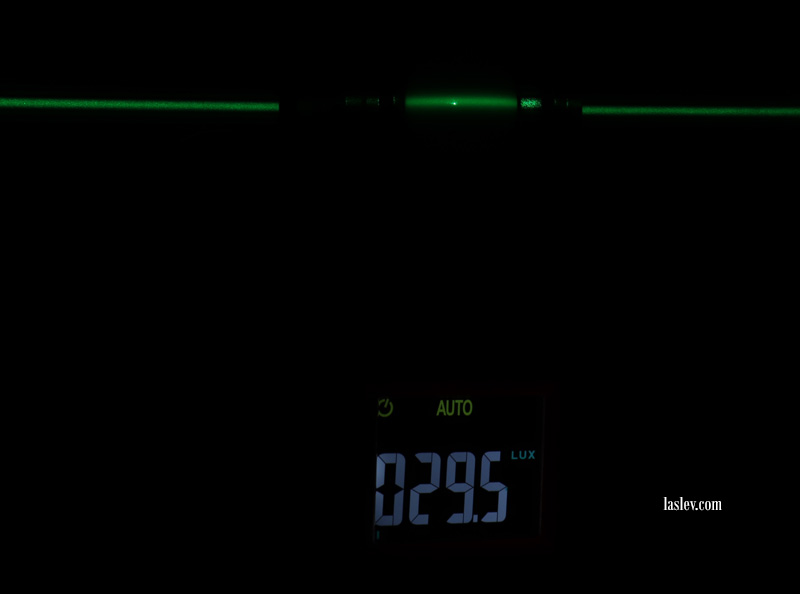
Measuring laser line brightness
The brightness test also showed good results. Based on the brightness table of the most popular laser levels, the LS04CG ranks 4th right after the bright Huepar S04CG.
As you know, cone prisms do not have the same brightness all around their circumference. There are brighter areas and dimmer areas. This statement applies to any laser level with cone prisms from any manufacturer.
Therefore, it is better to measure with a luxmeter in different positions. So, the results at distances of 5 and 10 meters:
- 5 meters bright side – 29.5 LUX;
- dim side 5 meters – 5.3 LUX;
- 10 meters bright side – 13.2 LUX;
- and 10 meters dim side – 1.8 LUX.
Compliance with the declared accuracy
An accuracy check at 10 meters showed that the Huepar LS04CG laser level was perfectly calibrated.
The maximum distance between points in the horizon check did not exceed 3 millimeters, with a maximum allowable gap of 6 mm at 10 meters, in accordance with the stated accuracy of ±3mm/10m.
For proper calculation of the error of laser levels with cone prisms, see here.
Thus, with this instance we have an inaccuracy lower than stated: the accuracy of this instrument is ±1,5mm/10m. Twice as precise!
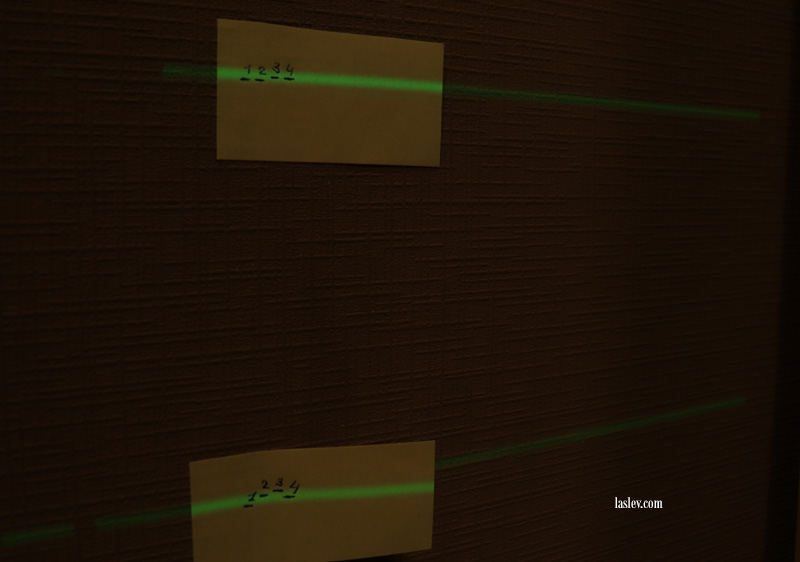
All four verticals also run along the plumb line, indicating that they are precisely adjusted.
Adjusting the Huepar LS04CG laser level
However, there are many factors that can affect the accuracy of a laser level. These include direct mechanical effects (shocks, strong vibrations) as well as various environmental influences (ultraviolet light, temperature, humidity, etc.).
Therefore, over time it may be necessary to adjust the accuracy of the laser level. It is easier to do here than with most other levels.
In general it must be said that almost all Huepar laser levels are quite easy to calibrate.
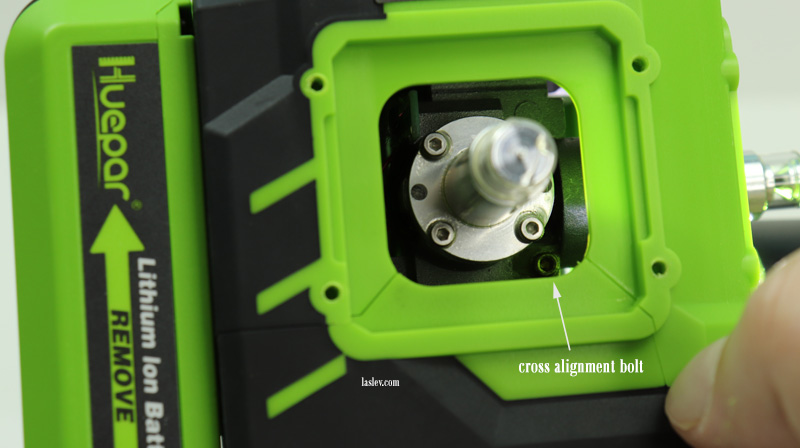
To calibrate this model, you don’t even need to disassemble the housing, you just need to remove the necessary protective towers.
So, to correct for the coaxial misalignment of all planes, it is sufficient to calibrate the position of the pendulum with two hexagonal alignment bolts: a transverse bolt and a longitudinal bolt.
They can be accessed by removing the side protective towers.
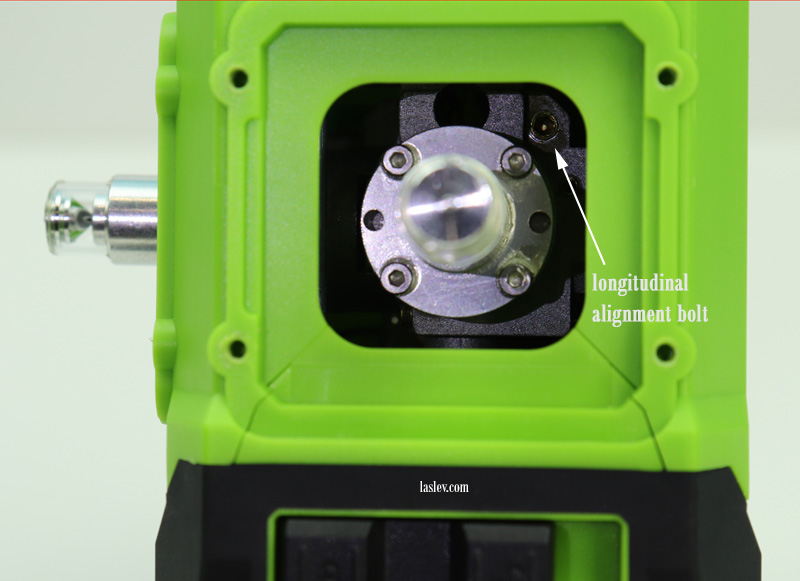
Moving the bolts in the body of the pendulum will change its center of gravity. For example, if the horizontal plane is tilted to the right, the cross bolt should be unscrewed to the opposite side of the tilted plane.
If the planes are not aligned, in other words the planes have different deviations, the adjustment is made for each laser module separately using the 4 bolts at the base of the module.
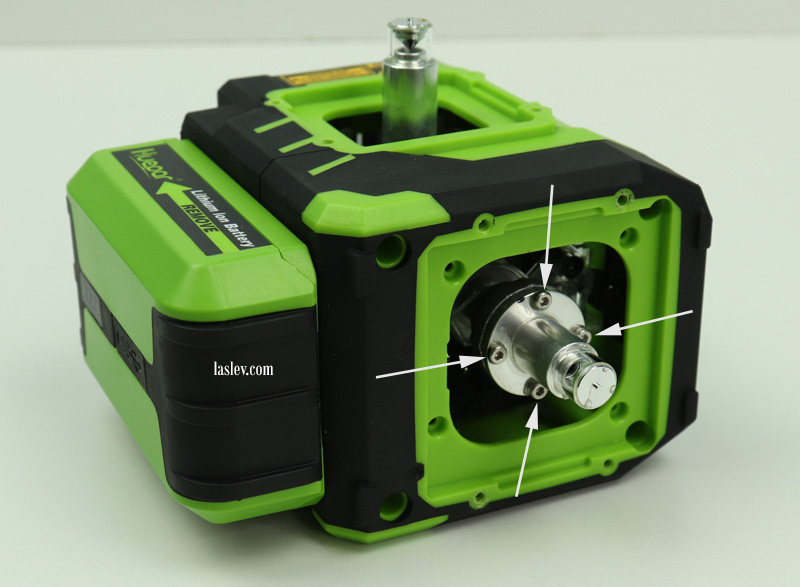
Such adjustment of 4D laser levels should be started from the lower horizon. That is, first the lower horizon is adjusted with the adjustment screws on the pendulum, and then the remaining planes are calibrated separately.
But LS04CG also has 4 bolts on the lower horizontal module for separate adjustment, so you can do the adjustment either together with the pendulum or separately from it.
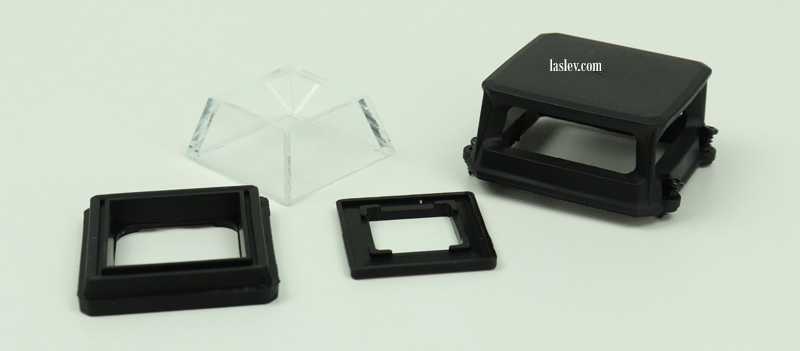
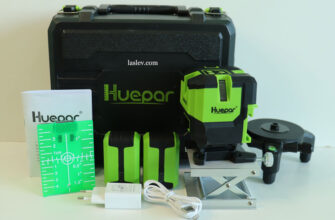
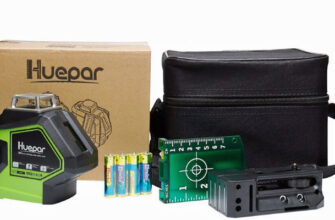
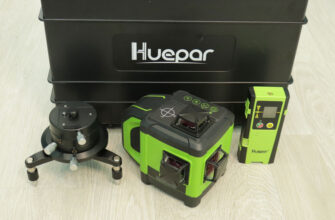
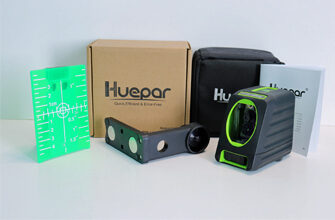
What is included in the laser level kit
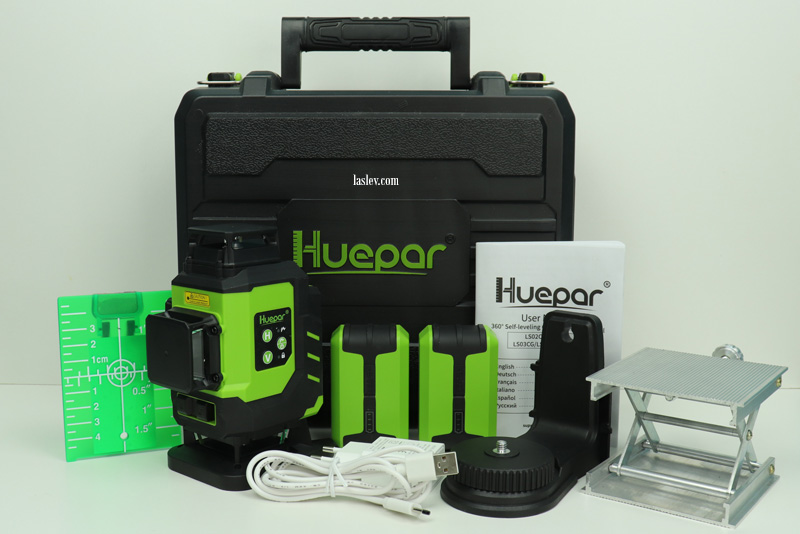
The Huepar LS04CG laser level is supplied in a compact plastic case containing the following items:
- 4×360° laser level
- 2 Li-ion batteries 3,7V 5200mAh
- Lifting pad with mechanical microlift
- magnetic mount with swivel pad and 1/4″ and 5/8″ threads
- magnetic target with stand
- USB plug
- USB/USB Type-C cable
- multilingual instruction manual
Pros and cons
High quality construction and materials, 4 planes at 360 °, thin and bright green lines, full plumb, high accuracy, the mode of operation with the receiver, the function TILT, working from the network, auto off, 2 batteries included, Osram laser modules, compact size, charging Type-C, easy alignment, towers are mounted through the rubber pads, metal support for the compensator, you can select any plane separately.
No remote control, the distance from the lower horizon to the floor would be desirable to lower in half, tight buttons on the control panel.

Hello. I would like to ask you abot individual adjustment of the planes by 4 screws. If I need to tilt the vertical plane, let’s say into right, which screw(s) should I screw in or out? Thanks.
Here you have to think logically, think and imagine how in your situation you have to tilt the whole module to make the laser line tilt to one side or the other. If the tilt is small, you can just tighten the bolt on one side a little. If the slope is large, then you need to loosen the opposite bolt a little so that there is room to tighten the bolt. Either way, twist just a little bit and watch the line position change. If the line has gone the wrong way, you can always bring the bolt back to the original position. And that’s how you do it step by step. You twist it a little bit, check it… – tighten it again, check it again.
The process is not quick, but in time you will understand exactly what and where to tighten.
Under “Specifications” you’ve listed accuracy as “+-1.9 inches.” Should be 1/9 inches, or .11 inches. Yes?
Yes 1/9 inches. Corrected.