- Where to buy laser measure profitably and reliably?
- Technical characteristics
- Housing Huepar T7-LM200C
- Control keyboard and full functionality
- #1 Power button
- #2 Green button “MEAS”
- #3 Button with a camera
- #4-5 Buttons “+” and “-“
- #6 “SET” button
- a) Bluetooth
- b) The “m” icon
- c) Changing the reference point
- d) Turn on the 3D digital level
- e) Rotate the screen
- f) Memory recall
- g) Calibrating the Huepar T7-LM200C laser distance meter
- h) Timer
- #7 Button with squares
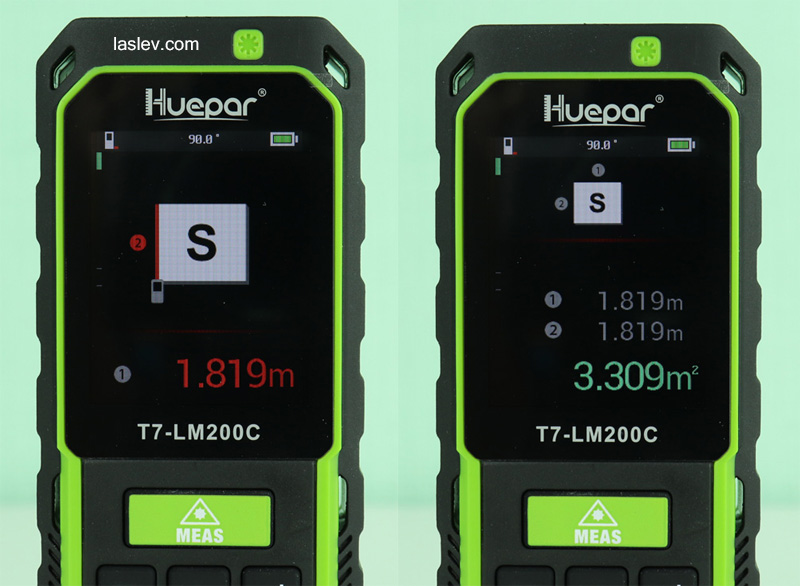
- 1. Quick calculation of the area (S) by two measurements
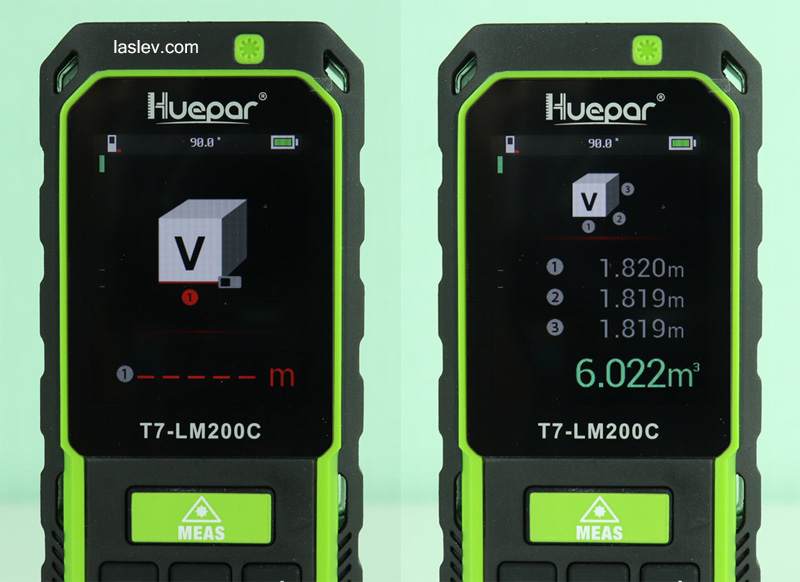
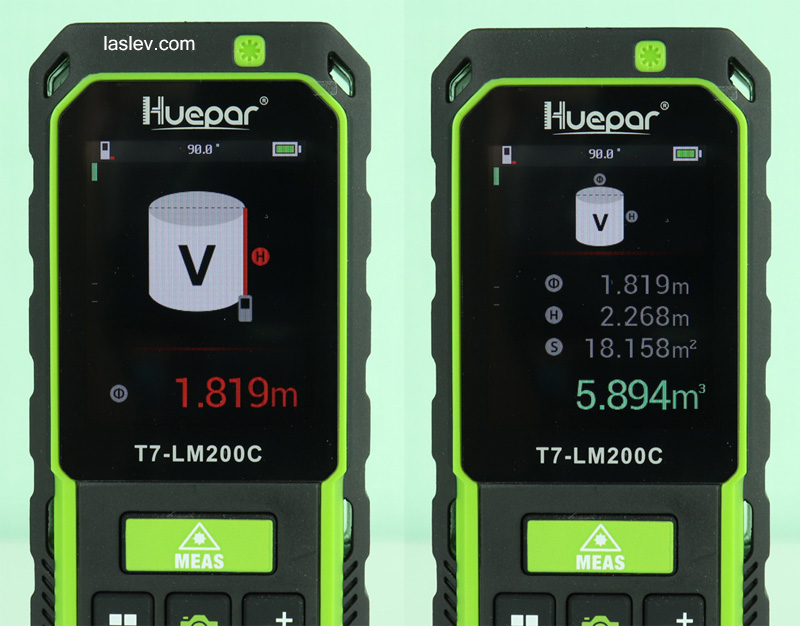
- 2. Calculation of volume (V) by three measurements
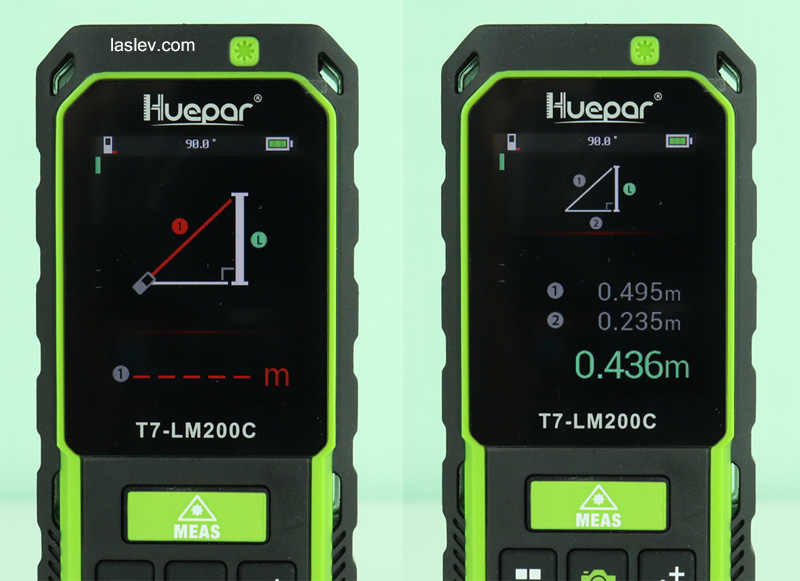
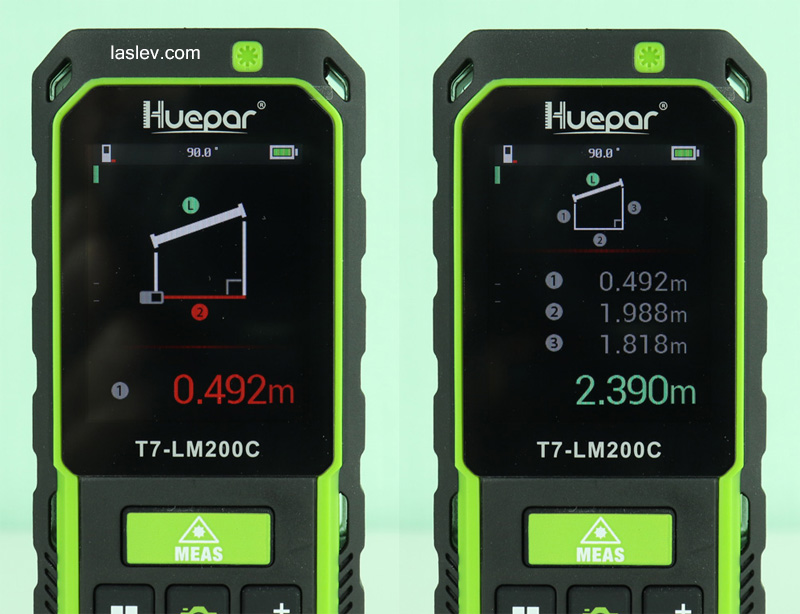
- 3. Calculating Pythagoras height using two measurements
- 4. Calculation of the height using three Pythagoras measurements
- 5. Calculating the length of an inaccessible segment by Pythagoras
- 6. Indirect length measurement over an obstacle
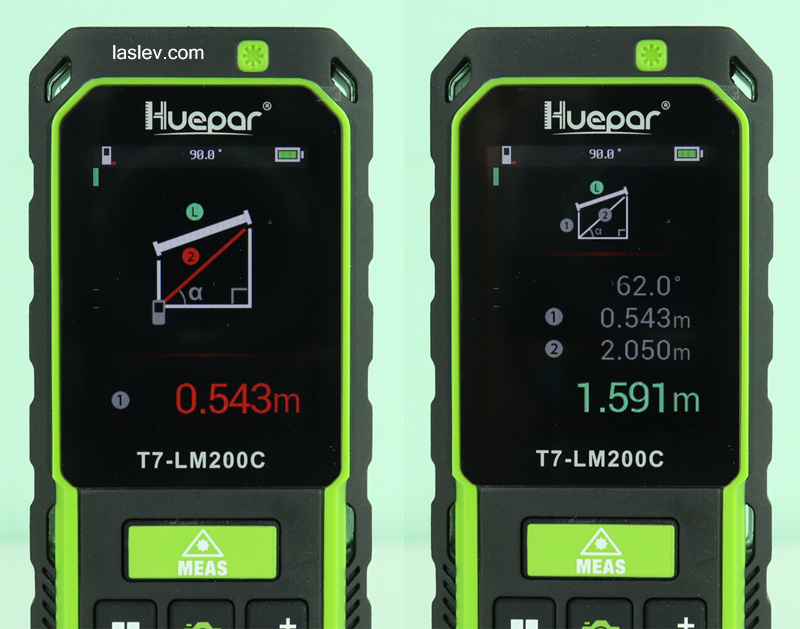
- 7. Indirect height calculation from two measurements
- 8. Calculating the length between two points (P2P)
- 9. Measuring the trapezium method 1. Calculating the length of the roof slope with three measurements
- 10. Measuring the trapezoid method 2. Calculating the length of the roof slope with two measurements
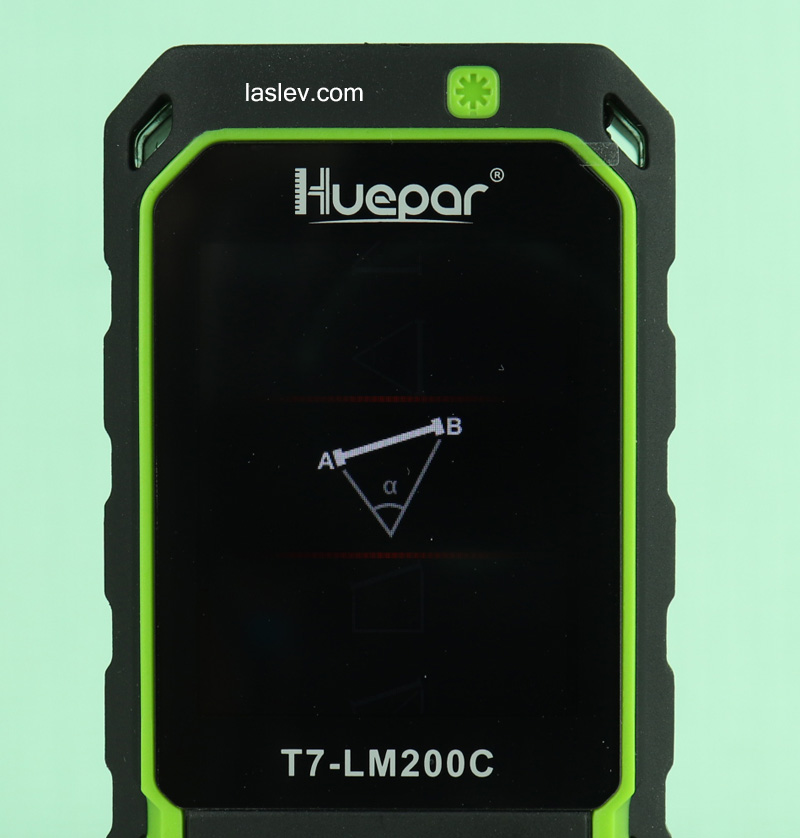
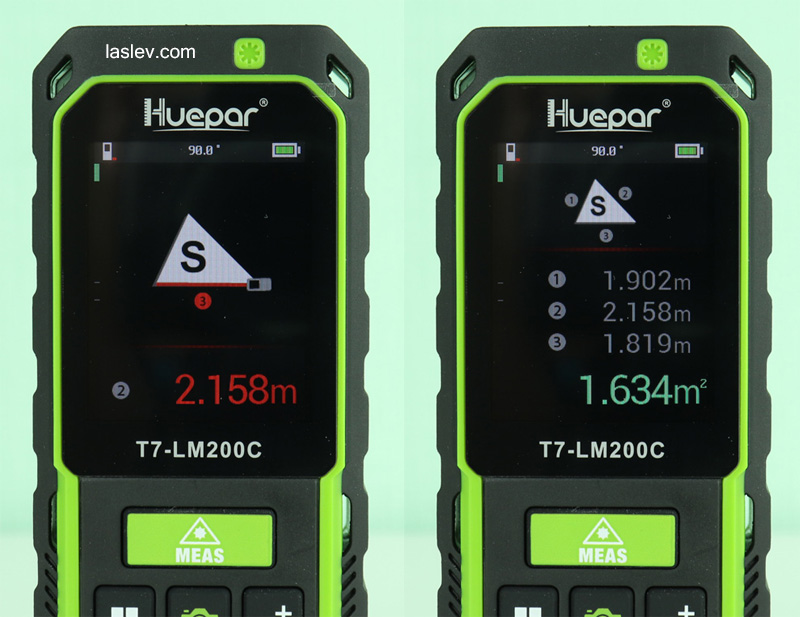
- 11. Calculating the area of a triangle
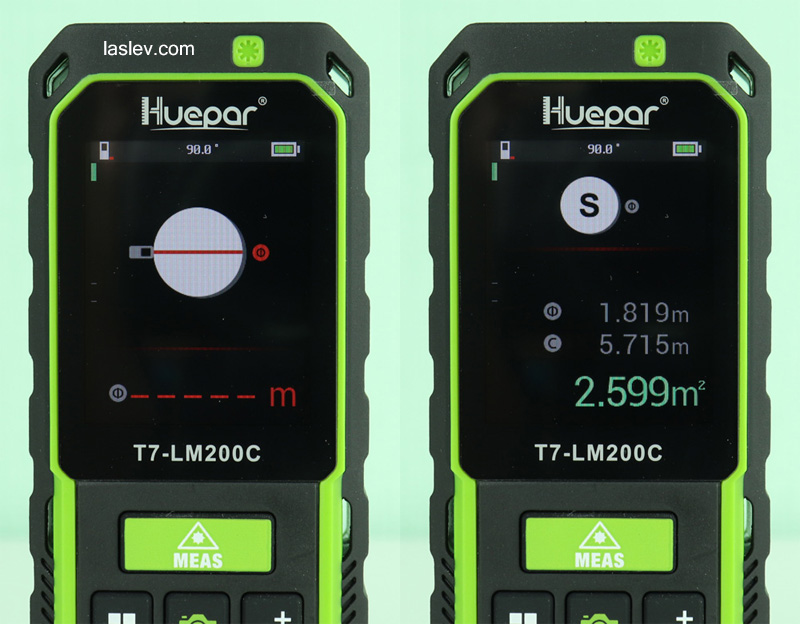
- 12. Calculating the area of a circle
- 13. Cylinder volume measurement
- 14. Marking the same segments
- Checking the accuracy and stability of measurements
- Table with deciphering of error codes
- Package Contents
- Pros and cons
- Video review of Huepar distance meters
The Huepar T7-LM200C laser distance meter is a flagship rangefinder with tremendous functionality, capable of measuring up to 200 meters with high accuracy.
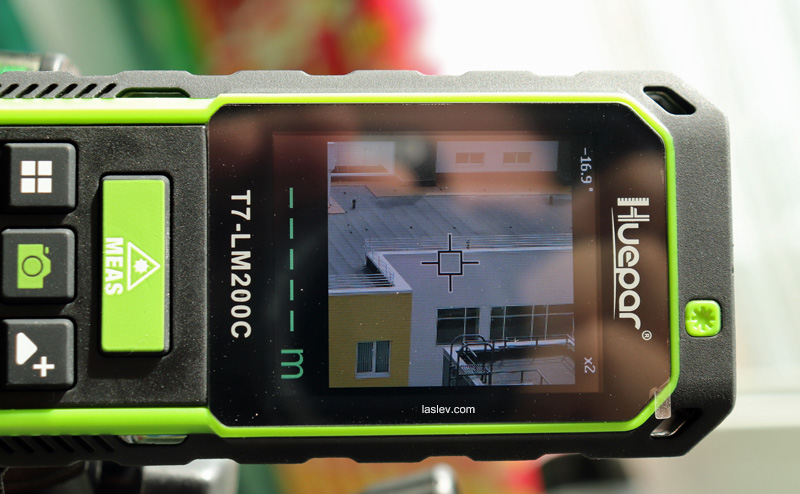
Thanks to the built-in video camera, screen sight and high protection (IP65) – laser distance meter Huepar T7-LM200C easy to work outdoors in all weather and time of day.
The device has passed all necessary certifications: CE, FC, RoHS, FDA.
If to speak about analogues, the nearest competitor on functionality, this laser distance meter Leica Disto X4 at which by the way considerable part of functions can be carried out only under condition of presence of a special turn adaptor DST 360 that in the complete set costs rather expensively. I’m not even talking about top models from Leica.
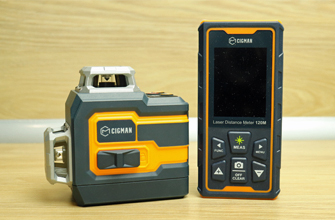
Yes, the flagship rangefinder is undoubtedly the pinnacle of engineering today and excellent workmanship, but the laser distance meter Huepar T7-LM200C can also do a lot at a price several times lower. I also recommend considering a direct competitor, the CIGMAN CD-120G laser distance measure.
Well about everything in order, and remember the decision is always up to you.
Where to buy laser measure profitably and reliably?
Technical characteristics
-
Measuring range: 0.05 ~ 200m (0.16 ~ 656ft)
-
Accuracy: ±(2mm+5×10⁻⁵xD) / ±(1/16inch+5×10-5xD), where D is the length of the measured distance.
-
Calibration: yes
-
Additional measurements: 14 options
-
Built-in memory: 1000 cells
-
Tilt sensor measurement range: ±90°
-
Number of reference points: 3 pcs (up/down/tripod)
-
Unit: m/ft/in/ft+in
-
Auto power off if no operation: 180 seconds
-
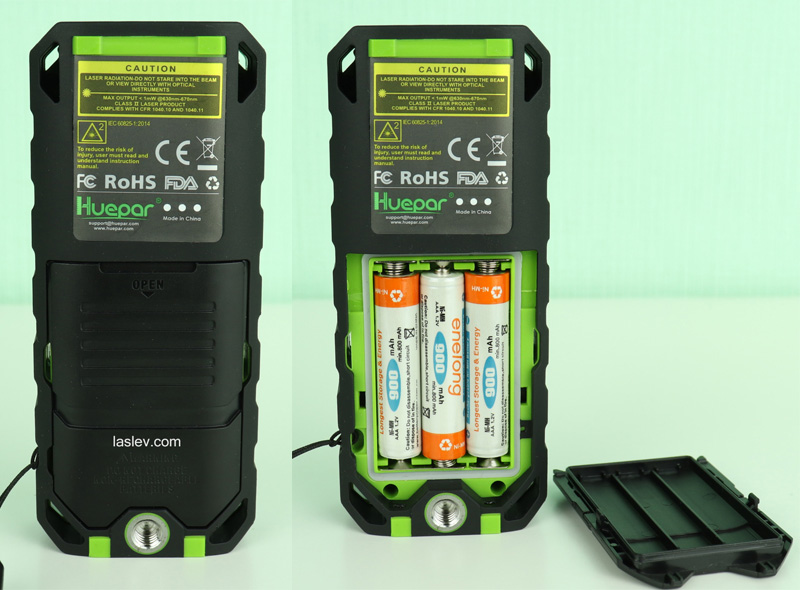
Power supply: 3xAAA NI-MH (included)/simple batteries/power bank
-
Tripod thread: 1/4″
-
Dust and water resistant: IP65
-
Laser class: II (IEC/EN60825-1/2014), <1mW
-
Laser wavelength: 630-670nm
-
Display: 2 inch rotatable, color
-
Bluetooth and video camera: yes
-
Zoom: 2X/4X
-
Timer: yes
-
Dual-axis digital level: yes
-
Dimensions and weight: 115x49x26mm/140 grams
-
Operating temperature: 0°C…+40°C (+32°F…+104°F)
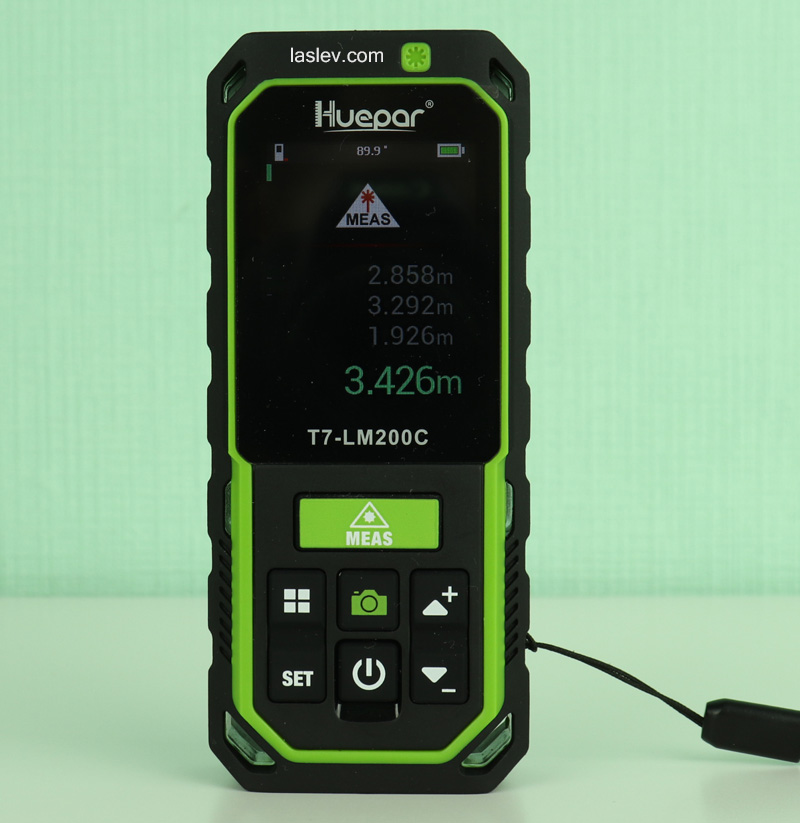
Housing Huepar T7-LM200C
The build quality of the Huepar T7-LM200C laser distance meter is impressive. Everything is done very neatly, without any hint of pretension.
Virtually the entire body of the device is covered with thick black rubber, except for the battery compartment cover and the button panel.
By the way, the housing of the MileSeey S2 laser distance meter comes to mind at once; they look almost identical.
The compact rubberized keyboard has seven buttons, which have a balanced elasticity of touch and excellent response.
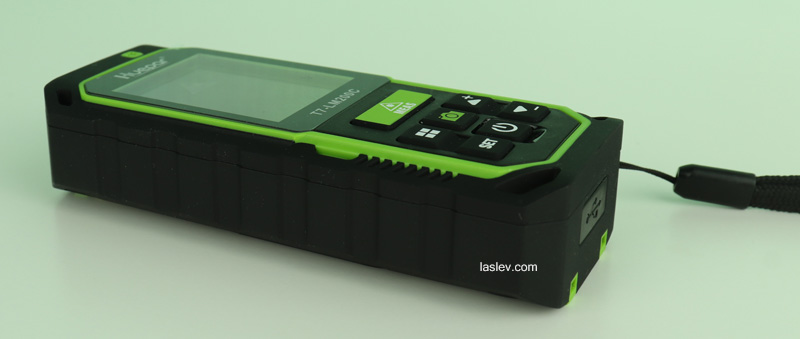
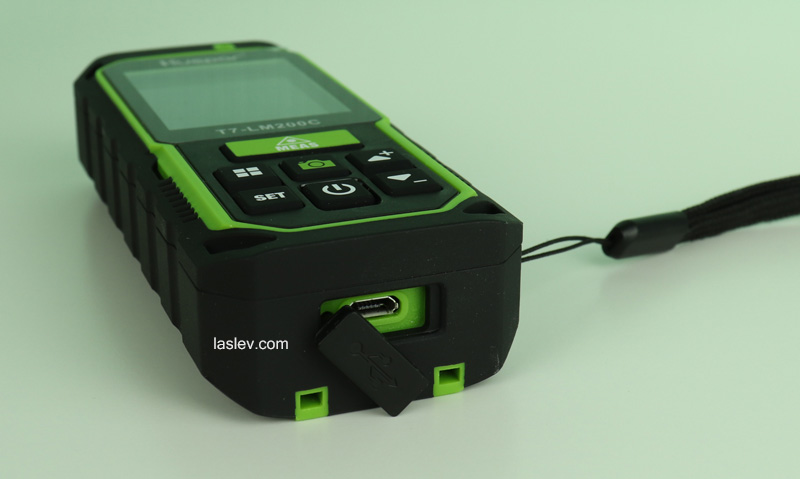
On the back side under the rubber-plastic plug is a micro-USB port for the charger.
This is certainly a minus, why they could not make a more modern and convenient port Type-C personally I do not understand.
On the front are three round windows of the most important elements of the laser rangefinder: the laser beam exit, the laser return signal receiver and the video camera.
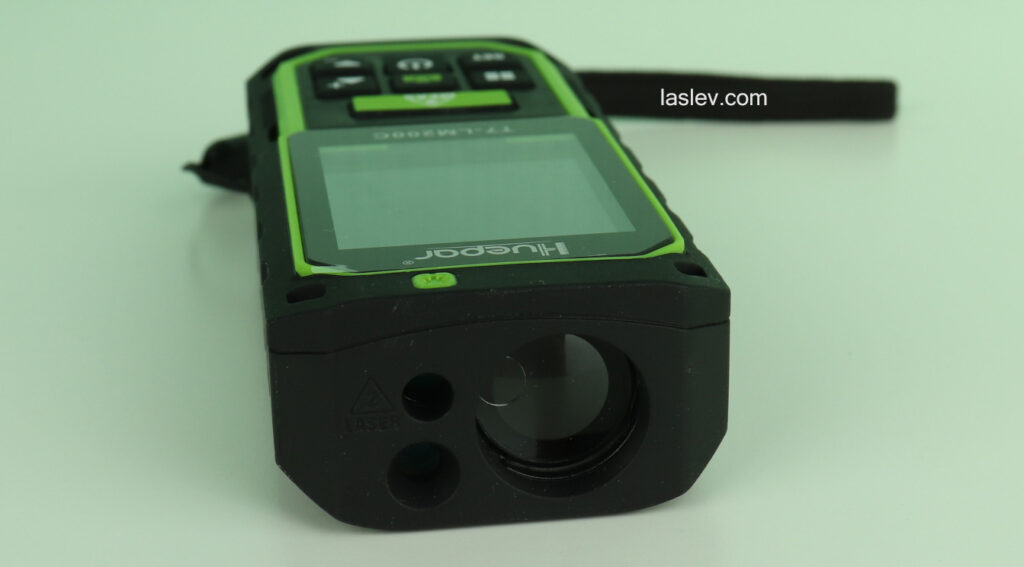
There is a 1/4″ thread on the back of the rangefinder for attaching to a photo/video tripod. And this should definitely be considered a plus, because all indirect calculations on the theorems are better to do with a tripod, otherwise the measurement accuracy will be low.
The battery compartment cover is sliding, which is quite convenient. It should be noted that it closes tightly with the inner rim of the lid against the white rubber gasket running all around the perimeter of the battery compartment.
Control keyboard and full functionality
The Huepar T7-LM200C laser distance meter has a lot of hardware functions as well as computing functions, which can’t be explained in a few words. So first, let’s number all the buttons and understand what each button does.
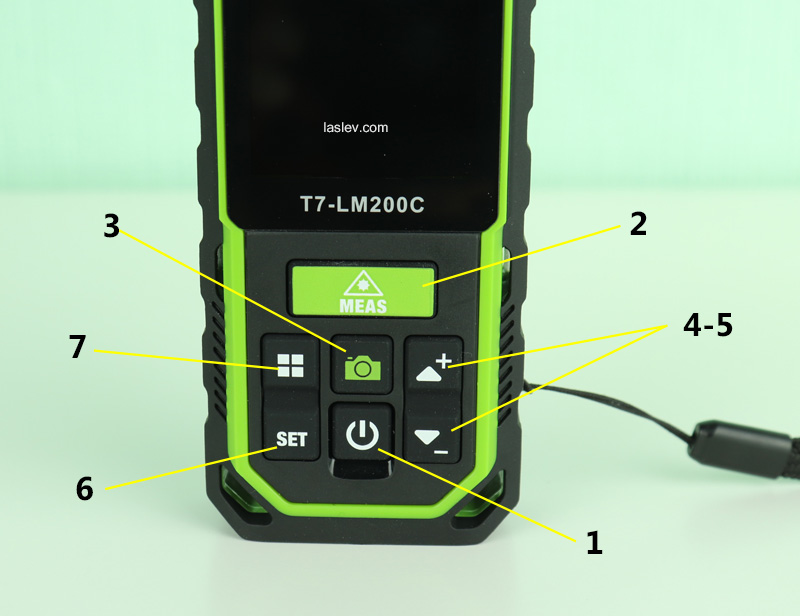
#1 Power button
Long press to turn the distance meter on or off. A short press while measuring resets the previous measurement values.
#2 Green button “MEAS”
A short press will measure the distance. Holding down the button for about 2-3 seconds activates the “min/max” function.
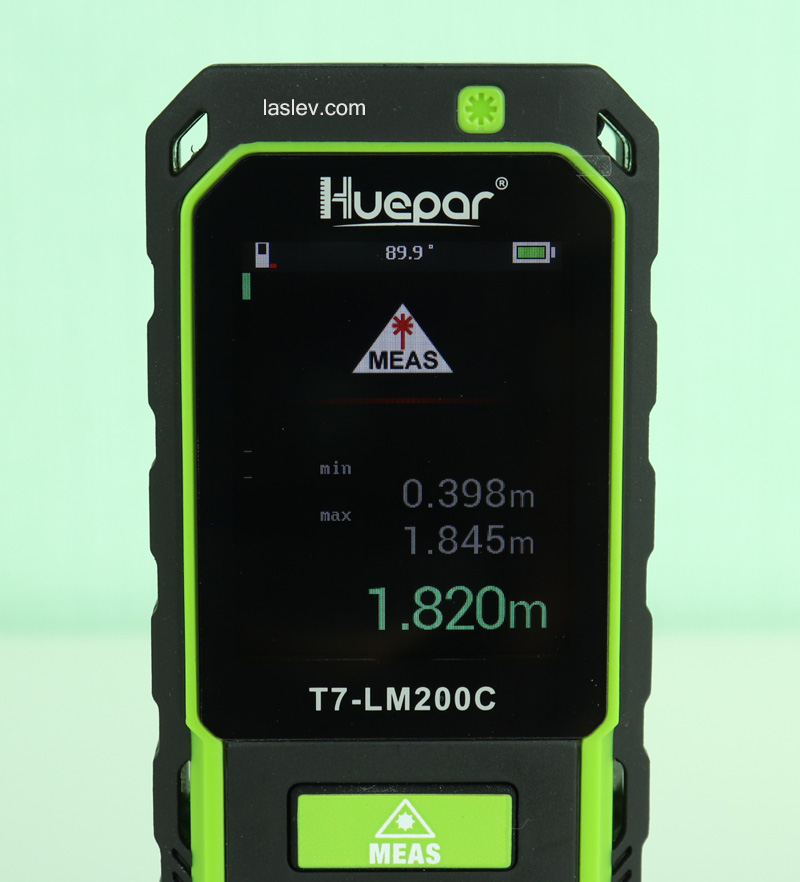
When you turn on this function, the distance meter goes into tracking mode, in other words, it constantly takes measurements.
For example, if you want to find the shortest distance (“min”), then slowly move the laser point along the segment where the intended perpendicular runs. Then measure at any point of this segment.
The “min” and “max” values will show up on the screen, respectively the minimum value is the perpendicular.
The same should be done when calculating the diagonal, only its length will already correspond to the maximum value on the screen.
#3 Button with a camera
Turns on the video camera, and the sight additionally appears on the screen for convenient outdoor measurements in clear weather. When you press again, the magnification is doubled from 2X to 4X.
#4-5 Buttons “+” and “-“
They are navigational and also add or subtract different values.
You can add or subtract not only simple linear measurements, but also volumes and areas, for example: S+S1+S2-S3 and so on, or V+V1-V2-V3+V4…
#6 “SET” button
Opens a menu of hardware settings and advanced features. Use the arrow “+/-” navigation buttons to move through the icons. Let’s take a closer look at each icon.
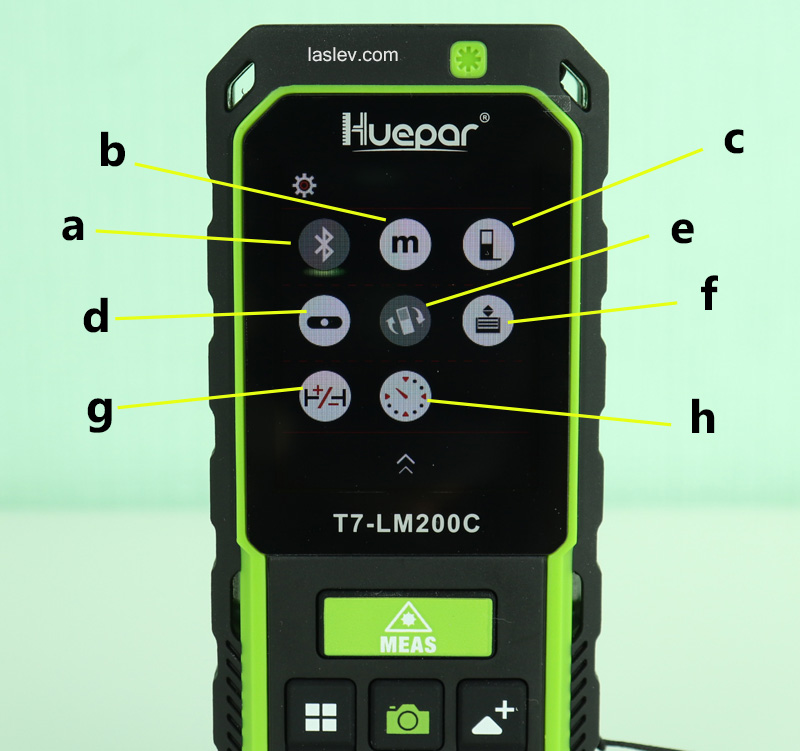
a) Bluetooth
The Huepar T7-LM200C laser distance meter is equipped with Bluetooth technology for remote measurement and data transfer in a special professional application “Joyplan” for creating projects including 3D.
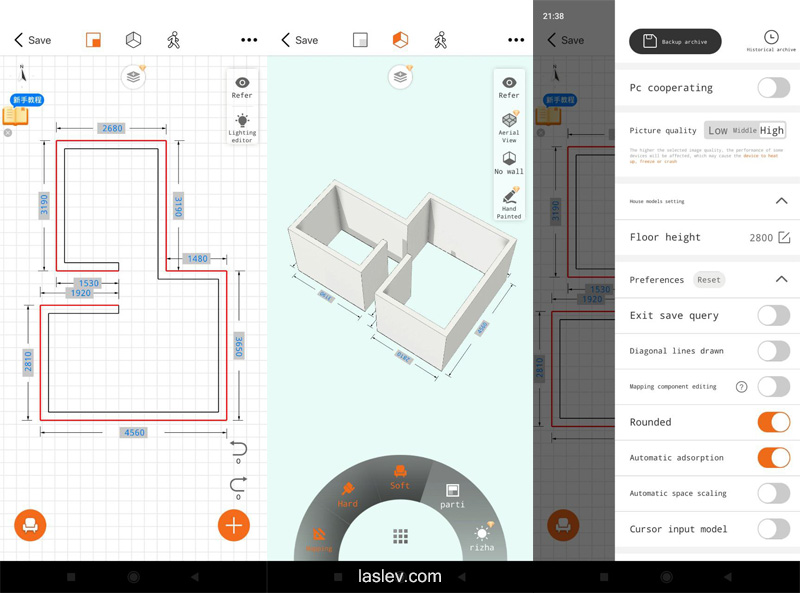
You can download the application from the App Store or Google play.
By default, Bluetooth is off and its icon on the screen is gray. To turn it on, just point the cursor and press the green “MEAS” button, then the icon will turn white, indicating that Bluetooth is on.
b) The “m” icon
Switching units of measure. Also point the cursor and by alternately pressing the “MEAS” button, select the desired units: m/ft/in/’ “/
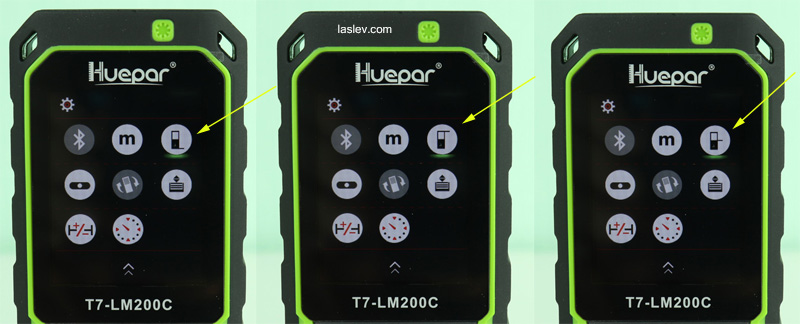
c) Changing the reference point
The Huepar T7-LM200C laser distance meter has three reference points. By default, the rangefinder calculates from the bottom edge of the housing. You can also choose to read from the top edge, and from the 1/4″ thread when mounted on a tripod.
Viewing or selecting the desired reference point is easy – you can see the schematic risk of the reference point right on the icon: rear, front, tripod.
To change the point, hover the cursor over the icon and use the “MEAS” button to set the desired point.
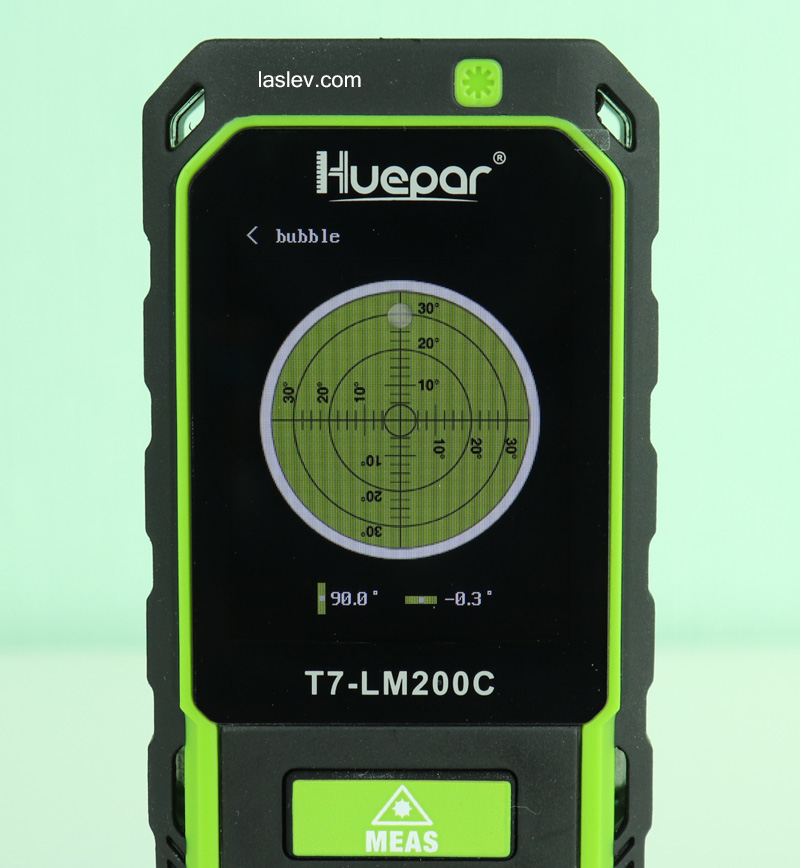
d) Turn on the 3D digital level
Use the navigation keys to move the cursor to this icon and press the green “MEAS” button.
An electronic spatial bubble level appears on the screen, with which you can quickly and conveniently determine the slope of any surface.
In addition to the digital bubble on the circular level below, the angle of inclination on the two axes is duplicated in specific numerical values.
e) Rotate the screen
With the Huepar T7-LM200C laser distance meter, when measuring on the side, you can make the screen flip to the horizontal position at that moment to make it easier to read the results.
Also in this position you can additionally monitor the level of the installation by a special green marker and two marks on the screen.

When the screen inversion is activated, it is when the screen is upside down you can not turn on the video camera, this is of course a disadvantage.
f) Memory recall
All measurements are recorded in the distance meter’s internal memory. I must say it is quite large – 1000 cells, in other words, you can record up to a thousand measurements, believe me this is really a lot.
To bring up the list of previously recorded measurements hover your cursor over this icon and press the “MEAS” button. Then you can use the navigation buttons to scroll through and view all the recorded cells with results.
Values that are not needed can be deleted by pressing the green button with the camera. To go back to the menu, briefly press the power button.
g) Calibrating the Huepar T7-LM200C laser distance meter
Clicking this icon takes you to an intuitive measurement calibration screen. You can make almost any correction, either with a “+” or “-” sign.
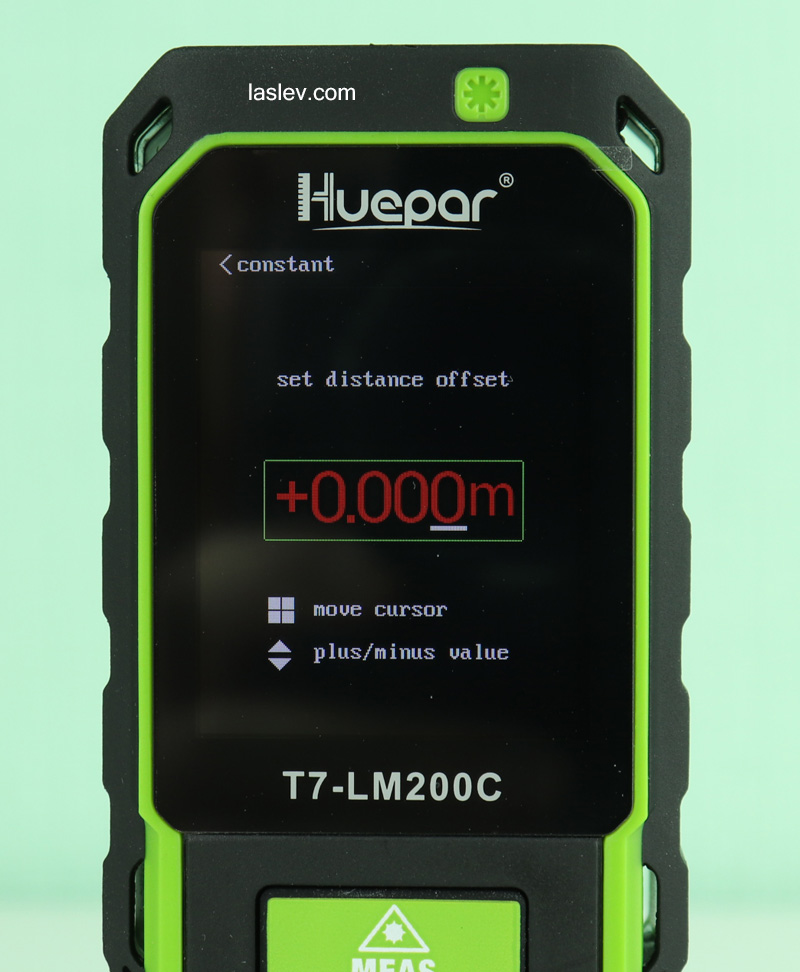
This is done very simply. Use button #7 with squares to move the cursor to the desired position and use the navigation buttons to set the desired value or change the sign from + to – and vice versa, and press the “MEAS” button – that’s it! After the changes made, the distance meter will take into account this correction in all subsequent measurements.
h) Timer
The last icon in this menu. Selecting it activates a timer for 5 seconds, after which the measurement will be taken.
It can be called not only for simple straight line measurements, but also for all other indirect calculations.
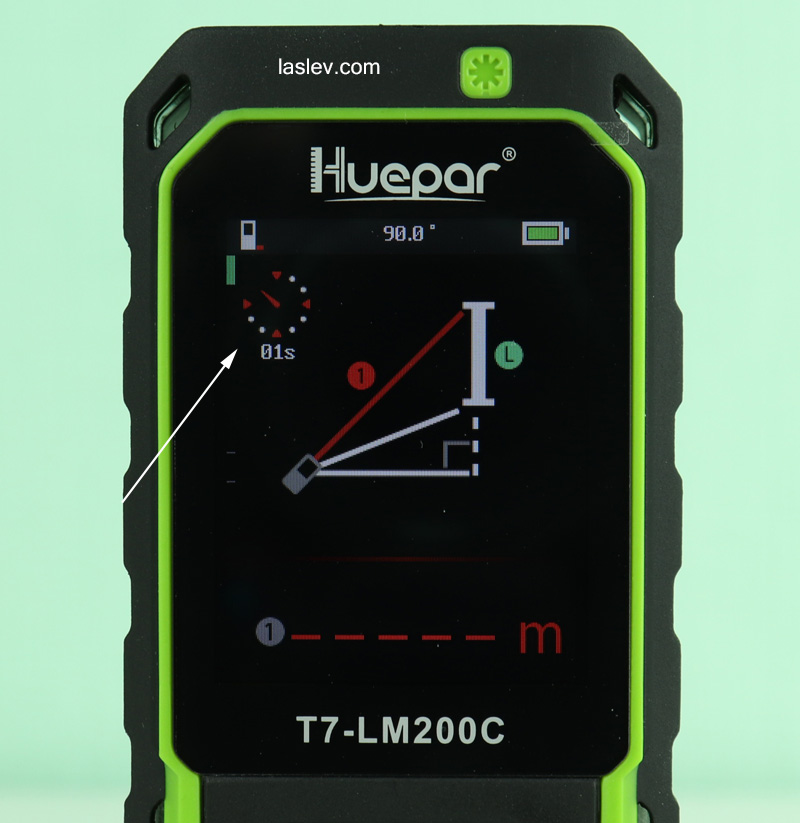
If we talk about the disadvantages, it can not be activated when the video camera is on, this is of course a major flaw. I would also like to be able to set a delay of more than 5 seconds, but it is not so critical.
So, we’re getting to the last most functional button.
#7 Button with squares
Pressing this button takes us to the menu for selecting various calculation functions and indirect measurements.
Use the up and down buttons to select the desired function and confirm with the “MEAS” button. Let’s look at all the functions in more detail.
Yes, it must be said that they really worked well on the interface. Everything is very interactive, on the screen each intermediate measurement is highlighted in red and signed by a serial number, and the final result is already displayed in green and larger font. Therefore, any even complicated measurement is done very easily.
1. Quick calculation of the area (S) by two measurements
To calculate the area in square meters – select this function, then measure the length and width of the plot or room, that’s all. In the final line we get the required area in “m2“.
Intermediate measurements are also shown on the screen in gray color under numbers 1 and 2.
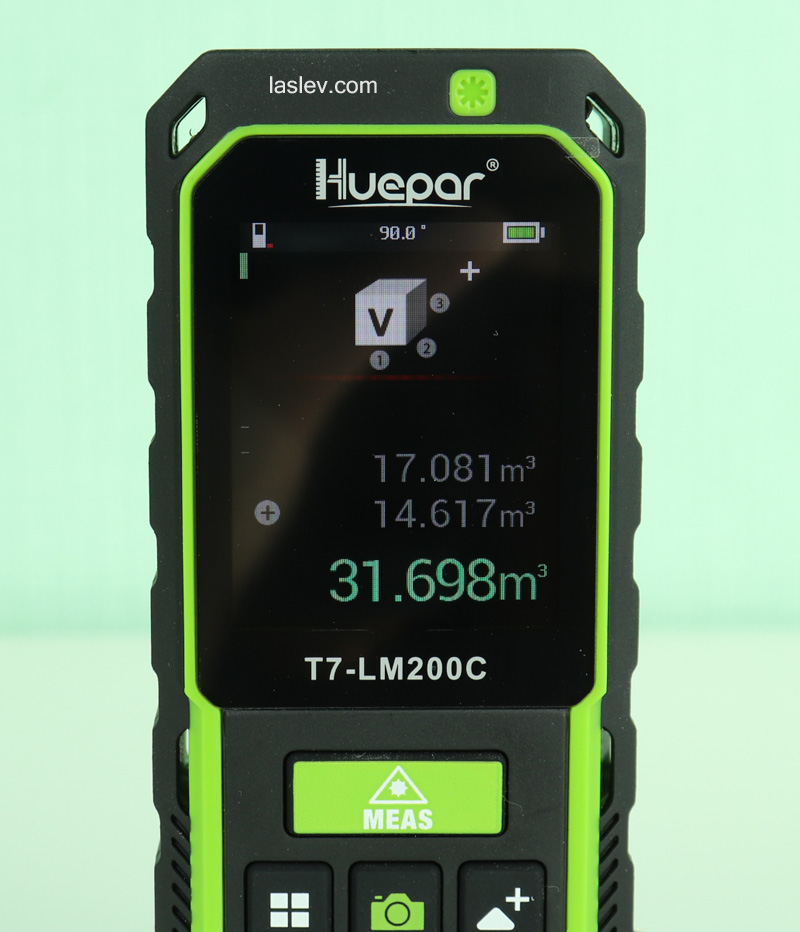
2. Calculation of volume (V) by three measurements
The function allows you to quickly calculate the volume in cubic meters using three measurements. We measure the length, width and height – in the final line we get the volume in “m3“. Everything is very simple and fast.
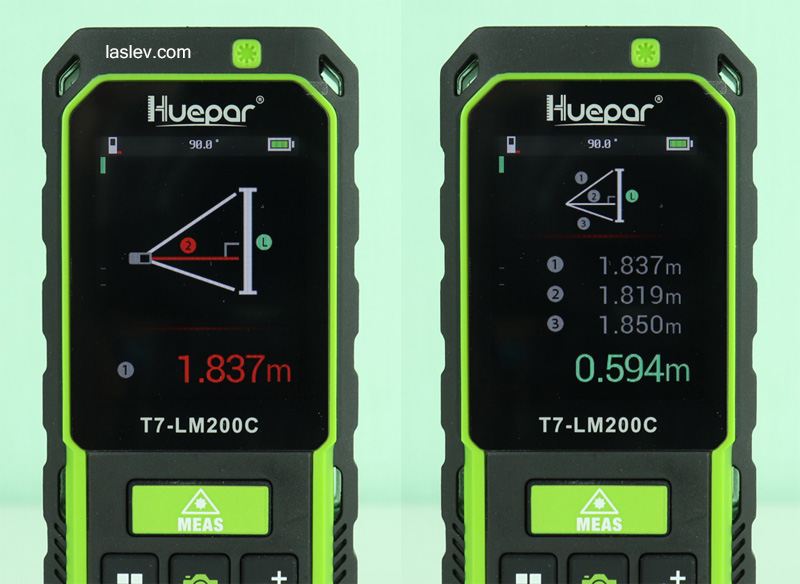
3. Calculating Pythagoras height using two measurements
Measure from one point. First measure the length of the hypotenuse of the imaginary triangle, then from the same point measure the length of the lower cathetus.
For maximum measurement accuracy, the second measurement should be taken at 90°. This is where the built-in inclinometer, which continuously displays the tilt angle on the screen, comes in handy.
4. Calculation of the height using three Pythagoras measurements
For high accuracy, this measurement should be taken from the same position on a tripod. Also at the second measurement (perpendicular measurement) the measurement should be made as much as possible under 90 degrees.
According to the hints on the screen, we do the first measurement to the upper point of the measured height, then we do the second measurement in a position under 90 degrees (looking at the angle of inclination on the screen). And we do the third measurement to the lower point.
In the final line we get the value of the calculated height.
5. Calculating the length of an inaccessible segment by Pythagoras
While all of the measuring functions listed above are found in almost all laser distance meters, starting with this function and all of the functions below are found only in the more expensive, more advanced rangefinders. And as you can imagine, the Huepar T7-LM200C laser distance meter is no exception.
So, calculating the length of an inaccessible segment using three measurements. For example, you need to calculate the distance between the 3rd and 4th floor. This is very easy to do with this function.
First we measure to the upper point of the segment to be measured, then to the lower point of that segment, and then we take the third measurement at 90 degrees.
The more precisely the 90° angle is set, the lower the error of measurement. And, of course, a tripod must be used for high accuracy.

6. Indirect length measurement over an obstacle
Imagine that you need to measure the distance to a house, but there is a fence in front of you. With this indirect calculation, we can find out the distance with just one measurement.
You simply measure to the visible part of the house (if you imagine a triangle, that would be the measurement of the hypotenuse) and that’s it! Through the known length of the hypotenuse and the known angle, the length of the lower cathetus of the triangle is calculated.
The length of this cathetus will be the required distance to the house. The value in the selected units is displayed in green in the summary line.
The measurement is made from a single point. Use a tripod for the smallest error.
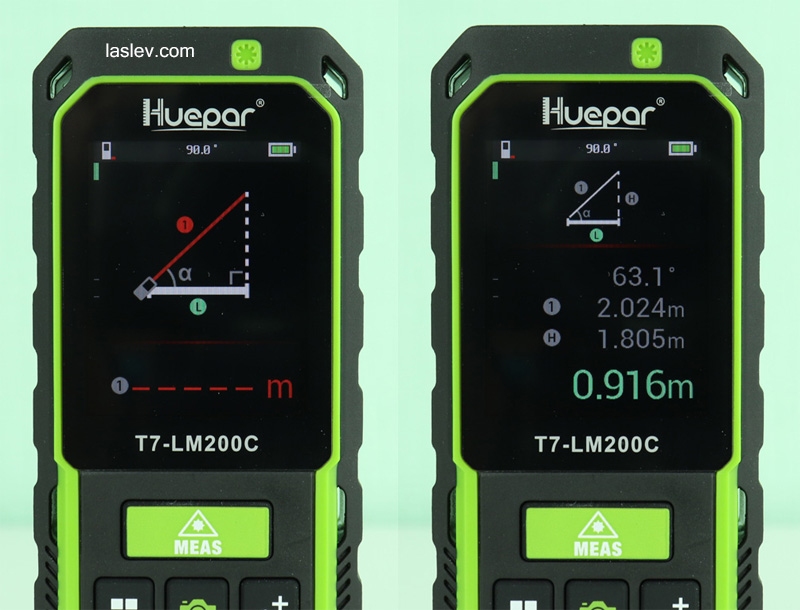
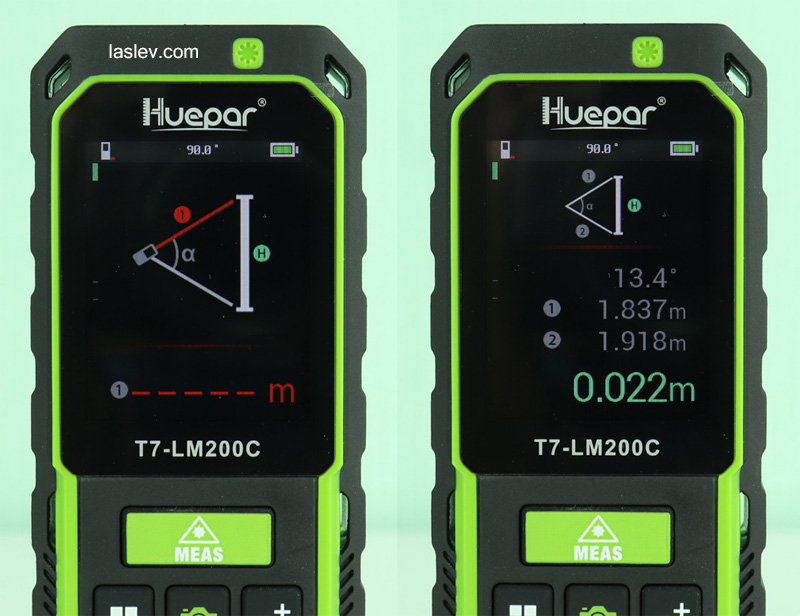
7. Indirect height calculation from two measurements
Quickly measure an inaccessible height through a known angle.
Place the Huepar T7-LM200C laser distance meter on the tripod and select the reference point from the tripod.
Then take the first measurement to the upper point of the calculated height and the second measurement to the lower point – the value of the measured height will appear in the summary line. The screen will also show the angle and intermediate measurements.
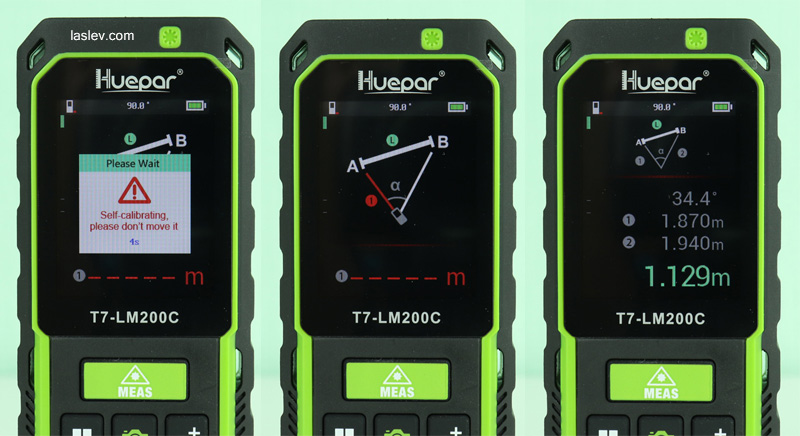
8. Calculating the length between two points (P2P)
A very cool feature found only in the latest Leica distance meters.
Important! Measurements must be taken with the rangefinder stationary, so the use of a tripod is highly recommended.
When this function is activated, the distance meter automatically calibrates for 5 seconds. If there is the slightest movement of the instrument, the calibration will fail and you have to start the procedure all over again.
When the calibration is successful, you will be taken to the measurement screen with prompts.
Then you measure to the first point and the second point you want to know the distance to. That’s it, the final line displays the value of that length.
9. Measuring the trapezium method 1. Calculating the length of the roof slope with three measurements
With this function you can find out the length of the slope of the roof standing below. Here everything is very simple and clear just follow the prompts on the screen.
The calculation is done with three measurements.
10. Measuring the trapezoid method 2. Calculating the length of the roof slope with two measurements
The same as the previous function, only you can calculate the length of, for example, the same slope of the roof with two measurements.
In certain situations, this method may be more preferable than the first.
11. Calculating the area of a triangle
If you want to calculate the area of a triangle, select this function and simply measure all the sides of the triangle one by one. The final line will show its area in meters squared.
12. Calculating the area of a circle
With the Huepar T7-LM200C laser distance meter it is very easy to find the area of a circle. It requires only one diameter measurement and that’s it!
You will get the area of the circle in m2 on the screen in the summary line and additionally the circumference of the circle will be displayed on the screen, very easy and convenient, don’t you agree?
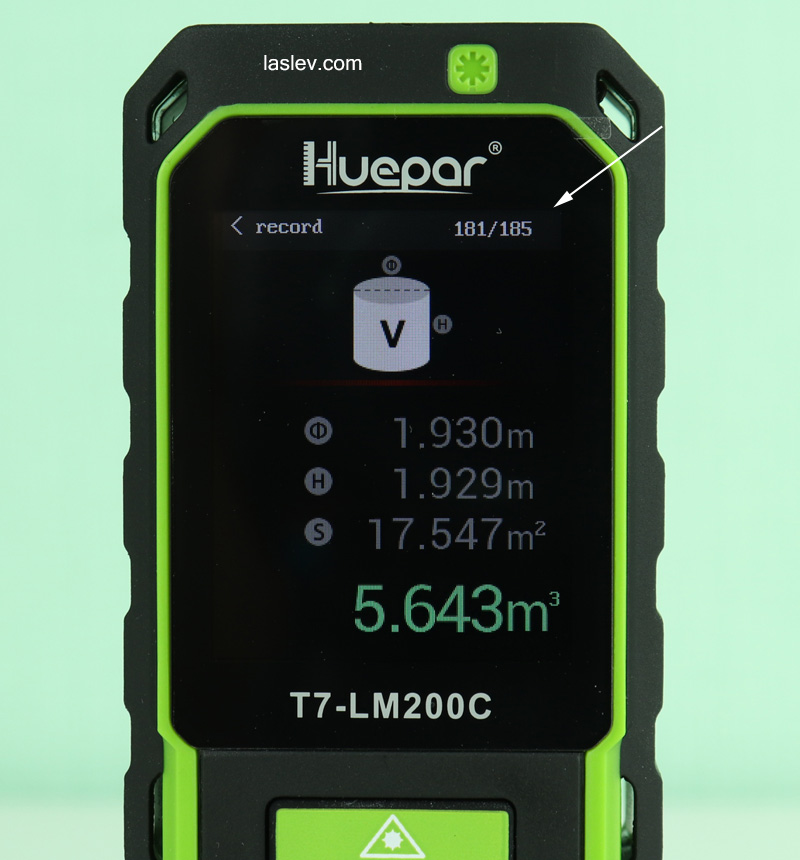
13. Cylinder volume measurement
Another very cool function, for measuring the volume of some huge cylindrical tanks.
This is also simple: measure the diameter of a cylindrical tank and its height – the bottom line will show the volume of the tank in m3.
Plus a line with the surface area of the tank in meters square will appear on the screen.
14. Marking the same segments
This function allows you to set and delay any desired line segments.
When you select this function, you are first taken to a screen where you set the value (length) of the segment. The principle of setting is the same as for the rangefinder correction (calibration).
After setting the value, press the green MEAS button. The Huepar T7-LM200C laser distance meter enters the tracking mode (continuous measurement).
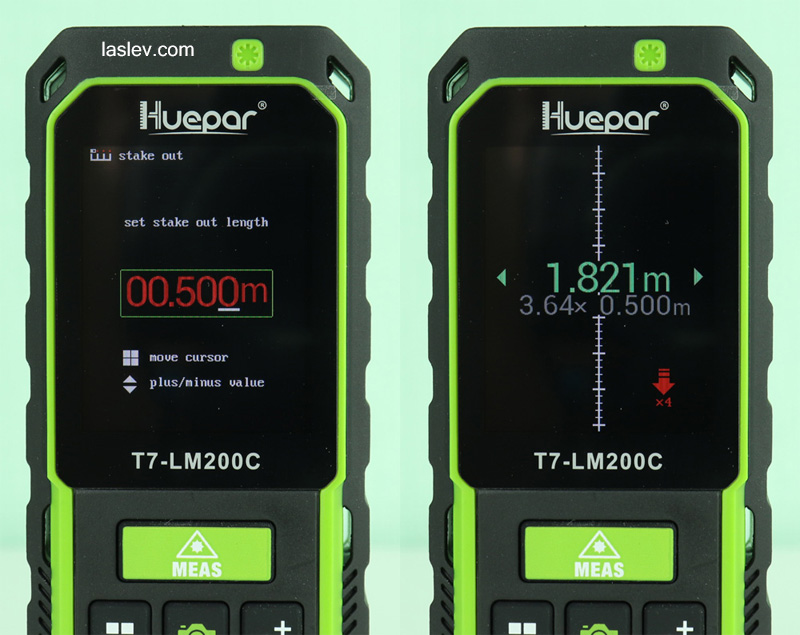
The green numbers on the screen show the real time measurement value.
The gray numbers below indicate how much of the set distance can fit into the real time measured distance (green numbers).
The red up and down arrows also indicate how many whole sections can fit into the measured distance.
By moving the Meter back and forth according to the red arrows, the device starts to beep when you approach the beginning of a new target distance.
In the end I would like to say that the Huepar T7-LM200C laser rangefinder has really interesting functionality, it is definitely better than another inexpensive Sndway SW-S120 laser distance meter with a camera.
I was also impressed by the interactivity, when you activate any function you understand immediately what to do and how to do it, everything is very simple and convenient.
Checking the accuracy and stability of measurements
In this part you should check the stability of measuring the same distance from the same point. It is important that the values do not fall out of the stated accuracy of ±2mm.
So, let’s take any arbitrary distance up to 10 meters and make 5 measurements in a row without moving the device.
As you can see in the photo below, the Huepar T7-LM200C laser distance meter passed the stability test.
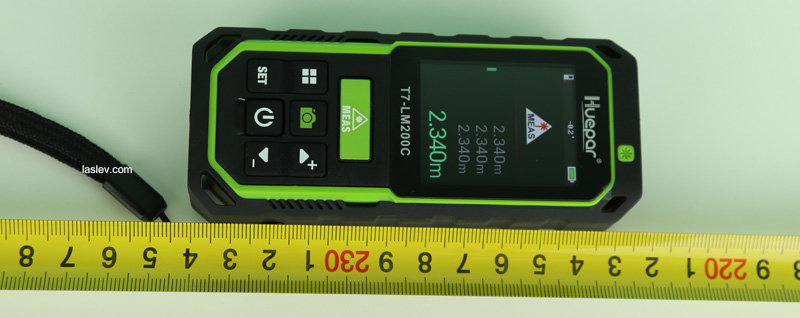
The rangefinder also calculates the distance correctly. In any case, you can always calibrate the accuracy yourself and very quickly if necessary.
Table with deciphering of error codes
Sometimes a numerical error code may appear on the screen if the measurements are not correct and other conditions are not suitable. See the table below for all codes, their causes and possible solutions.
| Code | Cause | Solution |
|---|---|---|
| 204 | Calculation mistake | Repeat the measurement. Follow the correct measurement algorithm |
| 208 | Excessive voltage | Contact the service center |
| 220 | Low battery power | Replace or charge the batteries |
| 255 | The reflective signal of the surface to which the measurement is made is too weak. | Use another reflective surface, such as white paper or a special plate. |
| 256 | Very strong reflective signal of the surface to which the measurement is made (for example, a mirror or water) | Same as error 255 |
| 261 | Impermissible measuring range | Select a distance within the measuring range |
| 500 | Hardware error | Turn the device on and off several times, if the error repeats, contact the service center |
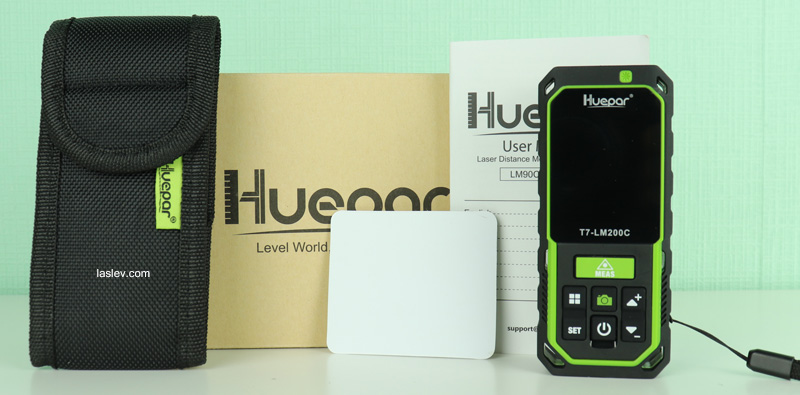
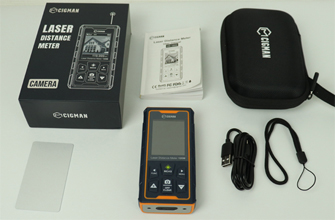
Package Contents
The Huepar T7-LM200C laser distance meter is shipped in a branded cardboard box:
- distance meter
- 3 х AAA NI-MH batteries
- charging cable
- hand strap
- multilingual manual
- reflective plate
- protective case
Pros and cons
Inexpensive for its functionality, built-in video camera with 4x zoom, the measured distance of 200 meters, excellent quality of construction and materials, there is a thread for attaching to a tripod, built-in inclinometer and spatial digital level, Bluetooth, color display, many rare functions, thoughtful usability, easy calibration, there is rotation of the screen, timer, three reference points, large internal memory.
You cannot turn on the timer when the video camera is activated, you cannot turn on the video camera when the screen is upside down.


Ever one of these ‘Laser distance meters’ is usable and reasonably accurate at 10 meters (32.8 feet). At this distance one can argue that the tape measure is more accurate and just as convenient. Using that distance for comparative testing is pointless.
Try testing them at 80-90% of the maximum distance (where they would actually be useful). Better yet try determining what their actual maximum range is. Thus far I have found the top end of the range specifications to be total and complete fabrications … with the possible exception of Bosch (who do not make such ridiculous claims for their maximum range).
It’s not all that clear-cut. As the distance increases, the error will increase in direct proportion, and this is absolutely normal! If you even take an ordinary tape measure, at a distance of 100 meters, it will give a much larger error than stated, because the sheet will be stretched. The maximum distance that is stated is not a fiction, it’s about something else. Measurement of any laser tape measure is directly affected by environmental factors. Roughly speaking in ideal laser conditions, for example, let’s take a dark basement, in such conditions every laser rangefinder will measure to its maximum stated value with minimum error, which cannot be said when measuring outside in sunny weather, etc. This applies to absolutely all laser rangefinders, not only Bosch, but also the leader in this area, Leica.