- Where to buy a laser level profitably and reliably?
- Technical specifications
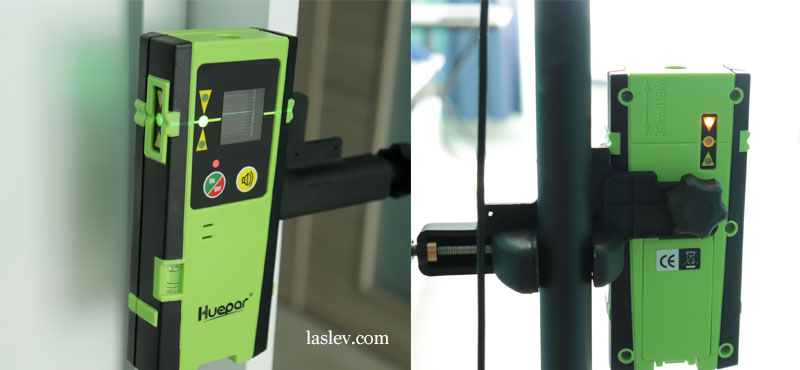
- Housing
- Build Quality laser level Huepar DT03CG
- Battery compartment and power options
- Electronic compensator
- Control laser level Huepar DT03CG
- Mode of operation with the receiver
- TILT function and inclination adjustment on the “X” and “Y” axes
- Declared accuracy
- Electronic calibration laser level Huepar DT03CG
- Electronic calibration algorithm on the “X” axis
- Electronic adjustment on the “Y” axis
- Adjusting the planes separately
- Setting the brightness of laser lines
- Adjustment algorithm
- Laser line thickness at different distances
- Comparison table with competitors
- Contents of delivery
- Laser Receiver
- Rotary base
- Pros and cons
- Video review Huepar DT03CG
Huepar DT03CG is a unique electronic 3D laser level with conical prisms and stepper motors on servo drives.
Laser levels with such an electronic compensator belong to high-precision professional and reliable devices.
There are also four major advantages that are not available to laser levels with a mechanical pendulum-type compensator on magnetic dampers:
- no small fluctuations (bouncing) of the laser line;
- you can use the buttons to set the slope on the “X” and “Y” axes up to 3.5°;
- there is an electronic calibration of the compensator using the buttons;
- you can adjust the brightness of the laser lines.
The only thing you will have to accept is a longer setting of the laser level – up to 15 seconds. This is probably the only negative. But this feature is inherent in all laser levels on servos. For more information about everything, see the review.
Where to buy a laser level profitably and reliably?
Technical specifications
- Accuracy: ± 1.5mm / 10m (± 1/17 “at 33Ft.)
- Working distance: 25m (85Ft.) Radius at 100 LUX
- Range with receiver: diameter 100m (330Ft.) (Receiver included)
- Compensator working range: ± 3.5°
- TILT function: advanced, with the possibility of angle correction
- Tripod thread: 5/8″
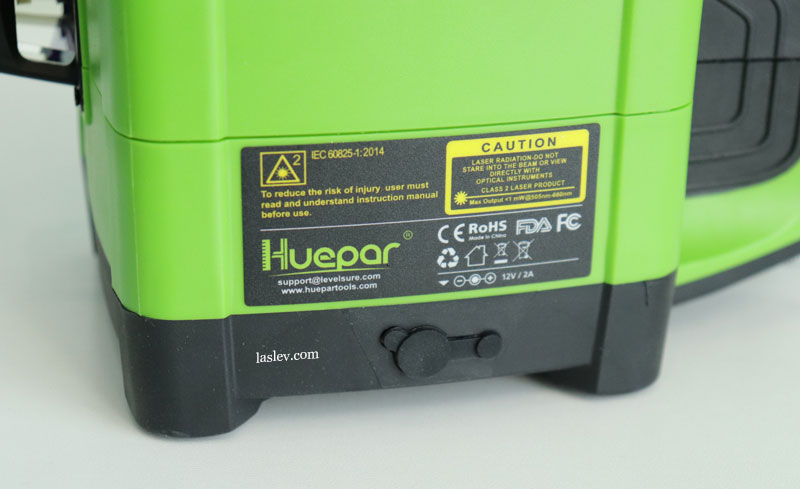
- Laser class: (IEC / EN60825-1 / 2014), <1mW
- Laser wavelength: 505-520nm (LD)
- Power supplies: Li-ion 7.4V 2600 mAh / 4AA * 1.5V / from the network
- Operating time from Li-ion battery: about 7 hours (all planes)
- Dimensions of the laser level with towers: ~ 18.5/12.5/14.5 cm
- Weight of the device with battery: 1377 grams
- Whole set weight: about 4.7 kg
- Working temperature: -10°С … +45°С
- Storage temperature: -20°С … +60°С
- Minimum distance from the horizon:
to the floor – 13.5 cm
to the ceiling – 1 cm - Distance from vertical to wall: 1 cm
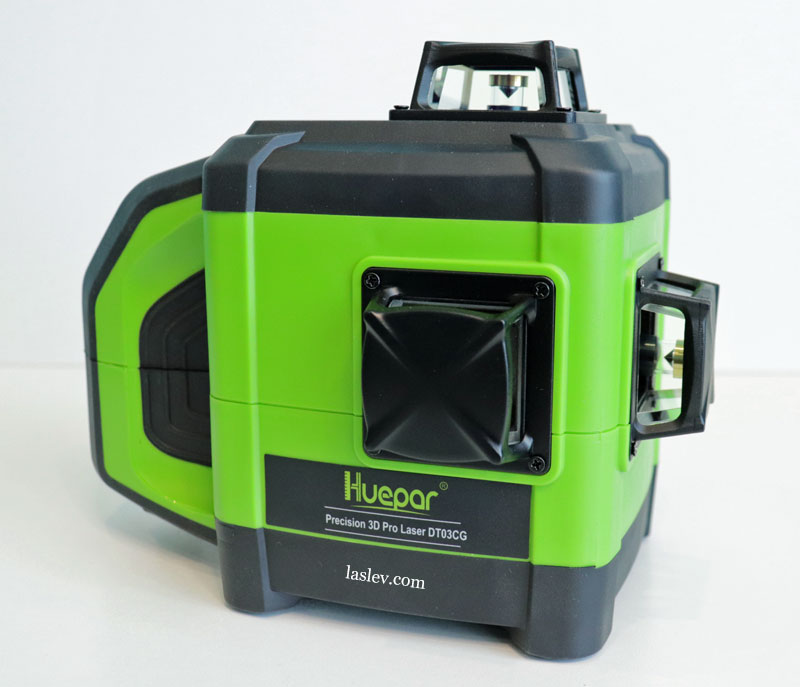
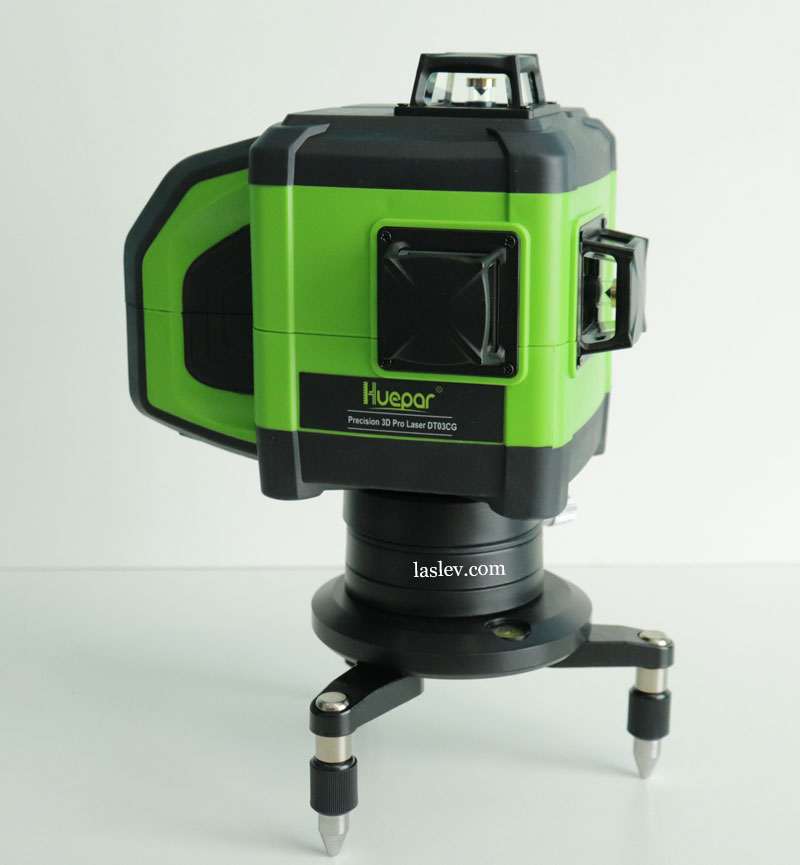
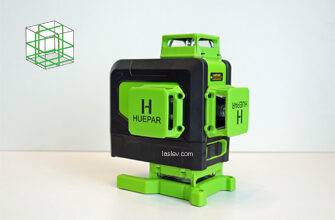
Housing
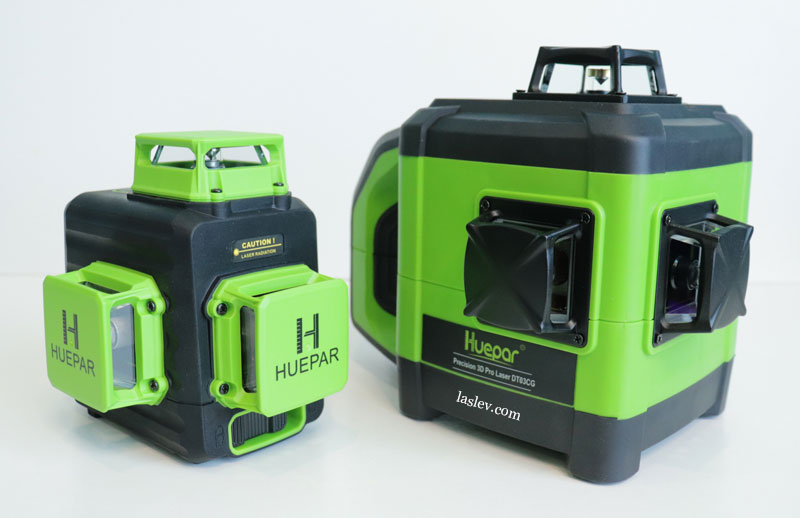
I must say that the laser level of the Huepar DT03CG is quite large. For example, if you compare it with the Huepar B03CG laser level, then the DT03CG model really looks massive against its background.
Build Quality laser level Huepar DT03CG
The housing is made of high-quality composite plastic, sometimes covered with black rubber. By the way, the entire bottom is also covered with rubber, so the device is very confident on slippery surfaces.
The entire housing consists of two large parts that have a good coupling between them.
A large thick handle, appeared most likely due to the lack of free space for a fairly large battery.
The handle does not have a through hole for the fingers to wrap around, so it is not very convenient to hold and carry the device for it, in my opinion.
The protective towers are made of metal and are attached to the housing by four screws through a rubber gasket.
Plus, the glass in the towers has a special coating, which reduces the number of small parasitic laser beams.

The Huepar DT03CG laser level has excellent LD laser modules. As declared by the manufacturer – OSRAM modules.
Of course, it is impossible to verify this, but what can be said for sure is that they are very carefully made, and project really thin, high-quality laser lines. (For the thickness at different distances, see below)
Moreover, you can also adjust the brightness of the laser lines. Thus affect the thickness of the lines, the lower the brightness, the thinner the line. See how to do this below.
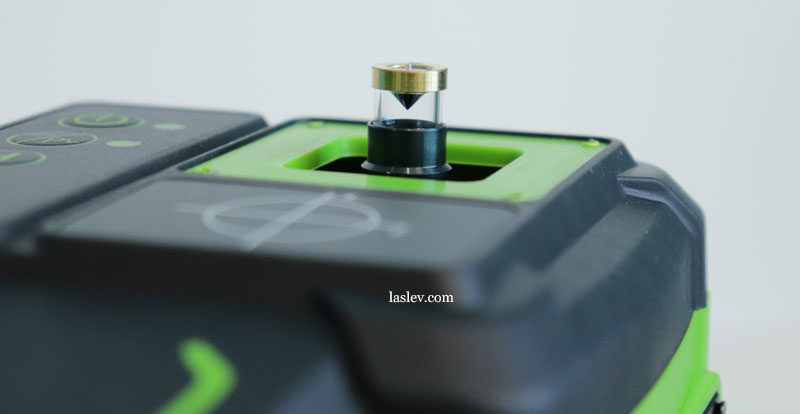
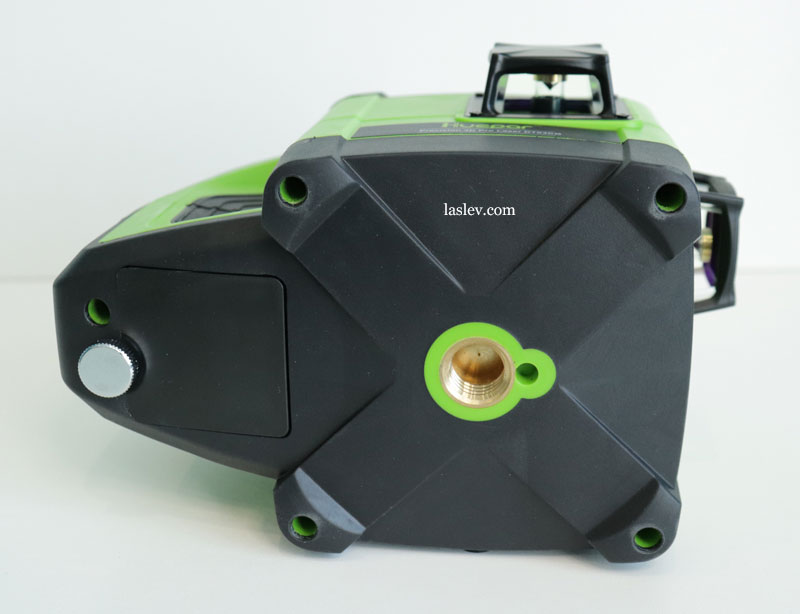
At the base of the device is a 5/8″ thread for mounting on a tripod or other optional accessories.
A neatly built-in brass bushing with a thread near it has an additional hole. This hole is made specifically for installation on the original rotary base, which is included in the kit, which we will consider later.
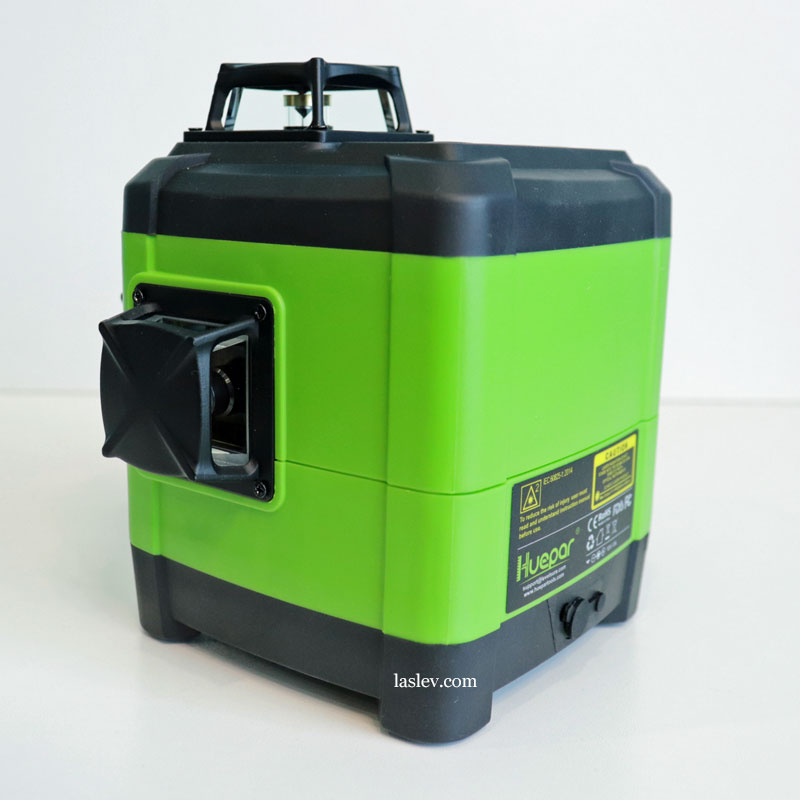
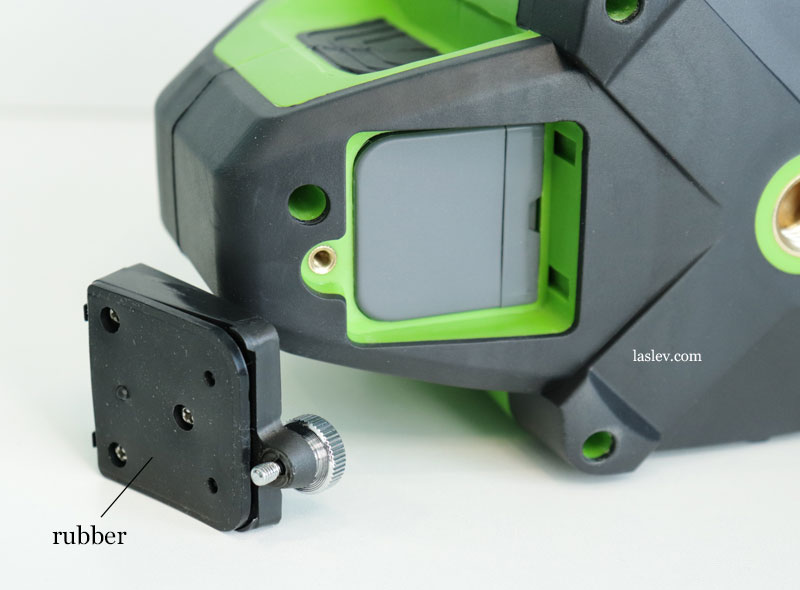
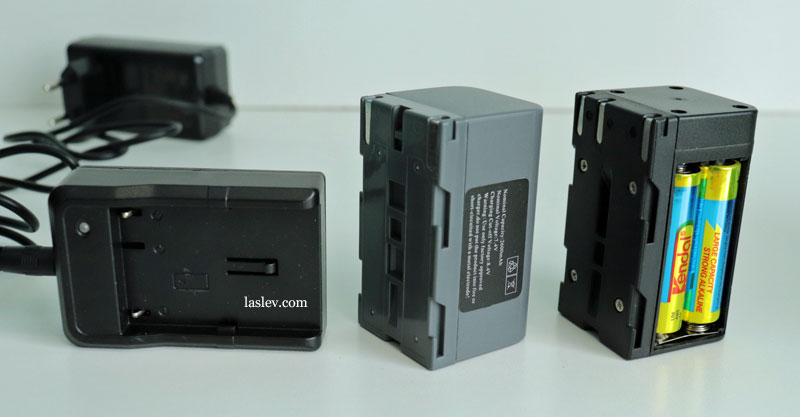
Battery compartment and power options
The battery compartment is located at the bottom of the handle cavity, and is very tightly closed with a cover on the pressure bolt. It is worth noting that the lid has a thick rubber gasket – this is undoubtedly a big plus.
On the other side there is a connector for connecting an adapter for working from the network, which is tightly closed with a rubber pad.
Important! The connector is only designed to operate from an outlet, not to charge the battery. Always remove the battery or batteries from the device.
In fact, the Huepar DT03CG laser level has the maximum power variation. That is, it can work from the mains, from a Li-ion battery, and from simple batteries inserted in a special adapter box.
The accumulator is charged separately from the device in the special charger which is included in the package.
For trouble-free operation, it would be ideal to buy a second additional hot-swappable accumulator. Although, in principle, you can do with simple batteries while the main accumulator is being charged.
You will not be able to work from the mains and charge the accumulator at the same time, since the same wire is used in both cases.
A full charge of the Li-ion battery takes about 5 hours, so in my opinion the best solution is still an additional accumulator.
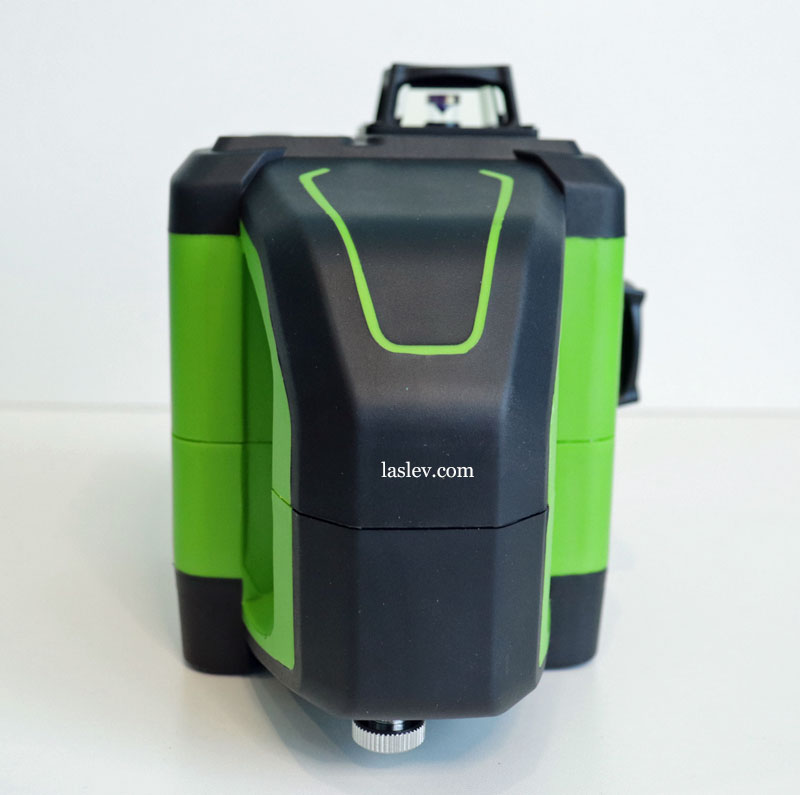
Electronic compensator
The Huepar DT03CG laser level has an electronic compensator with stepper motors on servos with built-in inclinometers.
The essence of such compensators is quite simple: based on information from thermostable tilt sensors, stepper motors use servos to set the pendulum to a vertical position with a minimum error.
In the photo, you can see that the entire system stands on metal supports, this is a serious difference compared to plastic supports.
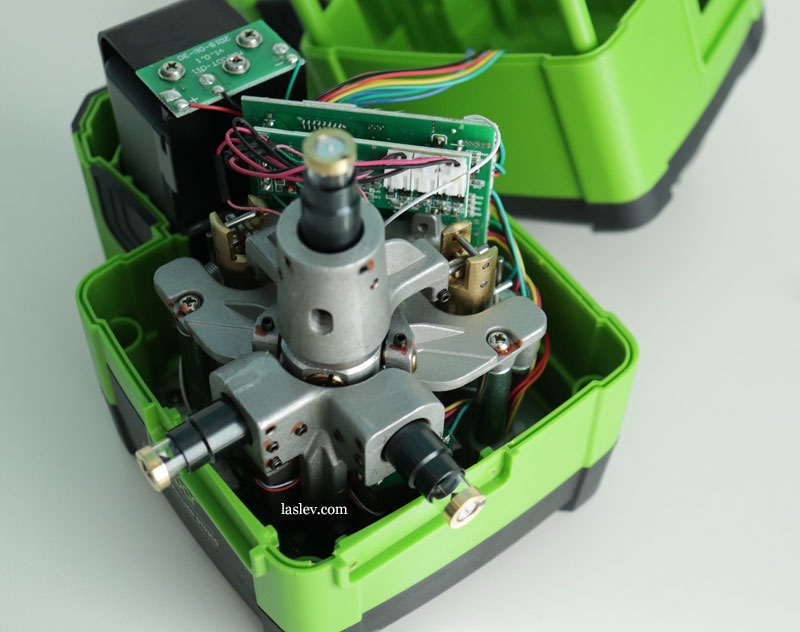
As practice shows, such compensators have proven themselves well in terms of reliability and practicality.
All such automatic leveling systems are anti-shock systems. With such laser levels, it is much more comfortable to work on vibrating surfaces and in windy weather outside. What, unfortunately, can not boast of laser levels with standard pendulum-type compensators with magnets.
Another simply fat plus of such compensators is that the pendulum in the device is constantly clamped, so that the laser lines do not have small twitches.
The range of operation of the compensator is 3.5° in all directions, the maximum installation time is up to 15 seconds.
If the maximum slope is exceeded, a visual alarm will automatically trigger, at which the laser lines will start flashing rapidly. Place the device on a flatter surface and wait for the automatic alignment. When fully aligned, the red diode on the top will stop flashing, and will be lit constantly.
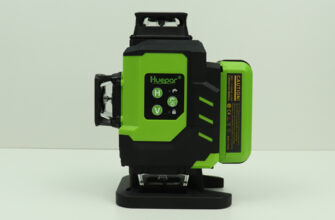
Control laser level Huepar DT03CG
All control of the device is done using the four buttons on the top. The layout of the “X” and “Y” axes is also shown on the top for greater convenience when adjusting and setting the tilt.
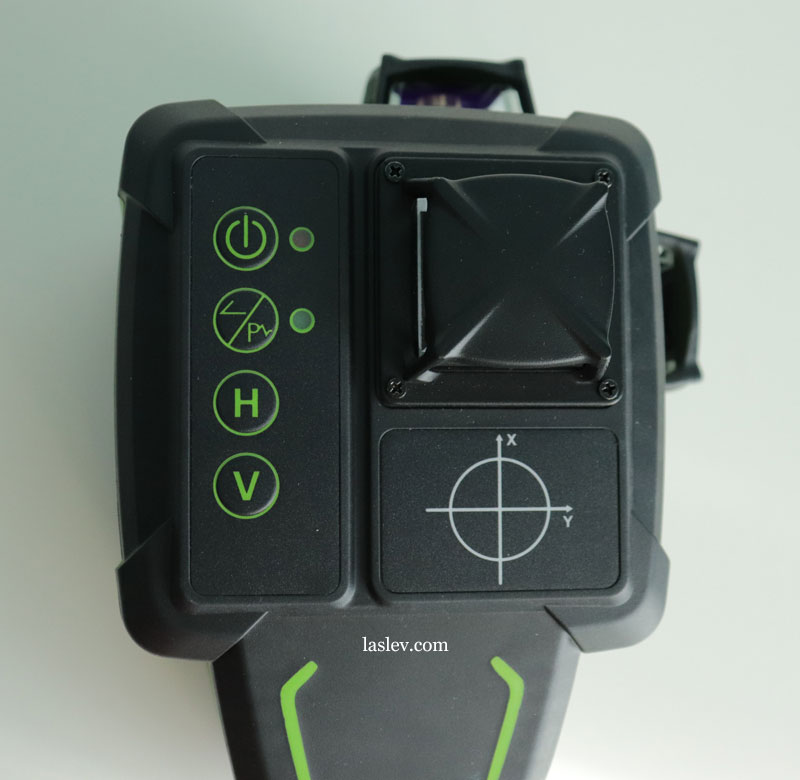
And so on in order:
The “on” button – when it is briefly pressed, the laser level turns on and the horizontal plane immediately lights up. A red LED starts flashing on the side of the button. When the level is set to the operating position, the red LED will be lit continuously.
The “H” button – disables and enables the horizontal plane.
The “V” button is responsible for switching planes:
- pressing – enables the front vertical;
- pressing – turns on the second vertical, 2 verticals are lit;
- clicking – disables all vertical planes.
The “P” button is responsible for two functions: switching to the receiver mode and for the TILT mode with slope control on the two axes “X” and “Y”.
Mode of operation with the receiver
To switch to this mode, turn on the laser level, select the desired number of planes, and briefly press the “P” button. A green indicator will light up to the right of the button.
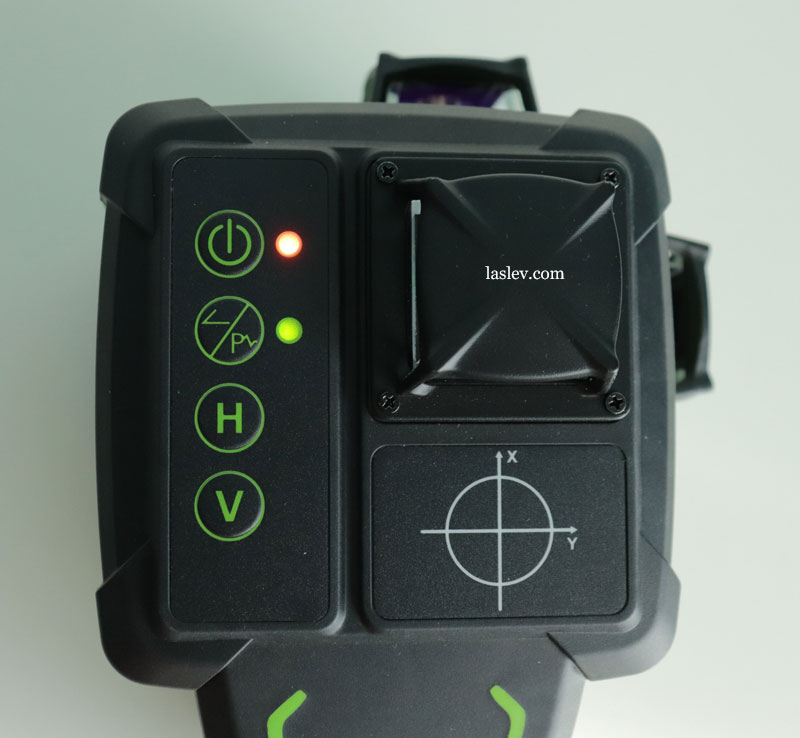
TILT function and inclination adjustment on the “X” and “Y” axes
Hold down the “P” button for 5 seconds. After that, the green indicator on the right will start blinking rapidly. Now you can install the device at any arbitrary angle.
You can also use the “H” and “V” buttons to control the tilt along the “X” axis up to 3.5°, while the lines will flash at a frequency of 1 time in 5 seconds. This is done so that you remember that you are in a special manual installation mode. The buttons can only control the tilt within 3.5°, so when this angle is exceeded, the lines will start flashing very quickly.
To switch to setting the slope on the “Y” axis, while remaining in the same mode, briefly press the “P” button. The green LED on the right will start flashing slowly – this means that the compensator has switched to setting the slope on the “Y” axis. The tilt can also be adjusted with the “H” and “V” buttons.
There are two ways to exit this function:
- turn off and turn on the Huepar DT03CG laser level;
- hold down the “P” button for about 5 seconds.
*Note. If you need to work with the receiver in this mode, first turn on the receiver mode, and only then activate the TILT function.
All buttons on the control panel are involved in the electronic calibration of the laser level Huepar DT03CG, its detailed algorithm will be discussed below.
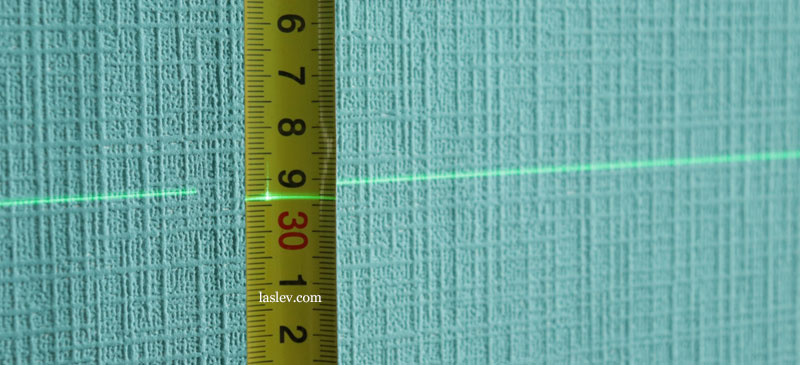
Declared accuracy
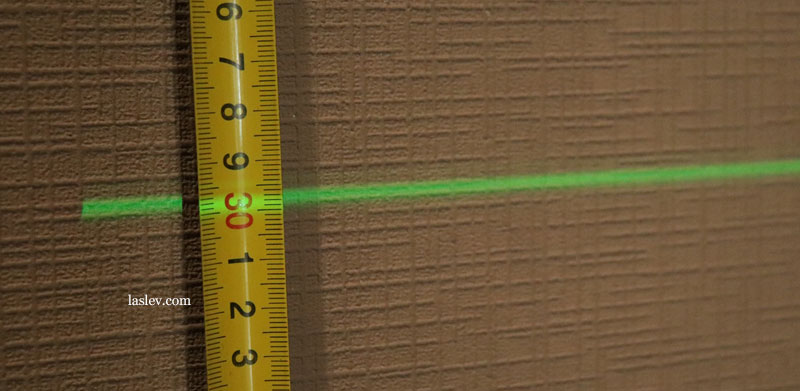
As you remember, the declared accuracy of this laser level is ± 1.5 mm/10m (± 1/17″ at 33Ft.). This is really a professional high accuracy, but checking the accuracy at 10 meters showed that it is even more accurate than declared by the manufacturer.
If someone does not know how the deviation is calculated for laser levels with cone prisms, then it is considered in two directions.
At 10 meters, the deviation was 1 millimeter. Thus we get: 1mm by 20 meters. The final deviation of the horizontal plane: 0.05 mm/m or 0.5 mm/10 meters. Agree very cool!
All verticals were checked by a thread plumb line. The entire thread from bottom to top was illuminated by a laser line, which also indicates an excellent vertical adjustment.
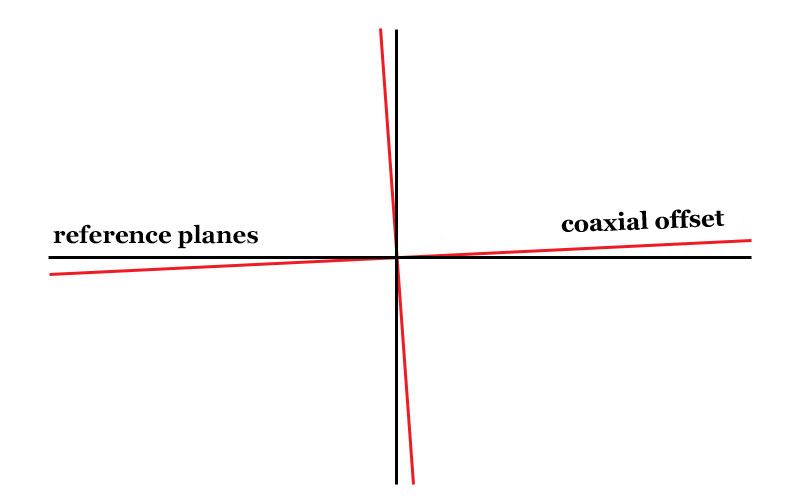
Electronic calibration laser level Huepar DT03CG
If the planes at the Huepar DT03CG laser level are coaxially offset, you can adjust them yourself using the buttons.
The process is quite simple, but you need to know in what order, and which buttons to press.
And so, let’s go through the whole process step by step.
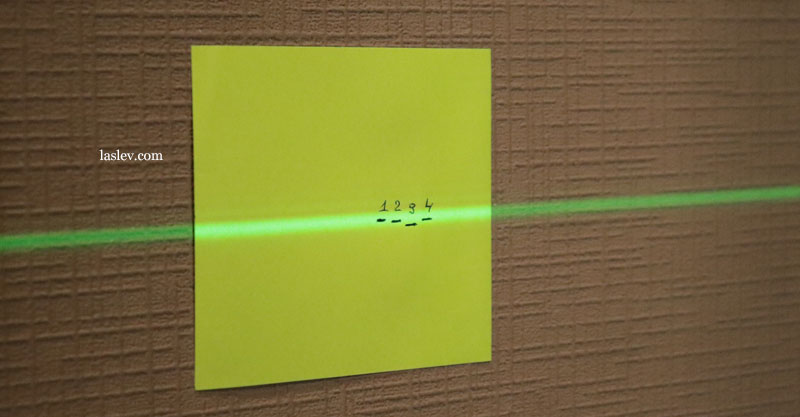
To start, set the laser level at a distance of 10 meters from the wall, this is a more convenient distance to adjust than 5 meters.
Next, you need to directly check the laser level for accuracy, and find out how and how much the horizontal plane tilts in conjunction with the verticals.
For example, let’s analyze such a coaxial offset: the horizontal plane has a slope from the desired horizon by 3mm. Accordingly, the lateral vertical will have the same deviation of 3mm from the desired vertical (you can use a plumb line to check).
The second, the front vertical will go along the plumb line, since it tilts along its own axis. That is, it will not be used. We analyze one of the possible coaxial offsets, there can be many of them.
If you also have a second vertical that does not show exactly, then you need to adjust it separately, this setting will be discussed below.
Electronic calibration algorithm on the “X” axis
Step 1. Turn on the laser level, select the required number of planes, and wait for the compensator to be installed. In this case, it is enough to select only the horizon, after setting it up, it is enough to check the wrong vertical again – it should also be in the correct position.
Step 2. Hold down the power button and hold for 5 seconds until the red LED flashes very fast.
That’s it, you’ve entered the X-axis calibration mode.
Step 3. Use the “H” and “V” buttons to lower or raise the horizon. The adjustment step is very small, for example, at a distance of 10 meters from the wall – 40 clicks on the “H” button raises the leading edge of the horizontal plane by 2.5mm (40 clicks on the “V” button also lowers the horizon).
20 clicks – lowers or raises 1.25mm. 80 clicks – on 5mm, and so on.
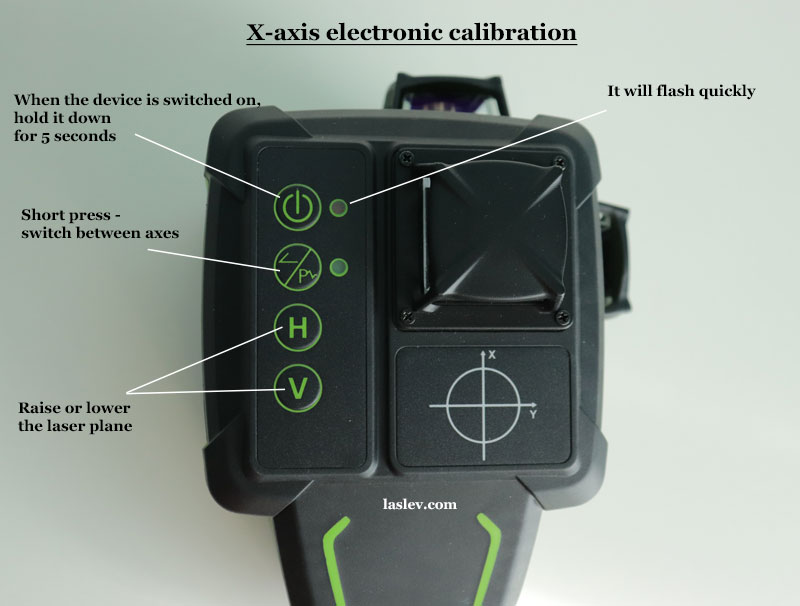
Further, without turning off the level, we go to the “Y” axis.
Electronic adjustment on the “Y” axis
After setting up the position of the horizontal plane on the “X” axis, switch to the “Y” axis. To do this, briefly press the “P” button, after which the red diode will blink slowly. This means that you have switched to the Huepar DT03CG laser level calibration mode on the “Y” axis.
The further algorithm is the same: use the “H” and “V” buttons to raise or lower the plane along the “Y” axis.
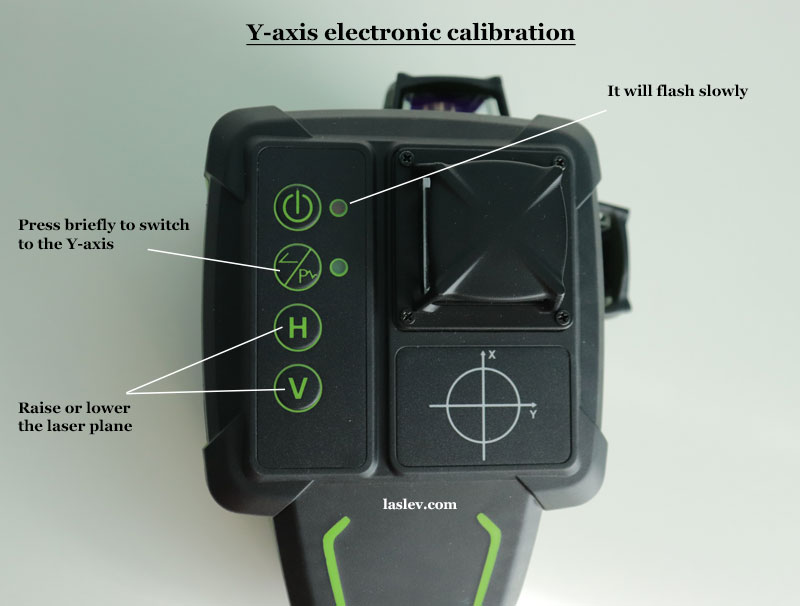
Important! When the calibration is complete, press the power button again for 5 seconds to allow the device to remember the new settings. If this is not done, then the next time you turn it on, everything will return to its original values.
Adjusting the planes separately
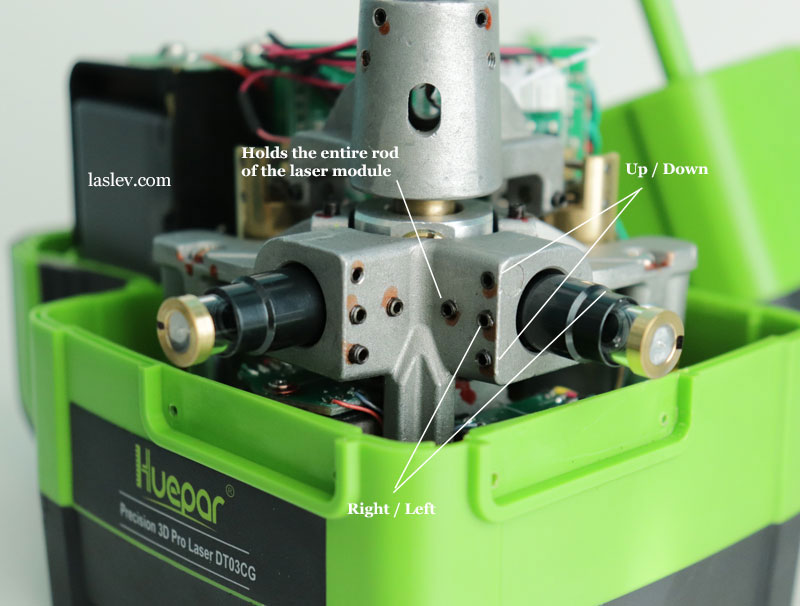
The principle of adjusting the position of the laser modules separately is very similar to the setting of the Huepar 603CG laser level, which has already been disassembled.
There are small differences in the Huepar DT03CG laser level, they only relate to the module that projects a horizontal plane.
The small adjustment bolts for the hexagon are located in a circle.
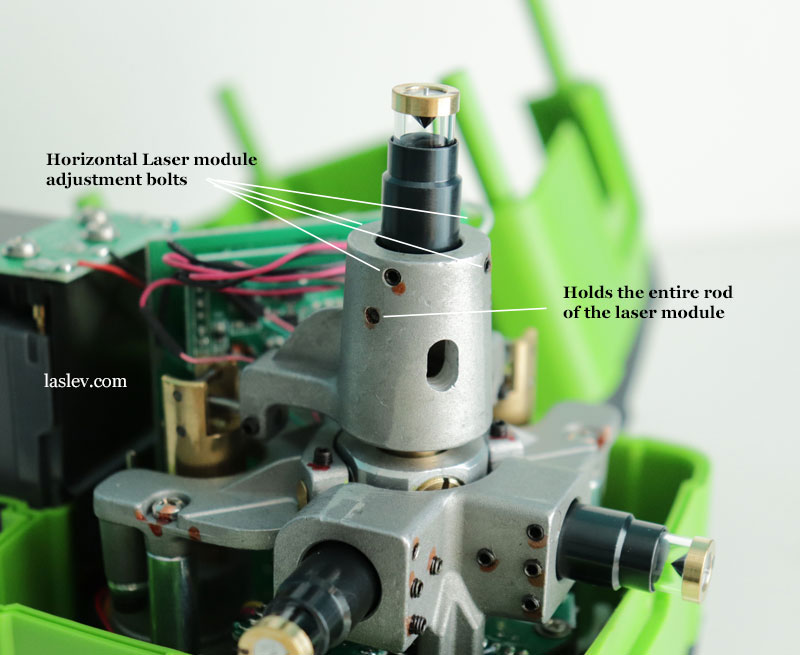
The opposite bolts are antagonists. That is, if you need to tilt the module in some side, then on the one side we loosen the bolt, on the other we tighten it.
There is another bolt that is below the other four. It does not need to be touched, it holds the entire rod of the laser module.
*Note. It is necessary to twist the bolts just a little bit.
For modules projecting verticals, the bolts are arranged as standard, as in many other laser levels.
The essence remains the same: on the one side we slightly unscrew it and on the other we clamp it.
The photo shows which bolts are responsible for which slope of the laser module.
The Huepar DT03CG laser level setting was sorted out. I can’t say it’s complicated. As a rule, there is a coaxial offset, and it is easier to correct it with the help of electronic calibration.
Setting the brightness of laser lines
In the Huepar DT03CG laser level, it is possible to adjust the brightness of the lines within five gradations of brightness. In some situations, this function can significantly save battery power.
Adjustment algorithm
- Turn on the laser level.
- Press and hold the “V” button for 5 seconds until the red light turns off. That’s it, you’re in brightness adjustment mode.
- A short press of the “H” button increases the brightness. A short press of the “V” button lowers the brightness.
- To remember the new brightness, hold down the “V” button for 5 seconds until the red indicator lights up again.
If you do not want the device to remember the new brightness data, then simply turn off the laser level.
The brightness in the receiver mode is not adjustable and is constant.
Laser line thickness at different distances
This model has excellent LD laser modules that project a clear, thin line. From this test, you can see for yourself.
So, at a short distance of 1 meter, the thickness of the laser line is 1mm.
At an average distance of 5 meters, it is also about 1 millimeter.
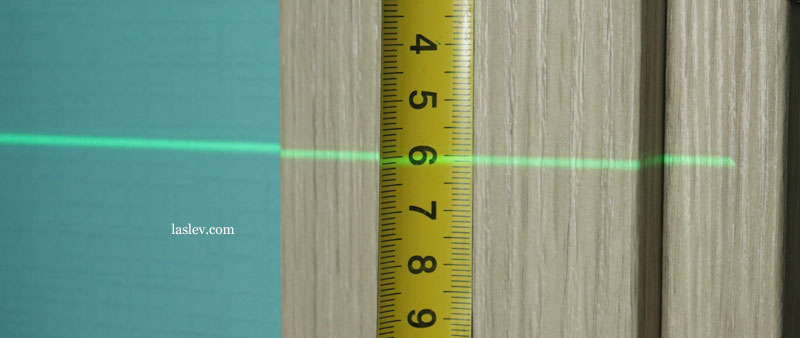
And at a far distance of 10 meters from the wall, the line thickness is less than 3 millimeters! This is a really cool result.
Comparison table with competitors
| Technical data | Huepar DT03CG | Firecore FIR-GL8-EA |
|---|---|---|
| Accuracy, mm/m | 1.5mm/10m (± 1/17 “at 33Ft.) | 2mm/10m (±1/13″at 33 ft) |
| Compensator range, ° | ± 3.5 ° | ± 4 ° |
| Range without/with receiver | 25m (85Ft.) 100LUX 50m (165Ft.) Radius | 25m (85Ft.) 100LUX 50m (165Ft.) Radius |
| Dust and moisture protection | IP54 | IP54 |
| Tilt function | + | + |
| Working with the detector | + | + |
| Power supplies | Li-ion 7.4V 2600 mAh / 4AA * 1.5V / mains | Li-ion 2700 mAh 7.4V / mains |
| Receiver included | + | + |
| Working temperature | -10°С to + 50°С | 0°С to + 45°С |
| Laser color | green (LD) | green (LD) |
| Prisms | conical | cylindrical |
| Setting the slope along the X/Y axes | + | + |
| Electronic calibration | + | + |
| Brightness Adjustment | + | no |
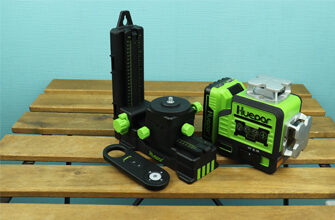
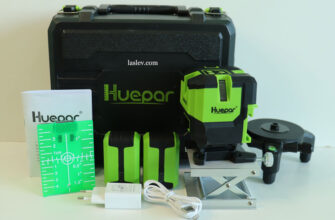
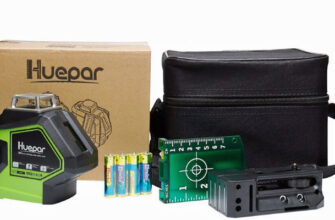
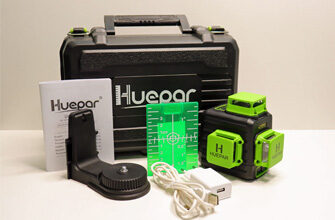
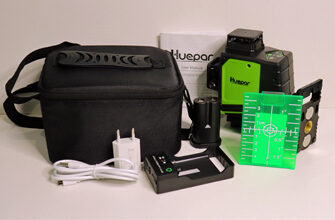
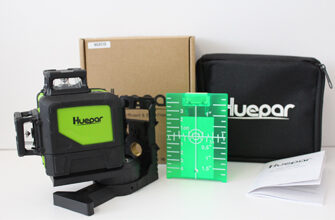
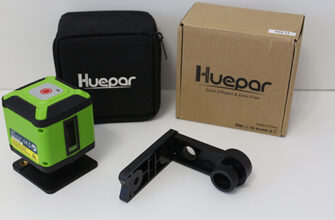
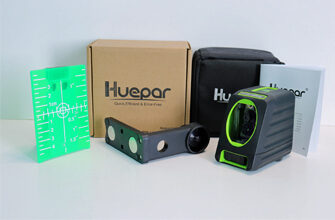
Contents of delivery
The Huepar DT03CG laser level is delivered in a large, powerful case. Inside is a dense, but soft material, in which neat cells are made for each accessory and device.
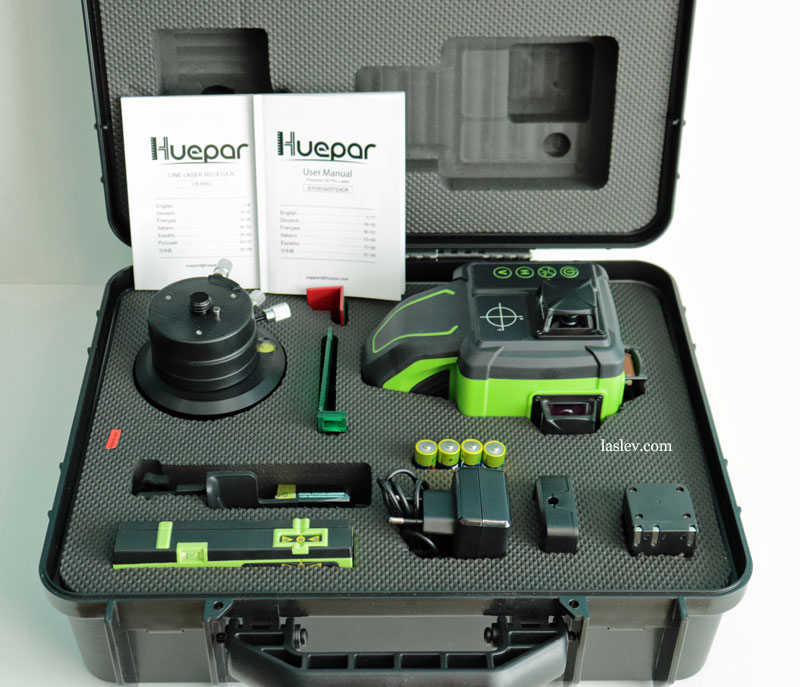
The case is closed with two massive latches with buttons.

The kit includes:
- electronic laser level
- laser beam receiver
- mounting the receiver on a geodetic rail
- 9V battery (6LR61) for receiver
- 4 batteries AA * 1.5V (LR6)
- Li-ion battery 7.4V 2600 mAh
- mains adapter
- charger
- box adapter for 4 AA batteries
- magnetic green target
- angled plastic target
- swivel base
- instructions in different languages
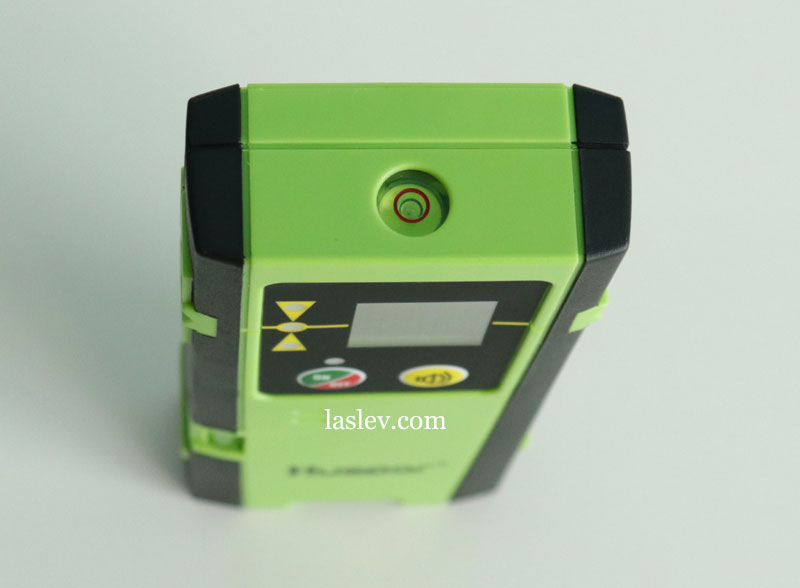
Laser Receiver
The Huepar LR-6RG laser receiver has two buttons: an on/off button and a mute button.
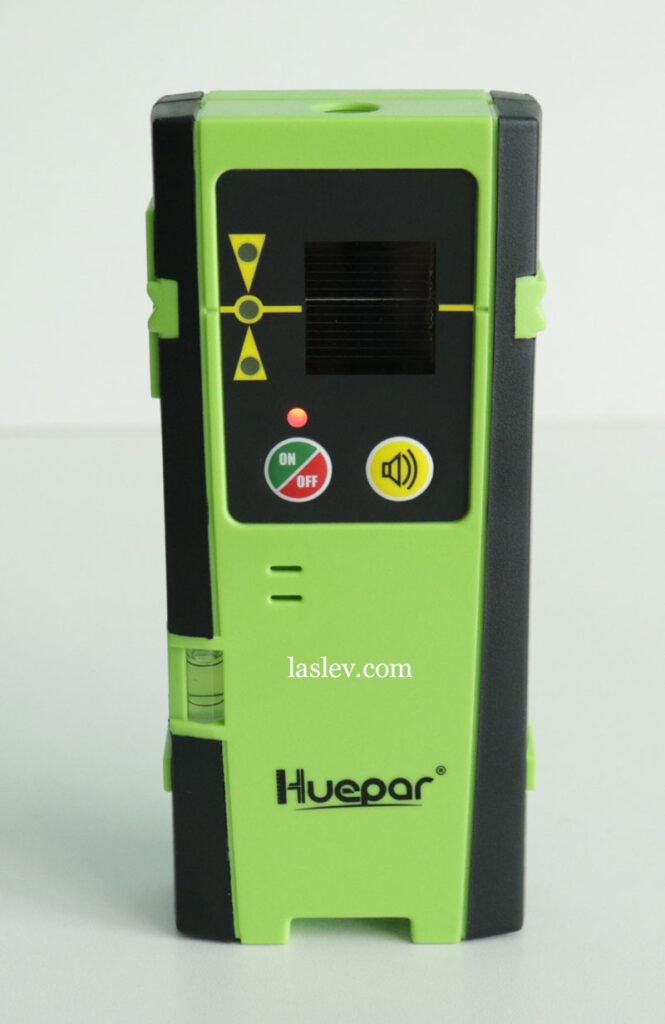
There are also two bubble levels on the front side and on the top, for a more convenient installation in the space.
Using the receiver is very simple and intuitive. On the street in sunny weather, when the laser line is not visible, you are in the intended area where the line passes, move the receiver up and down.
The photocell on the receiver detects the laser beam and shows the exact passage of the line with three indicators.
Two indicators at the top and bottom show where to move the receiver to catch the center of the laser line. The indicator in the middle shows that you have identified the center of the passing laser line. Then just make a mark, and so mark all the necessary points.
Three indicators are duplicated on the side and on the back of the receiver for easy reading.
Rotary base
Now let’s take a closer look at the rotary base. It is not made quite usually, as we are used to.
What is noteworthy is that the base has folding supports, which in the opened position add stability, and allow you to install the rotating base on a conventional geodetic tripod for optical levels, on a 5/8″ thread.
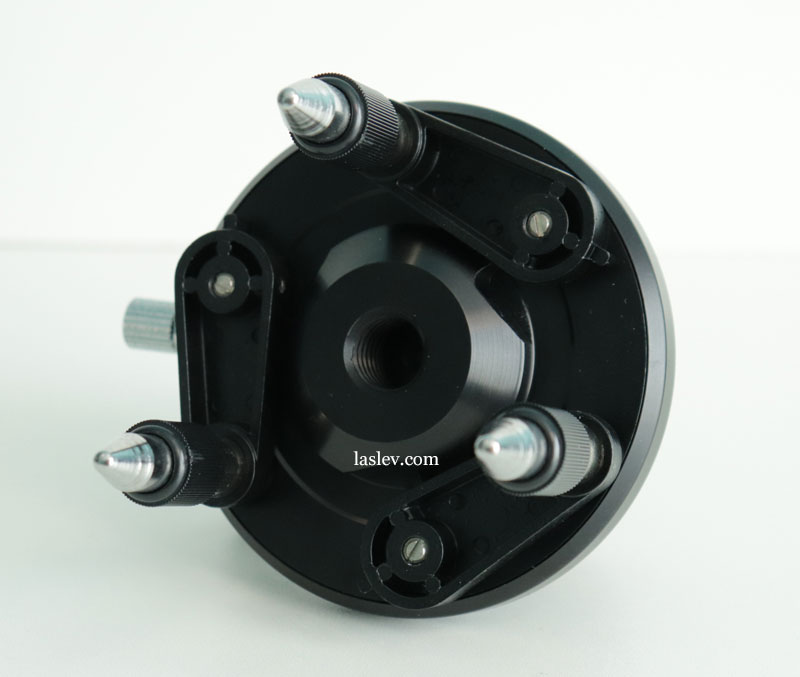
A spatial bubble level is built into the metal base of the treger.
Next comes a plastic cylinder consisting of three sections, with three “twists”.
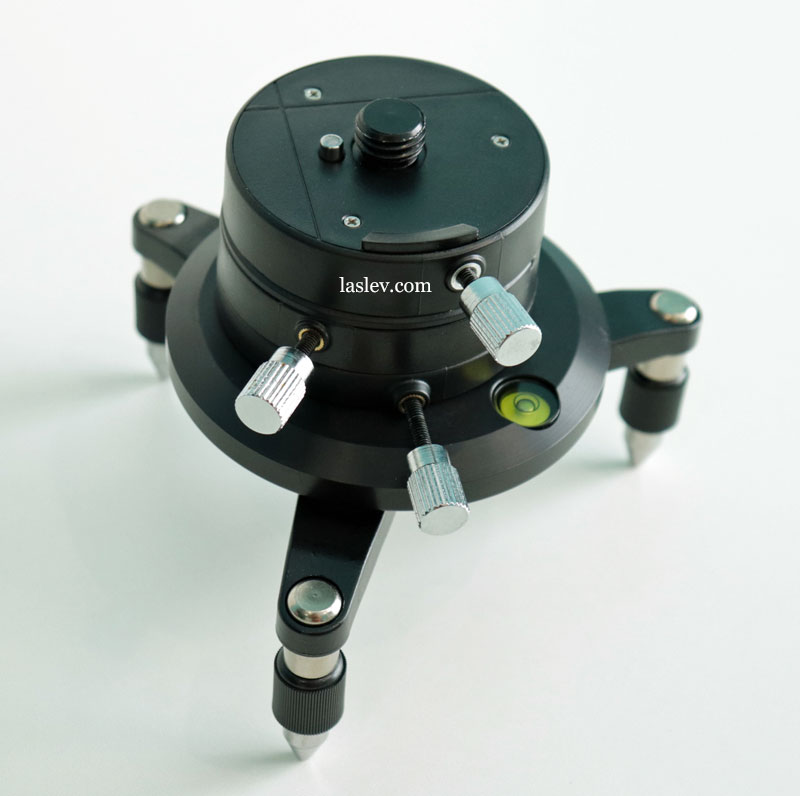
The lowest “twist” locks the entire cylinder. That is, the entire cylinder of 3 sections can move around the entire metal base, and rotate around its axis, including.
The “twist” in the middle moves the upper section back and forth by 5 millimeters.
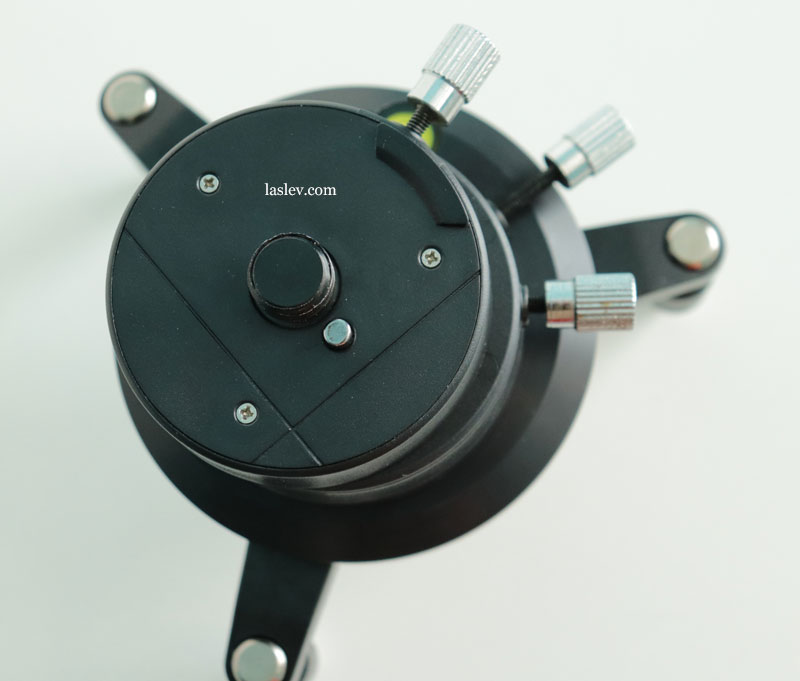
And the upper “twist” fixes the stanovoy screw. That is, to install the laser level on the rotary base, you need to loosen the upper bolt and fully remove the adapter. Further, screw it into the thread on the device, and install it back.
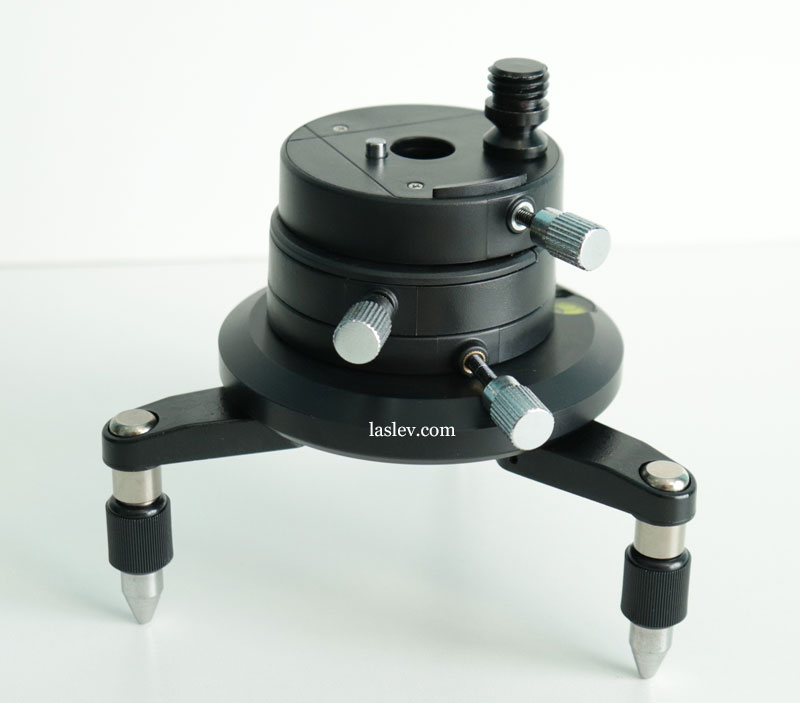
Thanks to the additional guides on the surface of the rotary base, and the clamping bolt – the Huepar DT03CG laser level is perfectly fixed.
Pros and cons
Inexpensive for this class of laser levelers, high accuracy, electronic compensator with calibration capability, 3х360 degree planes and a full plumb line, tilt control up to 3.5° along the “X” and “Y” axes, TILT function, receiver operation mode, maximum power variability, high quality of assembly and components, thin green laser lines, receiver included, glass with spraying, battery cover with rubber gasket, no twitching of laser lines, brightness adjustment of laser lines.
uncomfortable carrying handle.

Great site – thanks for all your efforts!! In your YouTube review of the DT03CG, there is a comment that one person saw significant accuracy fluctuations due to changing temperatures. Is that an expected or possible issue with the electronic compensators, such as the DT03CG?
Also, do you think that this unit performs much better than the S04GC in an outdoor setting with sun?
Hi! As the manufacturer says the sensors inside the DT03CG are heat-resistant, what exactly he had there is hard to say, maybe there was a defect, maybe he did something wrong.
2. You have to work with a receiver to be comfortable outdoors, and both laser levels have that mode. DT03CG has the receiver in the set, S04CG needs to buy it separately. The distance when working with a receiver is about the same. If you are talking about working outdoors without a receiver there won’t be much difference either. There is a simple principle: the brighter the daylight, the worse the laser is seen, and the darker it is, the farther away it is seen. That is, laser line visibility and distance will be directly proportional to the degree of illumination.
Hi there Sergei.
Well you seem to really know your stuff and I appreciate your reviews. It would be nice if you dated them.
Is the so3cg still your top Huepar choice. They don’t seem to have it listed on their website yet- Only the so4cg.
Is the servo system employed by the dto3 a better solution than a pendulum? Obviously it’s less prone to external movement but seems like there may be more to go wrong. Plus the dto3 seems to be quite a large beast!
Regards Jonathan
Hi! The DT03CG is really not small. The electronic compensator, it’s a pretty reliable design, with some advantages over the mechanical compensator. In fact, all rotary laser levelers have the same compensator, and it’s been working for years. Of course there are problems everywhere, but this is all part of the “statistical error” so to speak.
Electronic compensators are more accurate than conventional ones. In general, if to cut a long story short, the electronic compensator is certainly more advanced.
The S03CG and S04CG are in a class of their own, it’s rare that a laser level has a screen that displays a digital angle value in two axes.
Comparing the S03CG to the DT03CG isn’t quite right, they have significant differences in compensators. Write down the pros and cons of each one and make a choice because you cannot say which one is better, they are all great!
Just curious, did you try out the AA batteries? They don’t work for me. I tried several sets and trying to figure out if its the holder or something in the laser level..
Hello. Yes, I tried it, it works fine. Look at the contacts, both in the battery box itself and when installing in the instrument.
You should really give a ranking….. lots of detail, but its needs a conclusion