- Where to buy a laser level profitably and reliably?
- Technical specifications
- Housing laser level Zokoun IE16R
- What is the second horizon for?
- Build Quality
- Battery compartment and accumulator
- Connector on the housing and thread in the base
- Disassembly and adjustment
- How to adjust the Zokoun IE16R laser level
- How to disassemble
- Laser modules
- Compensator laser level Zokoun IE16R 4D 16 Lines
- Control elements
- Algorithm for switching planes
- Enabling the receiver operation mode
- TILT function
- Thickness of laser lines at different distances
- Possibility of mounting on various tripods
- Contents of delivery
- Pros and cons
- Video of the identical Clubiona E16R laser level
Zokoun IE16R – projects 16 laser lines as indicated by the manufacturer, but it is more accurate to say that it projects 4 planes of 360 degrees. Two vertical planes, which in addition to everything at the intersection points on the ceiling and floor form a plumb point, and two horizontal planes are also 360 degrees.
4D laser levels are appearing more and more in different price categories. The cheapest for today is HILDA 4D 16 Lines, but for this price you will need to put up with various shortcomings of the model.
If we talk about the 4D laser level Zokoun IE16R, then it belongs to the middle price category and is quite not bad quality, but there are better. To date, can distinguish three higher-quality competitors. This is the FUKUDA MW-94D-4GX 4D laser level, the recently released Huepar 904DG, and also the most functional novelty with Bluetooth, a tilt sensor on two axes, and with remote control from the phone – the Huepar S04CG laser level.
Where to buy a laser level profitably and reliably?

This model is ranked in the top 5 best 4D laser levels.
Technical specifications
- Projection accuracy: ± 0.3mm / 1m (How to calculate accuracy)
- Plumb bob accuracy: ± 0.4mm / 1m
- Range without receiver: 25m (* depends on the degree of illumination)
- Range with receiver: 40 – 60m
- Compensator range: 4 ° ± 1 °
- Power supply: Li-ion battery 5000 mAh 3.7V
- Working time: 5.5 hours (all planes)
- Protected from dust and moisture: IP54
- Laser: Class 2 (IEC / EN60825-1 / 2014), <1mW, 520 nm
- Tripod thread: 1/4 “, for additional mounts 5/8”
- Working temperature: from -10°С to + 50°С
- Storage temperature: from -20°С to + 70°С
- Dimensions: L.W.H. – 12.7 cm / 8.4 cm / 15 cm (dimensions taken with towers)
- Weight with battery: 606 gr.
- Minimum distance from vertical to wall: 1 cm
- Minimum distance from the horizon:
to floor (lower module): 1.5 cm
to ceiling (lower module): 13.3 cm
to floor (top module): 14.1 cm
to ceiling (top module): 0.8 cm - Distance between lower and upper horizon: 12.5 cm
Housing laser level Zokoun IE16R
The design of the Zokoun IE16R laser level housing essentially resembles the usual 3D laser levels with cone prisms, which have three towers. For example, you can take a professional model of the Huepar 603CG level, in fact, there are a lot of them, most of them can be viewed on the website.
All the difference is in the fourth tower from below, from which a second additional horizontal plane is projected also at 360 degrees.

What is the second horizon for?
The question arises: “why do we need a second horizon?” The answer is simple: “for more convenience!”
Example, when installing stretch ceilings, it would be more convenient to make the marking as close to the ceiling as possible. To do this, simply turn on the upper horizontal plane and quickly mark the horizontal level around the entire perimeter of the room, with a minimum distance from the ceiling – 0.8 centimeters.
For concrete screeds, installation of various floors or laying floor tiles, it is much more convenient to project a horizontal plane that goes as close to the floor as possible. In this situation, the second lower horizontal plane comes to the rescue.
Of course, everything can be done with one horizon, just move the points with a tape measure to any desired height. Here we are talking about banal convenience, and as a result, higher productivity.
Build Quality
Laser level Zokoun IE16R is made of ABC plastic, the coupling of the parts is not bad enough. The upper black part to the touch more like soft plastic than rubber.

Battery compartment and accumulator
In the lower part of the housing there is a battery compartment, which is closed with a removable plastic lid.
One of the disadvantages is the lack of a rubber gasket on the lid.

The battery compartment is designed only for the accumulator, simple batteries can not be inserted there.
This is also a small minus. But you can additionally buy a second battery and, if necessary, simply swap them. And if you consider that the Zokoun IE16R still works from the network, then the issue of uninterruptible power supply can be completely closed.
The lithium-ion battery included in the package has a capacity of 5000 milliampere hours. It can be charged both inside the device and separately via a modern USB Type-C connector.

Connector on the housing and thread in the base
On the side of the housing, under the rubber cover, there is a USB Type-C connector for working from the mains or charging the battery installed in the device. And as you guessed it, the charger also has a plug of the same name.

The lower “paw” is neatly mounted a brass bushing with a 1/4-inch thread, for mounting on various tripods and accessories included in the kit, which we will consider below.

Disassembly and adjustment
I must say that the 4D laser level Zokoun IE16R is conveniently disassembled and adjusted.
How to adjust the Zokoun IE16R laser level
If you need to set up a separate plane, you do not need to disassemble the entire housing. It is enough to remove the tower of the module that needs to be adjusted.
We unscrew the protective tower, and four adjustment screws open in front of us, which adjust the positions of the laser tube.

The laser module from the lower horizon also has four adjustment bolts, but as a rule it is adjusted by the position of the pendulum, and then the other planes are adjusted separately.
Important! These four bolts need to be twisted a little bit and watch as the plane moved. If the shift is not going to the right place, then return the bolt to its original position, and try another bolt. At first, you will have to run, then it will become easier and clearer.
And so, with a separate adjustment, everything is clear. If we talk about adjusting the pendulum, then here, too, everything is very simple!
For example, after checking it turned out that all the planes are tilted in one direction. In this situation, you do not need to adjust each plane separately! You just need to adjust the position of the pendulum on which all the laser modules are installed.
There is also no need to disassemble the housing. It is enough to remove two protective towers: in front and on the side of the vertical planes.
After that, the hexagon can reach the two adjustment bolts of the pendulum: transverse and longitudinal. Their movement in the body of the pendulum will change its center of gravity. Photos of the bolts will show on the disassembled device, so they will be better visible, but to get to them, just remove the towers.
To adjust the lateral tilt, turn the transverse adjustment bolt.

If the slope of the horizontal plane is up or down, as well as the front vertical, then it is necessary to twist the longitudinal adjustment bolt of the pendulum.

How to disassemble
For disassembly, you need to unscrew the 4 bolts from the bottom. Two are in the battery compartment, but to unscrew the other two, you first need to unscrew the large lower tower.

After that, we carefully remove the upper part of the housing, and get full access to the insides. The advantage is that the laser level remains working when disassembled.
The compensator stands on an additional plastic frame, it is certainly not metal, like the Huepar laser levels, but still also a convenient design.
It is worth noting a couple more moments:
- Pretty good execution of all internal components.

- The protective towers are attached through rubber gaskets.

Laser modules
The Zokoun IE16R laser level is equipped with LD laser modules of not bad quality They are all marked and have a neat appearance, which can not be said about cheap modules.

Compensator laser level Zokoun IE16R 4D 16 Lines
The compensator in this model is a mechanical pendulum type with magnetic dampers.
The only thing that distinguishes it from many of the same mechanical compensators is that the magnets for a faster stop of the pendulum are shifted to the rear. Usually the magnets are placed under the pendulum.
By the way, it is because of the unstable magnetic field that you can often see very small jumping of laser lines. This effect is completely absent only in laser levels with an electronic compensator on servos, for example, in the Firecore FIR-GL8-EA model.

Due to this arrangement of the magnets, the installation time of the compensator in the working position may increase. Here, the installation speed varies from 3 to 5 seconds, in principle, a normal result.
Each compensator has its own angle of inclination, which it can compensate for. In the Zokoun IE16R laser level, it is 4° (in all directions).
If the installation surface of the device has a more than 4° slope, then two duplicate alarms will automatically turn on:
- short repeated beep
- fast flashing lines
How this is done, see the photo below. With a large tilt of the housing, the ring of the pendulum touches the spring, a short circuit occurs and the alarm immediately turns on.

Do not forget to block the compensator when transporting the device! If the compensator is not locked, it may become damaged or increase the measurement error. The pendulum is locked automatically when the device is switched off by the toggle switch.
Control elements
The device is switched on by switching the toggle switch from the “closed lock” position to the “open lock” position.

After that, the compensator is unlocked and the lower horizontal plane immediately lights up.
All further control is carried out using the touch panel on the top with two buttons and two auxiliary indicators.
The touchpad is quite simple, but has a good response to touch.

Algorithm for switching planes
“H” button
- touch the button – disables the lower horizon and turns on the upper one;
- touch – includes both horizontal planes;
- clicking – disables both horizons. And so on in a circle.
“V” button switches the verticals in the following order:
- touch – turns on the vertical in front;
- touch – only the side vertical is illuminated;
- touch – both vertical planes are illuminated;
- clicking – disables both verticals.
Enabling the receiver operation mode
To activate this mode, place your finger on the “H” button for 2-3 seconds, until a beep sounds and the green light above the button lights up.
Also, when you enter this mode, the laser lines start to burn slightly dimmer. When using the laser level with the receiver, you can make markings in sunlight up to 100 meters in diameter.

To exit this mode, also hold your finger for 2-3 seconds or turn off the device completely.
TILT function
This is a special mode in which you can make the markup at an angle. In this case, the lines will blink much slower and there will be no sound signal at all.
To activate this function, when the device is switched on, press the “V” button for 2-3 seconds, until a signal sounds and the corresponding red indicator lights up above it. To exit, do the same.

Unlike other models of 4D laser levels here, this function is activated when the compensator is not locked, so you need to be more careful and avoid sudden movements, so as not to damage the compensator. This is of course a minus.
Thickness of laser lines at different distances
Testing showed the following results:
first test at a short distance of 1 meter, the thickness of the lines was slightly more than 1 millimeter.

at a distance of 5 meters from the wall, no more than 2 millimeters.

and at 10 meters, the thickness was about 3 millimeters! Good results.

Possibility of mounting on various tripods
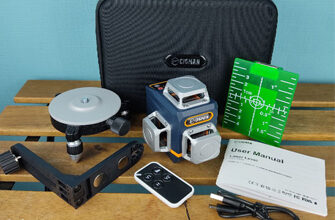
There is only one 1/4-inch thread at the base of the instrument. In most cases, it is enough. Plus, the kit includes additional accessories that allow you to make markup in various non-standard situations.
Let’s look at them in more detail.
Rotary base with micrometer screw. Which in turn can also be an adapter with a 1/4″ to 5/8″ thread.

Also included is a universal magnetic mount with a large number of settings. I must say quite a convenient mount.

The mount has two large and powerful neodymium magnets.
You can attach the mount to any magnetic surface. If there is not one, then the kit includes a special magnetic plate that can be attached to the screws.

This mount can be used not only as a ceiling mount, but also as a kind of vertical microlift with the appropriate installation. Moving along the arrow is possible within ten centimeters.

Contents of delivery
In addition to various mounts and additional accessories, it comes with a remote control, with a range of up to 20 meters.
The remote control has two buttons “H” and “V”, which can be used to switch planes. But you won’t be able to turn on the other special modes with the remote control! This is of course a flaw.

The whole set is packed in a leatherette bag. Inside the bag is polyurethane foam with cells for each item.

Pros and cons
Inexpensive, advanced functionality, 4 planes of 360 degrees, as close as possible to the projection (to the wall, to the floor, to the ceiling), a good kit, remote control, receiver mode, TILT function, separate switching of planes, network operation, full plumb line, simple adjustment and convenient disassembly of the housing, thin and bright green lines, not bad quality of materials.
You can not turn on special modes from the remote control, there is no rubber gasket on the battery lid, it is not possible to work from simple batteries, in the mode of operation under an inclination, the compensator is not blocked
Thks for the video.
Sorry I do not speak russian 🙂 so what is the best choice between IE16R and IE16?
Thanks in advance!
Hi, they are almost the same, there are small differences in design and laser modules, everything. If we compare them in all the details, then the IE16R model is a little better than just IE16
Thks Sergei !
I am glad to help!