- Where to buy a laser level profitably and reliably?
- Technical specifications
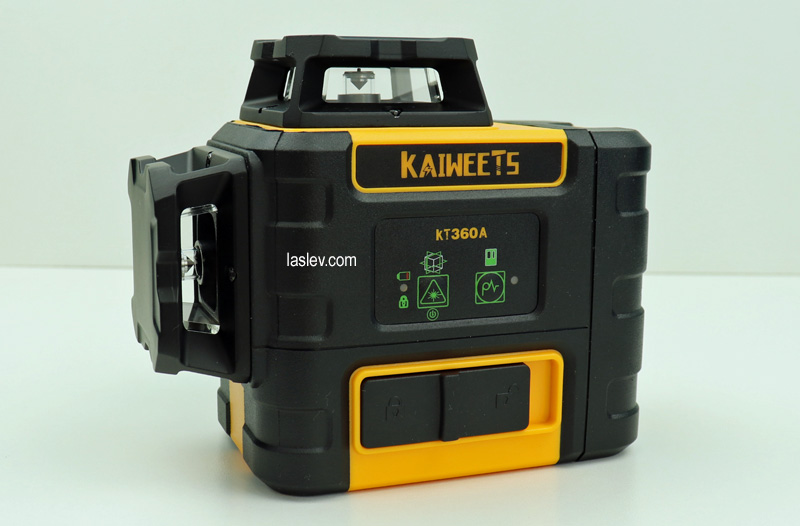
- Kaiweets KT360A laser level housing
- Construction of protective towers
- Laser modules
- Lithium ion battery
- Threads for mounting the Kaiweets KT360A laser level
- Compensator
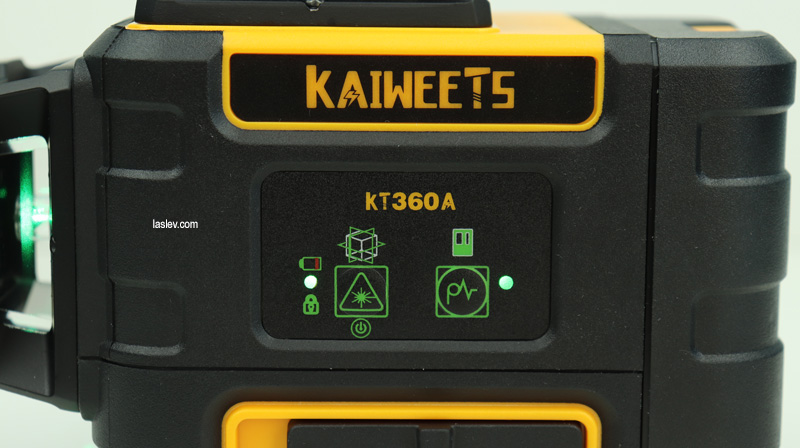
- Controlling the Kaiweets KT360A laser level
- Functionality
- Comparison table with competitors
- Laser line thickness at different distances
- Measuring laser line brightness
- Declared accuracy (compliance)
- Calibrating the Kaiweets KT360A Laser Level
- 1. Coaxial displacement of all planes
- 2. Separate adjustment of the laser module
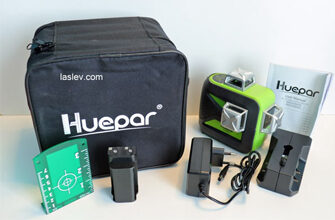
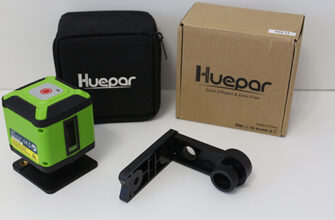
- Package contents
- Pros and cons
- Video review of the Kaiweets KT360A laser level
High quality 3D laser level Kaiweets KT360A with two powerful quick release batteries included and three year warranty. The unit projects three 360° planes and a complete laser plummet.
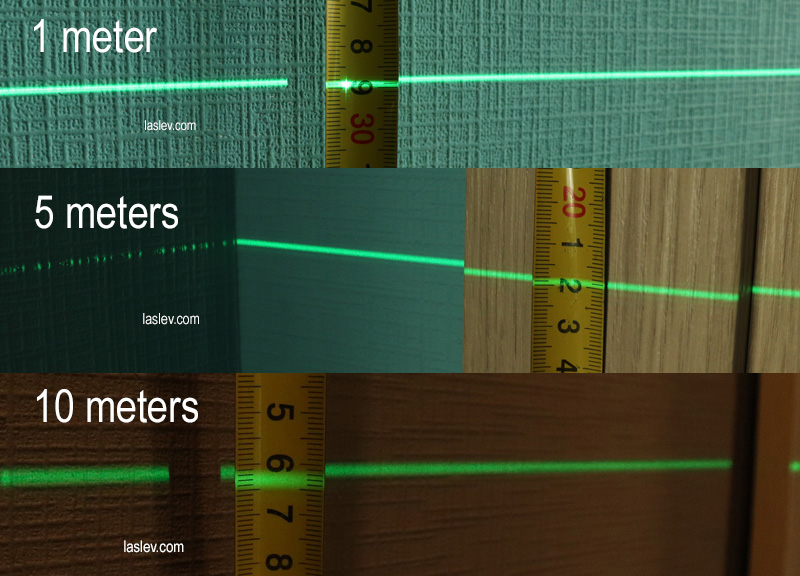
I would like to note right away the very thin green laser lines at different distances (see photo below in the review).
The model has passed many certifications: CE, RoHS, FC, FDA, which also indicates serious pre-sales preparation.
The Kaiweets KT360A laser level can absolutely be placed in third place in the list of the best 3×360° laser levels. And that’s only because it doesn’t have bluetooth and a screen with tilt angle display, if it did, it would be definitely 1st place.
Where to buy a laser level profitably and reliably?
Technical specifications
-
Accuracy: ± 0.3 mm/m (± 1.9 in. at 33ft)
-
Range without receiver: 30m*/98ft (*depends on light level)
-
With receiver LR100G: 60m/196ft
-
Compensator range: ± 4°
-
Setting time: ≤ 3 sec.
-
Laser class and wavelength: II, 520nm LD, <1mW
-
Water and dust protection: IP54
-
Tripod mount thread: 1/4″ and 5/8″
-
TILT function: yes
-
Protective towers: metal
-
Power options: 3.6V 7800 mAh li-ion battery (2pc) / power outlet
-
Operating time: planes 1 – 70h (35h*2), 2 – 40h (20h*2), 3 – 25h (12.5h*2)
-
Full charge time: About 8 hours
-
Charging port: Type-C, charging 5V=2000mA
-
Working temperature: -10°C…+50°C
-
Storage temperature: -25°C…+75°C
-
Maximum humidity: 90%
-
Unit weight: 1.05 kg
-
Dimensions: L/W/H – 139 x 99 x 118 mm
-
Min. distance from the horizon:
to the floor – 10,5 cm
to the ceiling 1,3 cm -
Distance from the vertical to the wall – 1,3 cm
Kaiweets KT360A laser level housing
The build quality of the housing and materials in general deserves all the praise. Excellent thick industrial plastic, in some places covered with dense black rubber.
The mating of all parts is very accurate with even gaps. There is nothing to complain about, everything is really done at the highest level.
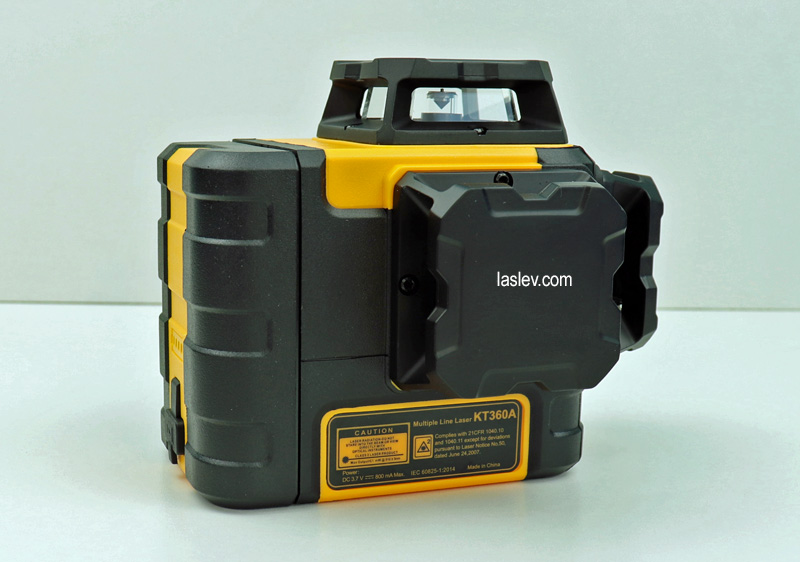
In general, I want to say that this model gives the impression of such a monolithic strong nut, and quite weighty. Nevertheless, its housing is easily and conveniently disassembled, for revision or adjustment of accuracy, if necessary. Let’s talk about calibration below.
Construction of protective towers
The protective towers are very massive, made of metal, and fastened with four bolts.
The designers of the Kaiweets KT360A laser level made an interesting tower construction that I have not seen before.
As you can see in the photo below – the glass unit is additionally attached to the tower from the inside. This creates a kind of protective module, which is then attached to the housing through a rubber edging around the perimeter.
As a result, this whole construction of the protective tower is quite good protection against dust entering the inside of the device.
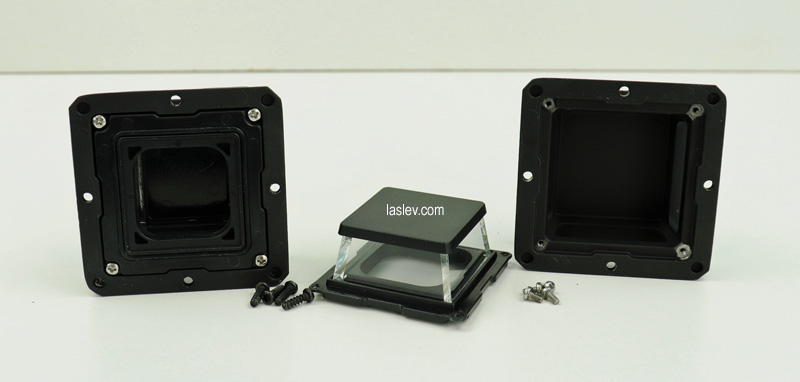
Another plus is that the glass in the protective towers is very recessed, so it is very difficult to break them accidentally. Also, it is almost impossible to smudge them with your fingers. You can pick up the tower directly without fear of getting the glass dirty.
Laser modules
I would like to point out the very neatly made marking laser modules. Which, by the way, end up with a very thin line. See the photo reports on line thickness at different distances of the Kaiweets KT360A laser level below in the review.
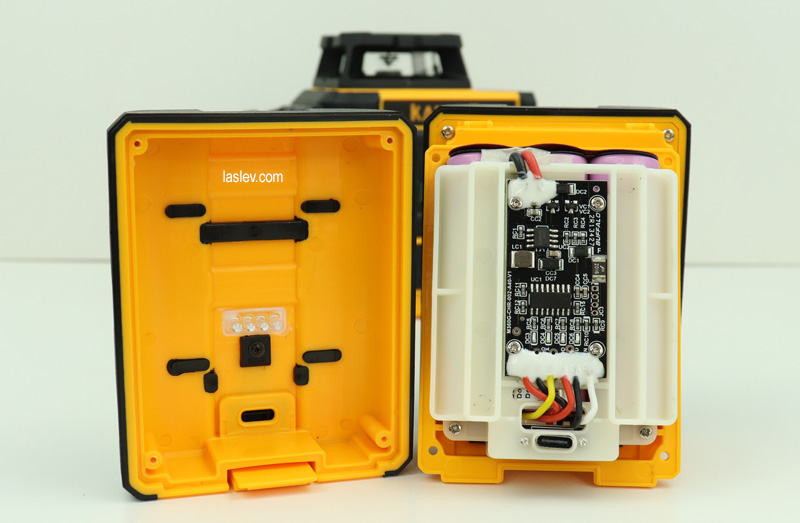
Lithium ion battery
As for the battery, here it is also of increased capacity – the device is ready to work almost a day without stopping with two switched on planes, it really is not a little.
The Kaiweets KT360A battery is quick-release, but it attaches perfectly and tightly. I caught myself thinking that if I don’t take it off for a few days, I don’t even immediately understand how it comes off – so it fits perfectly, ok, that’s all a lyrical digression.
The battery case is made of that thick plastic, and is also covered in black rubber. On the front side is a four-step charge indicator. Just below under the thick rubber overlay is the Usb Type-C port.
On the inside there is a contact group and battery specifications.
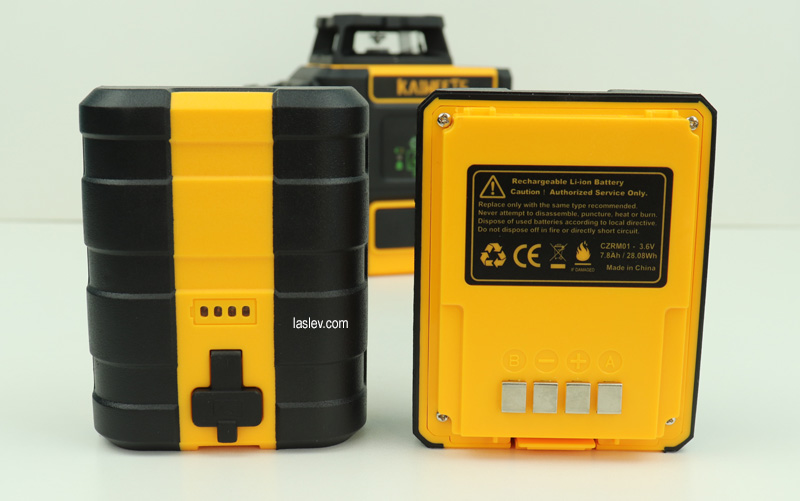
Another plus is that the battery is collapsible. Inside are installed: the controller and 3 pieces – the most common rechargeable cells 18650.
Which, if you want or need, you can quite easily replace with new ones. Although I think to the replacement is unlikely to come to, since the kit has two of them.
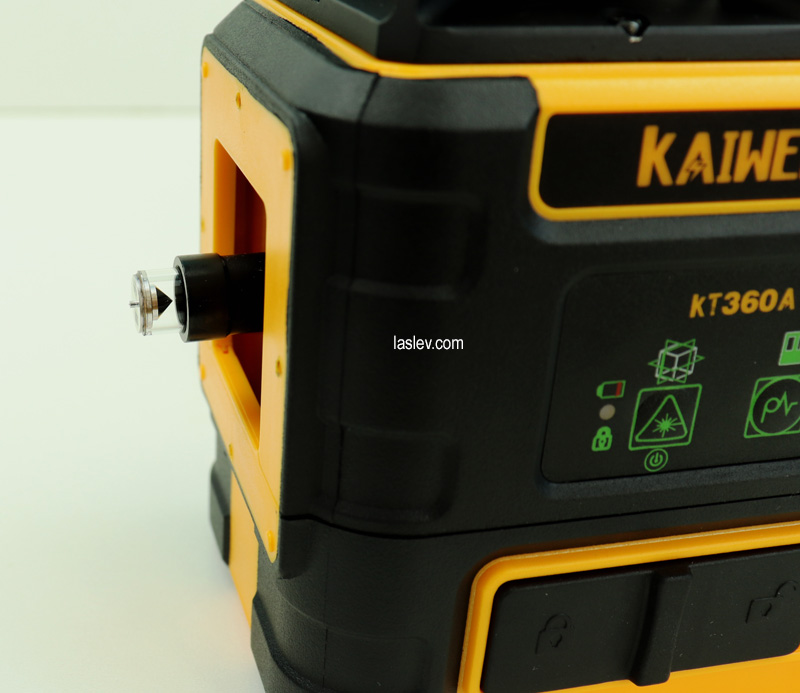
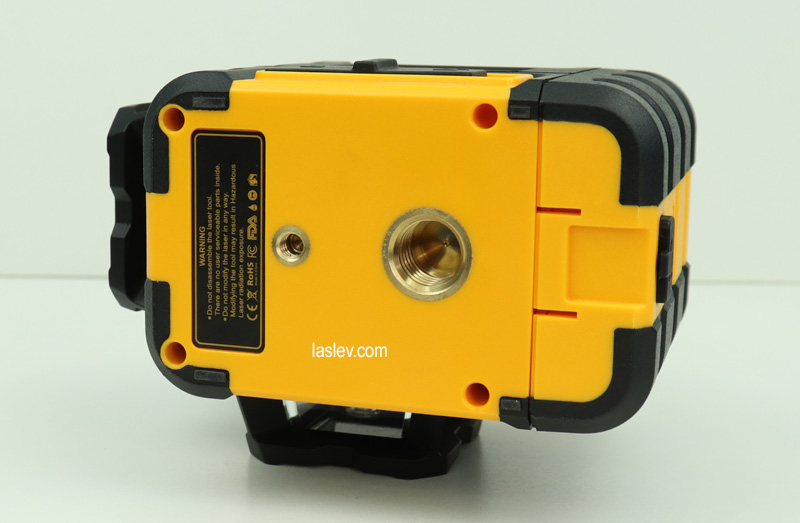
Threads for mounting the Kaiweets KT360A laser level
At the base of the instrument are two neat brass bushings with 1/4″ and 5/8″ threads, for attaching to various tripods, and other kinds of laser level accessories.
For example, the same company has a very cool universal telescopic pole with a tripod and most importantly with a landing pad with a microlift.
Compensator
The Kaiweets KT360A laser level is equipped with a lightweight, fast mechanical compensator on magnetic dampers.
The setting speed is about 3 seconds, which is very good.
Each compensator has its own range of operation, here it is ± 4°. This means that whatever way the instrument is tilted, the compensator pendulum will be aligned vertically within this range.
If the laser level is tilted more than 4° to either side, a visual alarm will go off automatically as the laser lines start flashing rapidly. As soon as the instrument is placed on a more level surface the lines will light up statically.
These alarms are designed on purpose so that you do not make critical errors when marking.
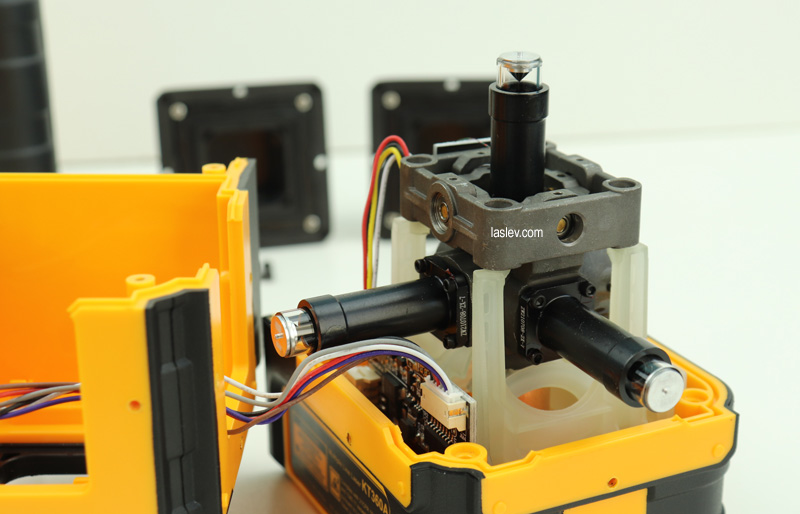
The only thing I didn’t like was the fact that the supports on which the compensator is mounted are made of plastic and not metal, as for example in the Huepar LS04CG laser level.
But considering the fact that all 4 supports have reinforcing ribs and the compensator itself is quite light, there is definitely enough safety margin.
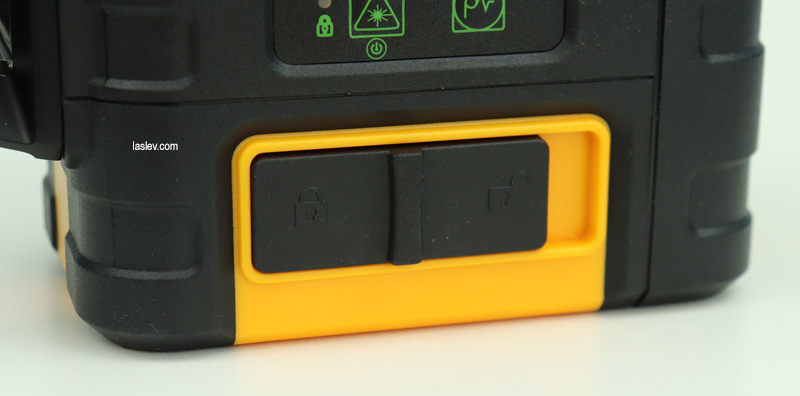
Controlling the Kaiweets KT360A laser level
There is nothing out of the ordinary here, it’s just like most. A two-position toggle switch and a control panel with two buttons and indicators.
The toggle switch is responsible for locking and unlocking the pendulum and also for turning on the laser level.
The compensator lock is necessary for transporting the device.
And so, let’s get into the details.
-
The toggle switch in the “closed lock” position – the instrument is switched off and the pendulum is locked.
Also in this state you can activate the TILT function for marking at any arbitrary inclination. To do this, press and hold the laser icon button for 4 seconds. Then the horizontal plane will light up and the green light on the panel will flash rapidly.
The lines in this mode will also flash in increments of once every five seconds. This does not interfere with marking, but does not allow you to forget that you are marking oblique lines and the device is not automatically aligned at this time.
To turn this mode off (TILT), you can press the laser button again for 4 seconds, or move the toggle switch back and forth.
-
The toggle switch in the “open lock” position – the pendulum opens and begins automatic setting, also immediately the horizon lights up and the green indicator on the left is static.
All further switching is done with two buttons on the panel.
Use the “laser” button to switch the planes individually. The algorithm is as follows:
- 1 press – the horizon is turned off, only one vertical from the front is enabled.
- Press 2 to add a second vertical. Only 2 vertical planes are lit.
- Press 3 – side vertical is disabled. Horizontal plane and front vertical are lit.
- 4 press – all three planes are lit.
- 5 press – only the horizon is lit up again. And then the algorithm repeats.
The “p~” button to the right is used to activate the LR100G receiver. The laser beam receiver is sold separately and allows you to work outdoors in sunny weather. (How else to operate the laser level in daylight)
Functionality
The Kaiweets KT360A laser level has full standard functionality and all the advantages of 3D laser levels over conventional laser crosses.
Perfect for all types of finishing and construction work. In other words, a quality professional laser level 3×360 for daily work.
In terms of functionality it is inferior only to the new 4D laser levels, which already have 4 planes of 360 degrees. If we talk about the maximum functionality, at the moment, this level is Huepar S04CG.
Comparison table with competitors
| Technical Data | KAIWEETS KT360A | DEWALT DW089LG |
|---|---|---|
| Accuracy, mm/m | ± 0.3mm/1m ± 1/8″ per 33′ | ± 0.3mm/1m ± 1/8″ per 33′ |
| Compensator range, ° | ± 4° | ± 4° |
| Range without / with receiver | 30*m/98ft 60m/196ft | 35*m/98ft 50m/196ft |
| Control panel | analog | analog |
| Dust and moisture protection | IP54 | IP65 |
| Tilt function | yes | no |
| Work with the detector | yes | yes |
| Remote control | no | no |
| Working from an outlet | yes | no |
| Battery | 3.6V 7800 mAh (2 pcs.) | Li-Ion 12 Volts |
| Operating temperature | -10°C to +50°C | -10°C to +50°C |
| Price range | up to $200 | above $500 |
Laser line thickness at different distances
In this test, the Kaiweets KT360A 3D laser level performed well. At all distances: short, medium, long – the line remains thin with clear boundaries. See photo below.
Measuring laser line brightness
All 360 laser levels with cone prisms do not have the same perimeter brightness. This is such a physical feature of this prism and transmitter design.
Therefore, when testing for laser line brightness, I use 4 measurements, in the following positions:
- at a distance of 5 meters the brightest side – 27,3 LUX
- 5 meters the dimmest side – 5,1 LUX
- 10 meter distance, the brightest side – 13,5 LUX
- and 10 meters the dimmest sector – 2,1 LUX
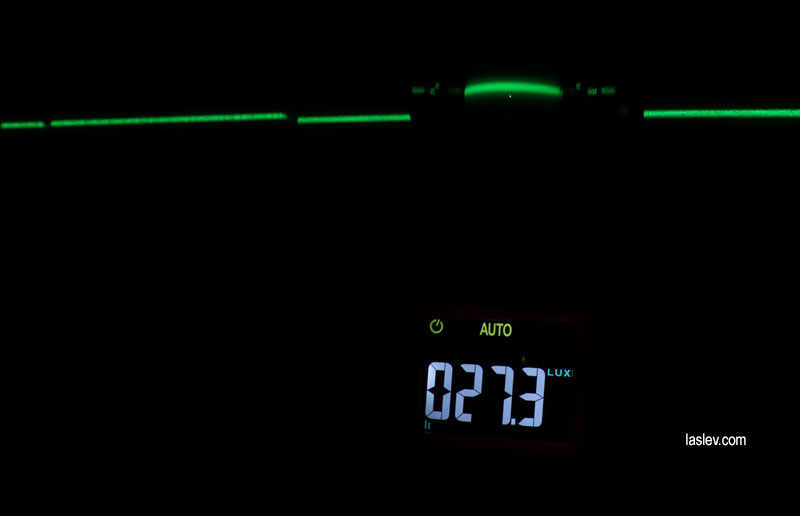
For a comparison of results with other laser levels, you can see a special brightness table which by the way I am constantly adding new data.
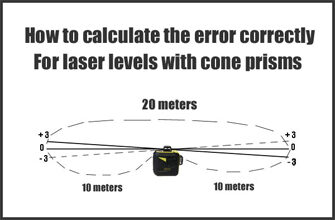
Declared accuracy (compliance)
When testing the accuracy of the Kaiweets KT360A laser level, I was surprised again. At a distance of 10 meters (look at the photo) the maximum difference between the points is no more than 1 millimeter!
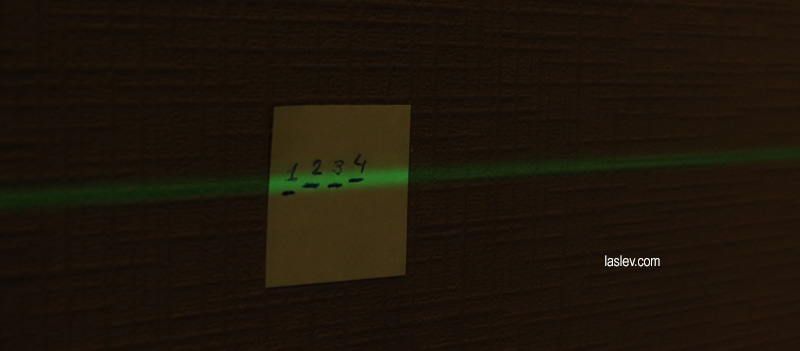
Thus it can mark a distance of 20 meters with an accuracy of ± 1mm/20m, or if converted to 1 meter = ±0.05mm/m. This is very cool, you will agree.
Both verticals were checked with a plumb line, they are also perfectly adjusted.
Calibrating the Kaiweets KT360A Laser Level
And yet, no matter how you spin it, there are cases where you may need to adjust the accuracy. So let’s take it apart too, it’s pretty simple here.
And so, there are two main cases:
1. Coaxial displacement of all planes
Here it is sufficient to adjust the position of the entire pendulum and all the planes fall into place at the same time.
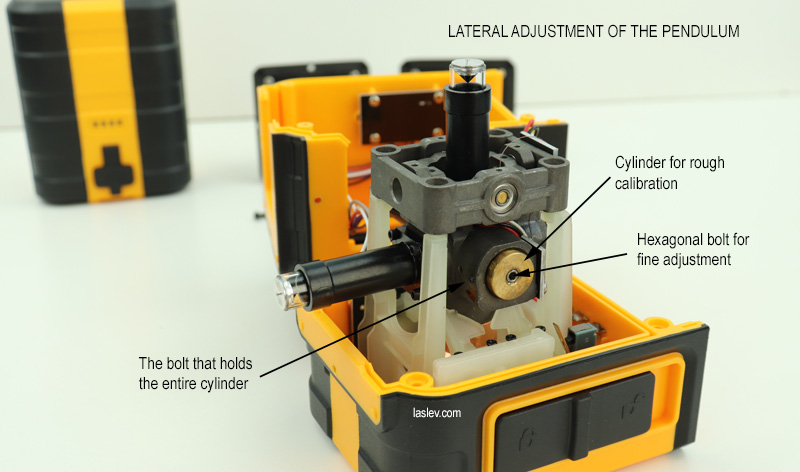
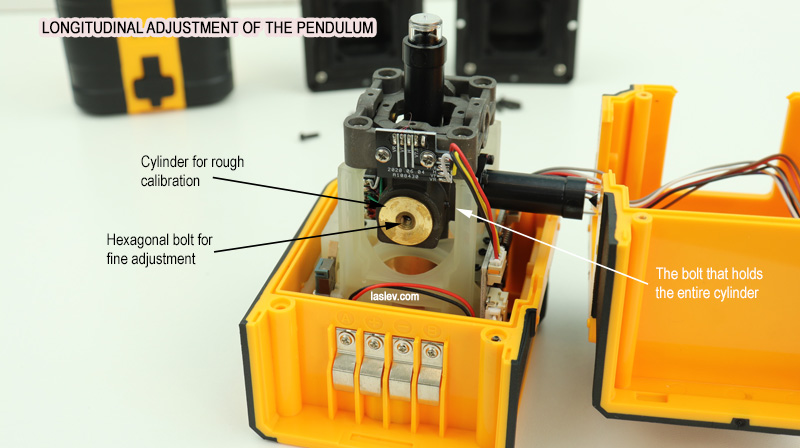
The pendulum position is adjusted here with two bolts and brass cylinders.
That is, you can loosen and move the entire cylinder for a strong offset, and then use the hex bolt in the center to make a fine fine fine adjustment.
In this photo the cross cylinder and the bolt, by moving them you change the roll of the horizontal plane to the right – to the left. You also change the position of the lateral vertical. The front vertical is not affected.
And now you see in the photo below, the cylinder and the bolt of the longitudinal displacement. By moving them the horizon will go up – down. The front vertical will also be affected by moving them. The lateral vertical will remain in place.
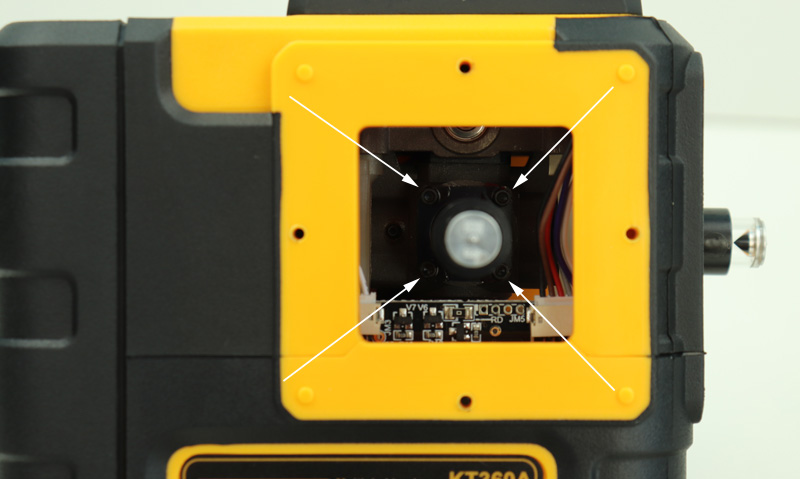
2. Separate adjustment of the laser module
If you want to adjust the planes individually, this is done with four screws at the base of each laser module.
There are no definite instructions here, you have to see what the situation is. So, try it and if you see that the plane is going the wrong way, you can always roll it back.
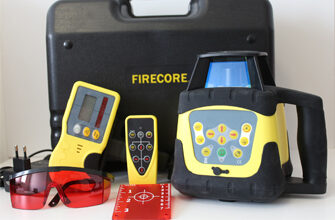
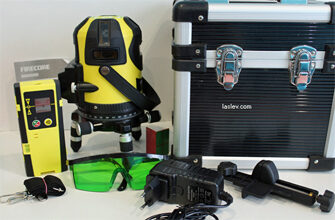
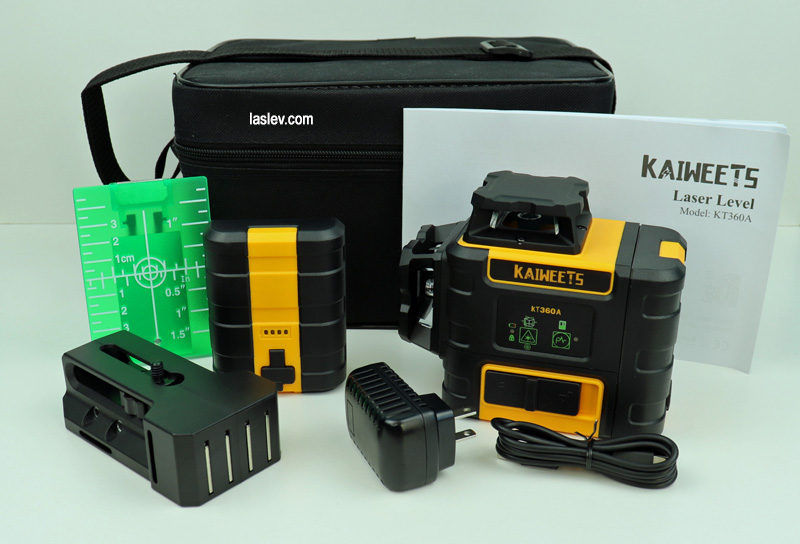
Package contents
The Kaiweets KT360A laser level is shipped in a cloth bag with polyurethane foam cells inside.
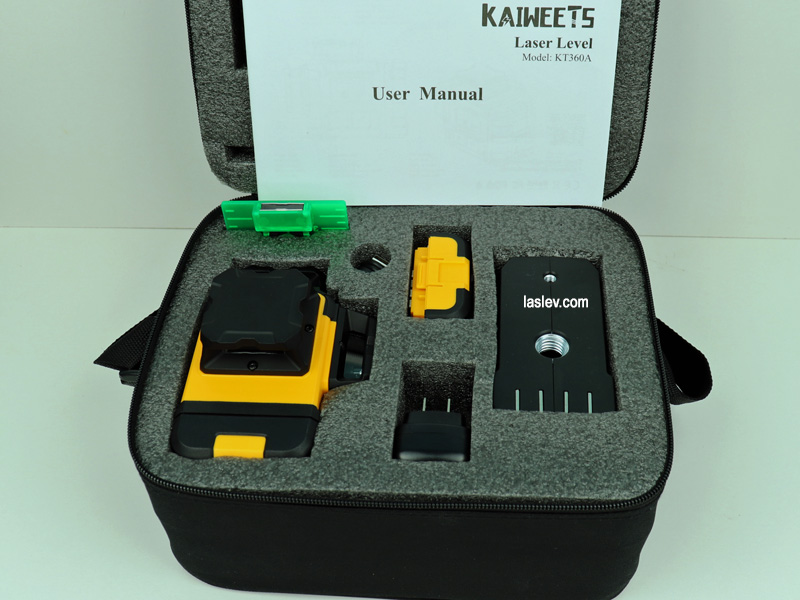
The kit includes:
- 3×360 laser level
- 2 pcs. 3.6V 7800 mAh batteries
- plug and cable for charging
- magnetic clamp
- magnetic laser target
- instruction manual
- transport bag
Pros and cons
High quality build and materials, metal protective towers, high accuracy, 3 planes of 360 degrees, plumb, thin and bright green laser lines, high-quality laser modules, the receiver mode, the TILT function, working from the network, 2 powerful batteries complete with 4-step indicators, convenient algorithm for switching planes, easy disassembly and adjustment of accuracy, a large number of passed certification.
There is no European plug or adapter included, there is no ability to work with simple batteries.
Video review of the Kaiweets KT360A laser level
Turn on the subtitles you want and watch.